You can also view this document as PDF.
Table of Contents
Team Information
- Application/team name: ezkomment
- Proposed level of achievement: Artemis
Project Scope
ezkomment aims to produce a PaaS to provide easy comments handling and moderation for the web.
Static sites have always been struggling to support commenting, because unlike posts or other parts of the sites which are static, comments are dynamic data that can change at any time. Existing solutions are also not flexible and lack several necessary features. Hence, we aim to produce a PaaS to deal with these issues: an easy and straightforward comment solution for the web, with built-in moderation features and full customisability.
Motivation
Problems with Handling Comments on the Web
Many programmers start learning web development by writing static sites. It can be for various purposes: self-introduction, product showcases or blogs. And we all want to get feedback on the products we built. However, since the sites we built, whether by pure HTML, with static generators such as Jekyll, or even more complex frameworks such as React, are all static, we cannot host comments on them since they are dynamic contents and do require a back-end with at least a database to store those contents.
A member of the team, Dung was also once in the same position: he would like to add a form to the end of his blog for readers to add comments to it, so that he (and other readers if he wanted to) could know what people think of his contents. However, he could only work on front-end development at the time, so that was not possible. He found a tutorial on the Internet on making some tweaks to his Google account and the form such that whenever the reader submits the form, client-side JavaScript would update a Google Sheets document, which would consequently trigger his Google account to send an email to himself. He did make it work, but of course not only was it terribly complicated, it was also impractical: other readers could not read those comments, and he would like to host the comments elsewhere so that his inbox does not get filled.
And not only do static sites face these problems: since implementing the whole system to handle comments to posts may be unnecessarily complex while not contributing much to the main application logic, many modern full-stack applications also did not implement a comment section at all, despite having a fully functional back-end and database.
Therefore, many websites and applications opted to use more easy-to-use services.
Existing Solutions
Disqus is arguably the most popular option on the web as of now (2022): whenever you go to a site not by WordPress or similar tools (which provide comments as a built-in feature), there is a high chance the comment section is managed by Disqus. A website that all NUS students use frequently, NUSMods, use it for module feedback management.
There is also fastfeedback.io. Its main goal is not to provide a service but to teach a course, but it still does the work and can be used on any website. Dung got to know of this site after taking that very course.
Problems with Existing Solutions
However, there still remain many problems. Firstly, these services do not allow custom design for the entire section. Their own design is nice, but it is not customisable enough to be consistent with the main site design. For example, we do not think Disqus' design below can go along with NUSMods' design well. Some of the consistencies that anyone can notice with the naked eye without inspecting the source, written by a person who has not even taken an official course in digital and UI/UX design:
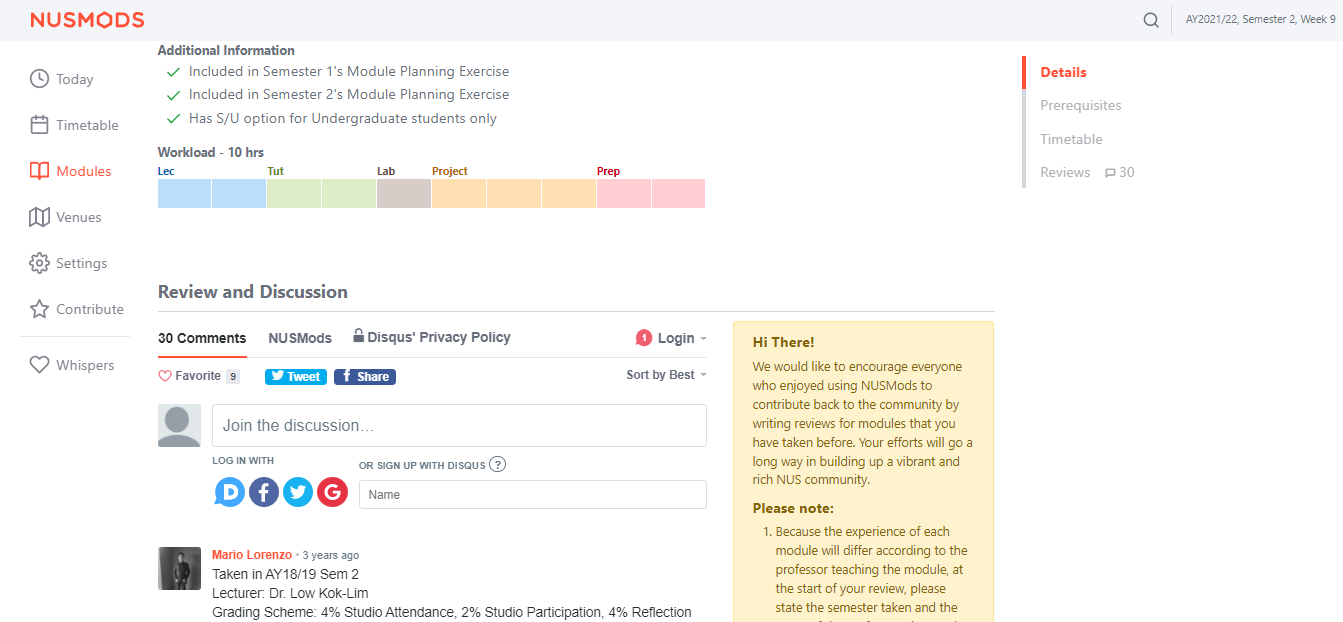 NUSMods screenshot as of 14 March 2022, with Disqus loaded.
- Fonts: NUSMods uses the standard system font stack (Segoe UI on Windows, San Francisco on macOS, etc.), while Disqus uses Helvetica Neue.
- Colours: While Disqus allows customisation of the primary colour (with the
--publisher-colorCSS variable), other colours do not have the same privilege. A naked eye can tell the body text colour of NUSMods and Disqus are completely different (NUSMods' is "greyer"). A source inspection shows NUSMods' body colour is #60707a, while Disqus uses all sorts of grey shades: #2a2e2e, #687a86, #657c7a, etc. Furthermore, the dropdown by Disqus does not follow--publisher-colorat all, and still uses normal blue (#2e9fff). - Spacing: While NUSMods buttons are quite spacious and have large paddings, Disqus buttons (such as the social share buttons or dropdown items) are narrower.
- Borders: NUSMods' borders are normally 1px wide and are pretty faded, Disqus borders are 2px wide and filled with a far stronger colour.
- etc. and etc.
As a person making static sites myself, we would like a service which is fully customisable and contains all the features we think a commenting service should have. We decided to build this service in Orbital, leading to the project scope and aim described above.
Features
Some Vocabulary Definitions
A user can have a lot of websites under different domains, each website needs several different comment sections (each for a blog post, for example). Therefore, we define specific terms for the application, which is used throughout the project.
A site is a collection of pages. Each page may correspond to a blog post, an announcement, etc. and has one comment section dedicated to it. Each site is identified from its domain, and all of its pages have to be under that domain.
For example, assume that a user has two websites at foo.com and bar.com. foo.com hosts his 20 blog posts and bar.com hosts his portfolio. Then
- He would have two sites configured, one for
foo.comand one forbar.com. - For
foo.com, he would have 20 pages, each for one of his posts. - For
bar.com, he would have only one page for his portfolio.
Zero-configuration HTML Embed for Comments
In its simplest form, we want the service to be able to produce a URL for each page so that users can embed them into their websites, with as few clicks required as possible. No matter how extensible the service may become, it is absolutely crucial that it can do the most basic form of its job and does it well.
The embed is done by <iframe> – it has been supported by all browsers since basically the birth of the Internet, so the embed works as long as the user is using web technologies. We render the HTML on the server before serving it.
User Stories
The typical user workflow for this feature is:
- As the user logs in, he is redirected to a dashboard where all of his sites are listed. In the dashboard, there is a button to add a new site.
- Upon clicking that button, the user is asked for the site name and the site domain. They are for identification only, so the user knows which ezkomment site corresponds to each of his websites.
- After submitting, the user is redirected to the dashboard of that site. There is another button to add a new page.
- The user is then asked for a page "title" and page URL, these are also for identification purposes only. Typically, the page title is the blog title.
- The user is then redirected to the dashboard of that specific page, where he has an embed URL ready to be used.
How the Comment Section Works
Everything is Public
The comment sections are public. In other words, everyone who can see that comment section can write comments on it. Both the GET and the POST methods for the comments does not require any authentication.
If a user wants the comment section to be limited to a particular set of people (e.g. only people from his team can comment), he can put it inside a protected page. Although the endpoints to access the content are public, the URL is randomised enough that it cannot be guessed.
Users may find this not secure enough, as their teammates can always leak the URL to an outsider. However, we decided not to address this issue, since even if the URL is protected, the insider can still leak by other methods (e.g. screenshotting). Adding authentication would mean unnecessary JavaScript sent to everyone, which is against the principle of this application.
However, if a user truly, really want to integrate an authentication system, he can always use the API routes. Instead of exposing those routes directly, he can mask them inside his own protected internal API. By doing so, he can also hide the randomised URL from everyone, thereby resolving the issue of leakage to outsiders.
Sending Comments
We think that although the comments are all public and authentication is not needed to post new ones, there should still be a way to identify the commenter. It is optional: we ask for the name of the commenter along with the required comment body.
If the name is provided, it is displayed publicly instead of the placeholder "Anonymous", and the ezkomment user may use this information to decide whether the comment should be approved.
Comment Formatting
Markdown is supported, with non-XSS HTML and GitHub Flavoured Markdown also available. We compile the comment content as Markdown to HTML on the server before serving. Since it is likely most comments does not need Markdown formatting features (real-life example: Reddit), we does not add a Markdown editor since it would only increase the unnecessary JavaScript footprint, but only add a little help text "Markdown is supported".
Many users may not be happy with that, however, they can always introduce their own editor by customising the comment section (see the customisation section below). We restrict the amount of JavaScript introduced by us but never impose any restrictions on custom JavaScript by users.
Some users may find that they need custom Markdown features/plugins or use their own Markdown alternative. In that case, the API route is necessary; we send the comment body verbatim without any formatting, so users can process that string in any way they want. However, using this method, users need to be aware of and guard against XSS attacks, since the comment body is not escaped. See the API section for more details.
Moderation Features
When a comment section is public, if it is on a popular website (e.g. in a newspaper), undoubtedly there are spam and hate speech. To mitigate this issue, we support moderation for the comment sections, where the site owner acts as a moderator to decide which comment to keep and which to remove.
If this feature is turned on, whenever a new comment is posted, it does not show up in the public comment section right away, but instead, it is directed to a "pending" section in the ezkomment app. The site owner can then approve or remove any comments in the pending queue, and only after a comment is approved would it appear in the public feed.
Even after approval, the site owner can still remove comments. Removed comments are gone forever and not recoverable, therefore there is a warning in the UI to prevent the user from doing so by accident.
By default, this feature is turned off (i.e. auto-approve is turned on), since that is how most current solutions work. However, even when auto-approve is on, we still allow the deletion of "auto-approved" comments.
User Stories
In the page dashboard, there are two sections, one for pending comments and one for approved comments. If auto-approve is off, a typical workflow is as follows:
- User checks the notifications of any pending comments.
- User goes to the page dashboard of the said comment section.
- There are two buttons, approve and disapprove (delete). The user reads the name of the commenter (if provided) and clicks the appropriate button. If the comment is approved, it is displayed publicly, otherwise, it is forever lost.
- For approved comments, the deletion button is also visible for the user to use. Again, if the user clicks this, the comment is forever lost.
Notifications
We will display a notification pane in the navigation bar of the app, so the user always knows the latest updates to their comment sections, whether this feature is enabled or not. Especially when the feature is enabled, it is necessary for the user to check the pending queue once in a while so as not to effectively prevent all new comments from ever being displayed publicly. As of 5 August 2022, this feature is still in progress.
Scope
Users can set this feature per page. Pages that may involve heated discussions may need this feature, while more "neutral" pages may not need it, hence we do not think this feature should be set site-wide.
Customisation
A default styling for the comment sections is provided, which follows the overall design principles of the ezkomment front-end application. However, obviously those design principles cannot fit many websites, for the UI/UX reasons that we have described above. Therefore we allow the user to completely customise the HTML and CSS of the comment section.
Customisation is for Sites, not Pages
By UI design principles, all pages under the same website should share the same design system for consistency. To encourage this, we only allow customisations to be done site-wide, i.e. for all pages under a site.
If a user really wants to hack the system and have different styling for each of his blog posts, he can always have two different ezkomment "sites". However, it requires many clicks and keystrokes, and the bad UX of that is intentional: we want to discourage users from doing so.
Customise Everything
Users are completely free to customise the app by the whole code of the HTML sent to clients, even from the <!DOCTYPE html> tag. In that, users can decide how and where to put stylesheets in, how to add custom JavaScript libraries, everything.
In essence, the user is allowed to modify a HTML file, called templates, in its entirety, from the usual opening <!DOCTYPE html> to the closing </html> tag. Of course, the user is also allowed to add any scripts and styles he wants, just like how we typically developed the web from the HTML-CSS-JS days.
However, the users need to add the data-ezk attribute to a number of elements. This attribute is used to identify each part of the comment section, so that the app can populate it with the appropriate information, or handle form submission correctly. Interested readers can read more about it in Milestone 2 README (it has been removed from this README version) or in the public documentation.
Then, each time the comment section is rendered, the server simply takes the HTML and sends it. This is pure server-side rendering. However, before sending, the server would insert an additional JavaScript module to the HTML, for the following purposes:
-
Data fetching: We need a data fetching strategy close to how SWR works so that the UX is enhanced.
-
Data parsing and populating: We are not doing React here, so we need to manipulate the HTML with pure, vanilla JavaScript.
-
Send a message to the
<iframe>parent about the document height, so that the<iframe>can be rendered correctly (more information).
Interested readers can read the JavaScript file to see in more details. The file is minified and compressed, also due to the nature of it being an ECMAScript module, naming clash with other custom JavaScript is not a problem.
With this, we believe the user already has very good control of how the whole thing looks and works. In fact, he can add custom scripts to render a customised Markdown editor, he can even add scripts to mine cryptocurrency in his users' browsers etc (not that we support it).
Dark Mode
The embed URL has an optional query parameter dark. If it is used with the value of 1, the comment is delivered in dark mode. The <html> element would have a class .dark, and of course, the user can control how their comment section looks in dark mode by modifying his <style> accordingly.
<!-- /embed/:siteId/:pageId -->
<html>
  ...
</html>

<!-- /embed/:siteId/:pageId?dark=1 -->
<html class="dark">
  ...
</html>
Demo
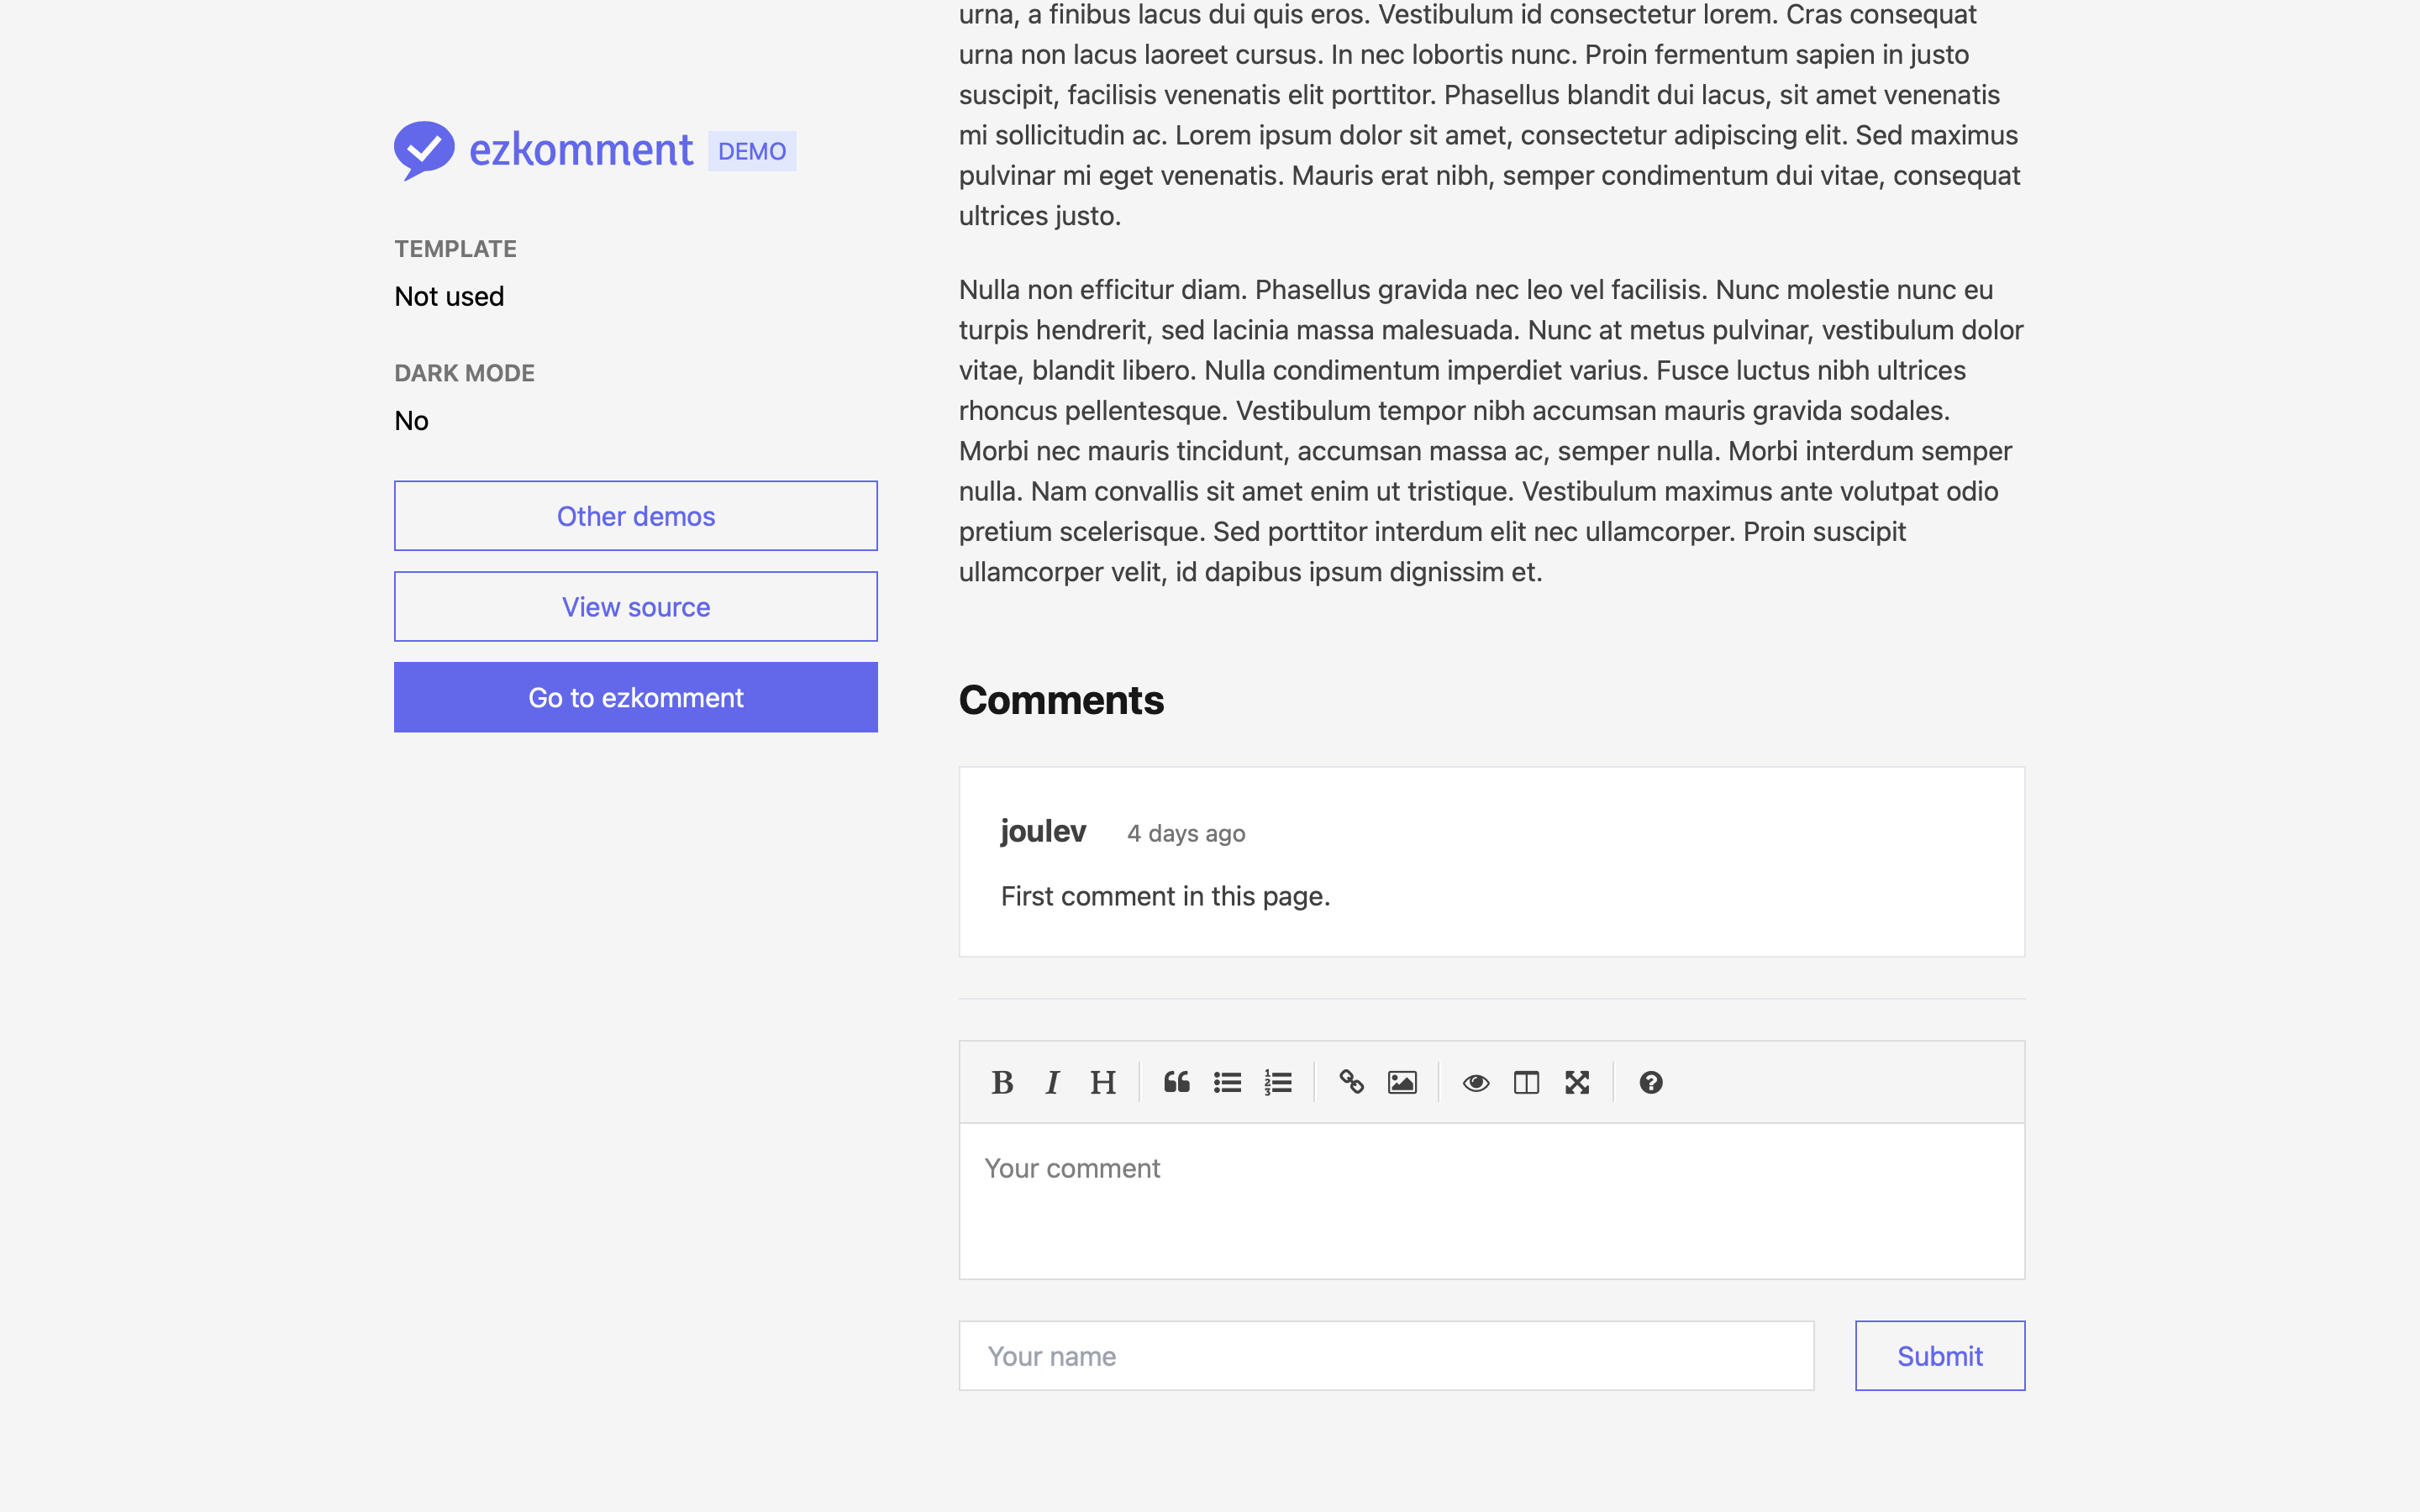
You can view the demo of this feature and the public API in https://demo.ezkomment.joulev.dev. These are a few screenshots for ease of reference.
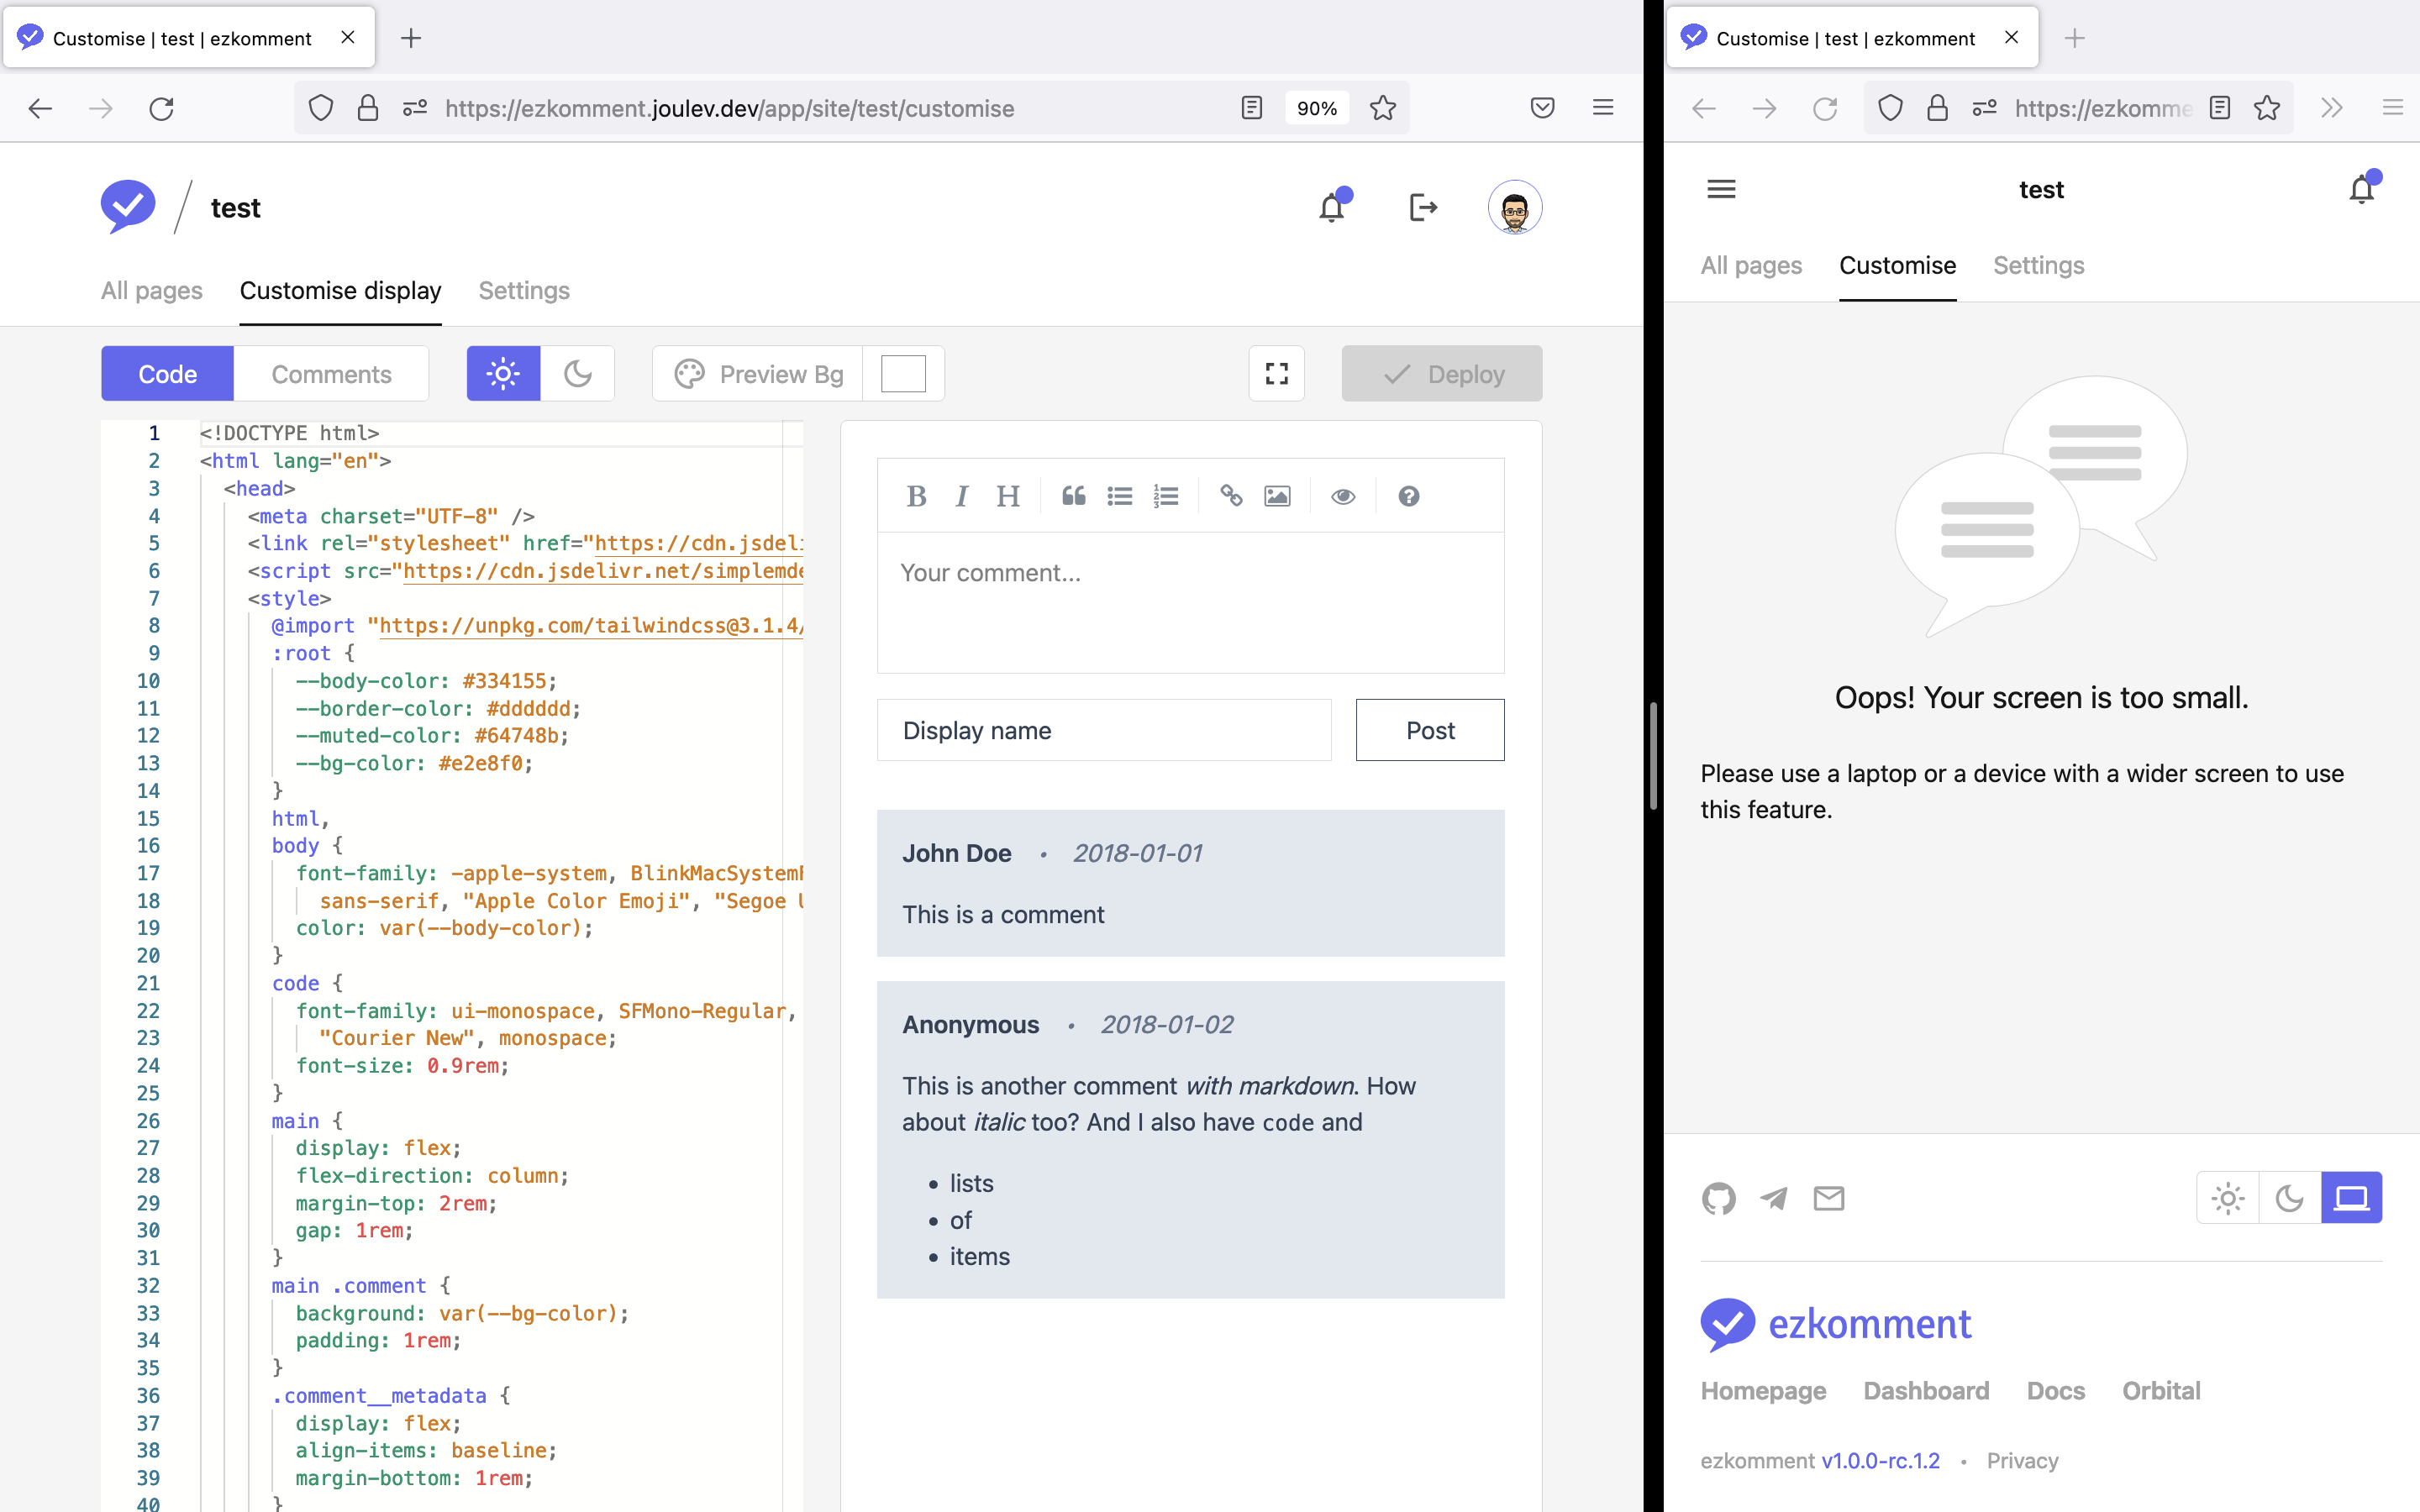
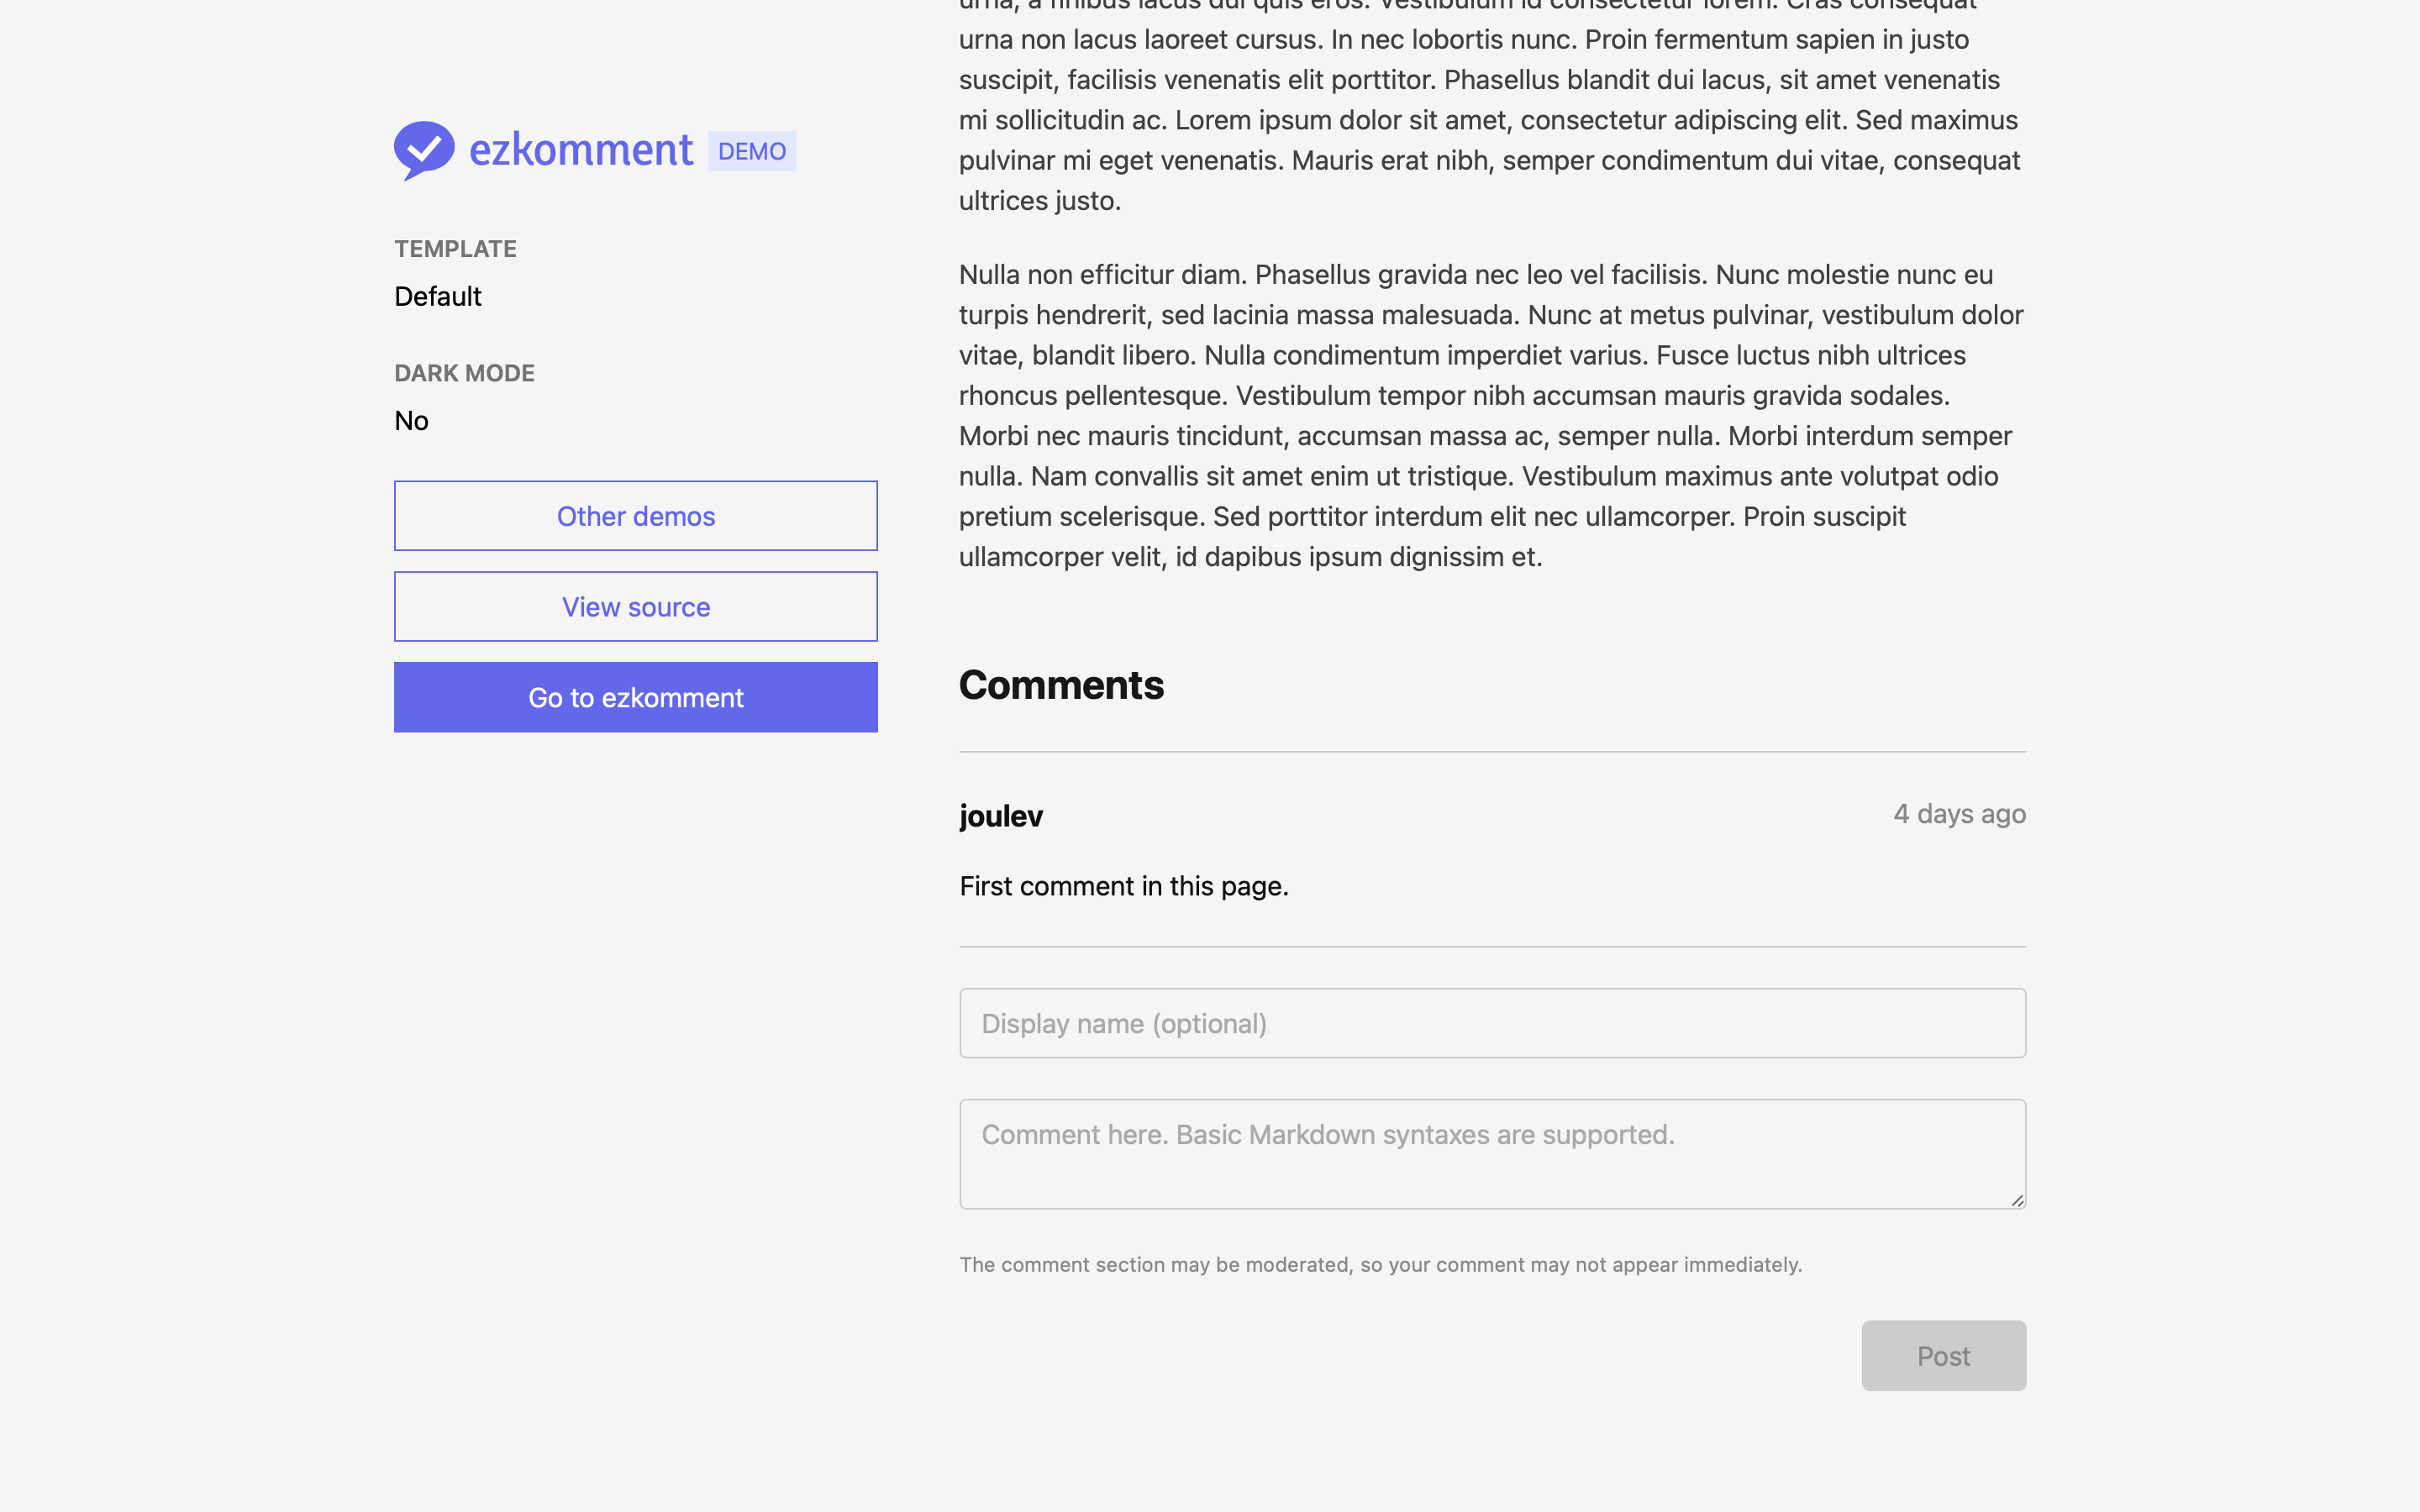 Default template, at light mode
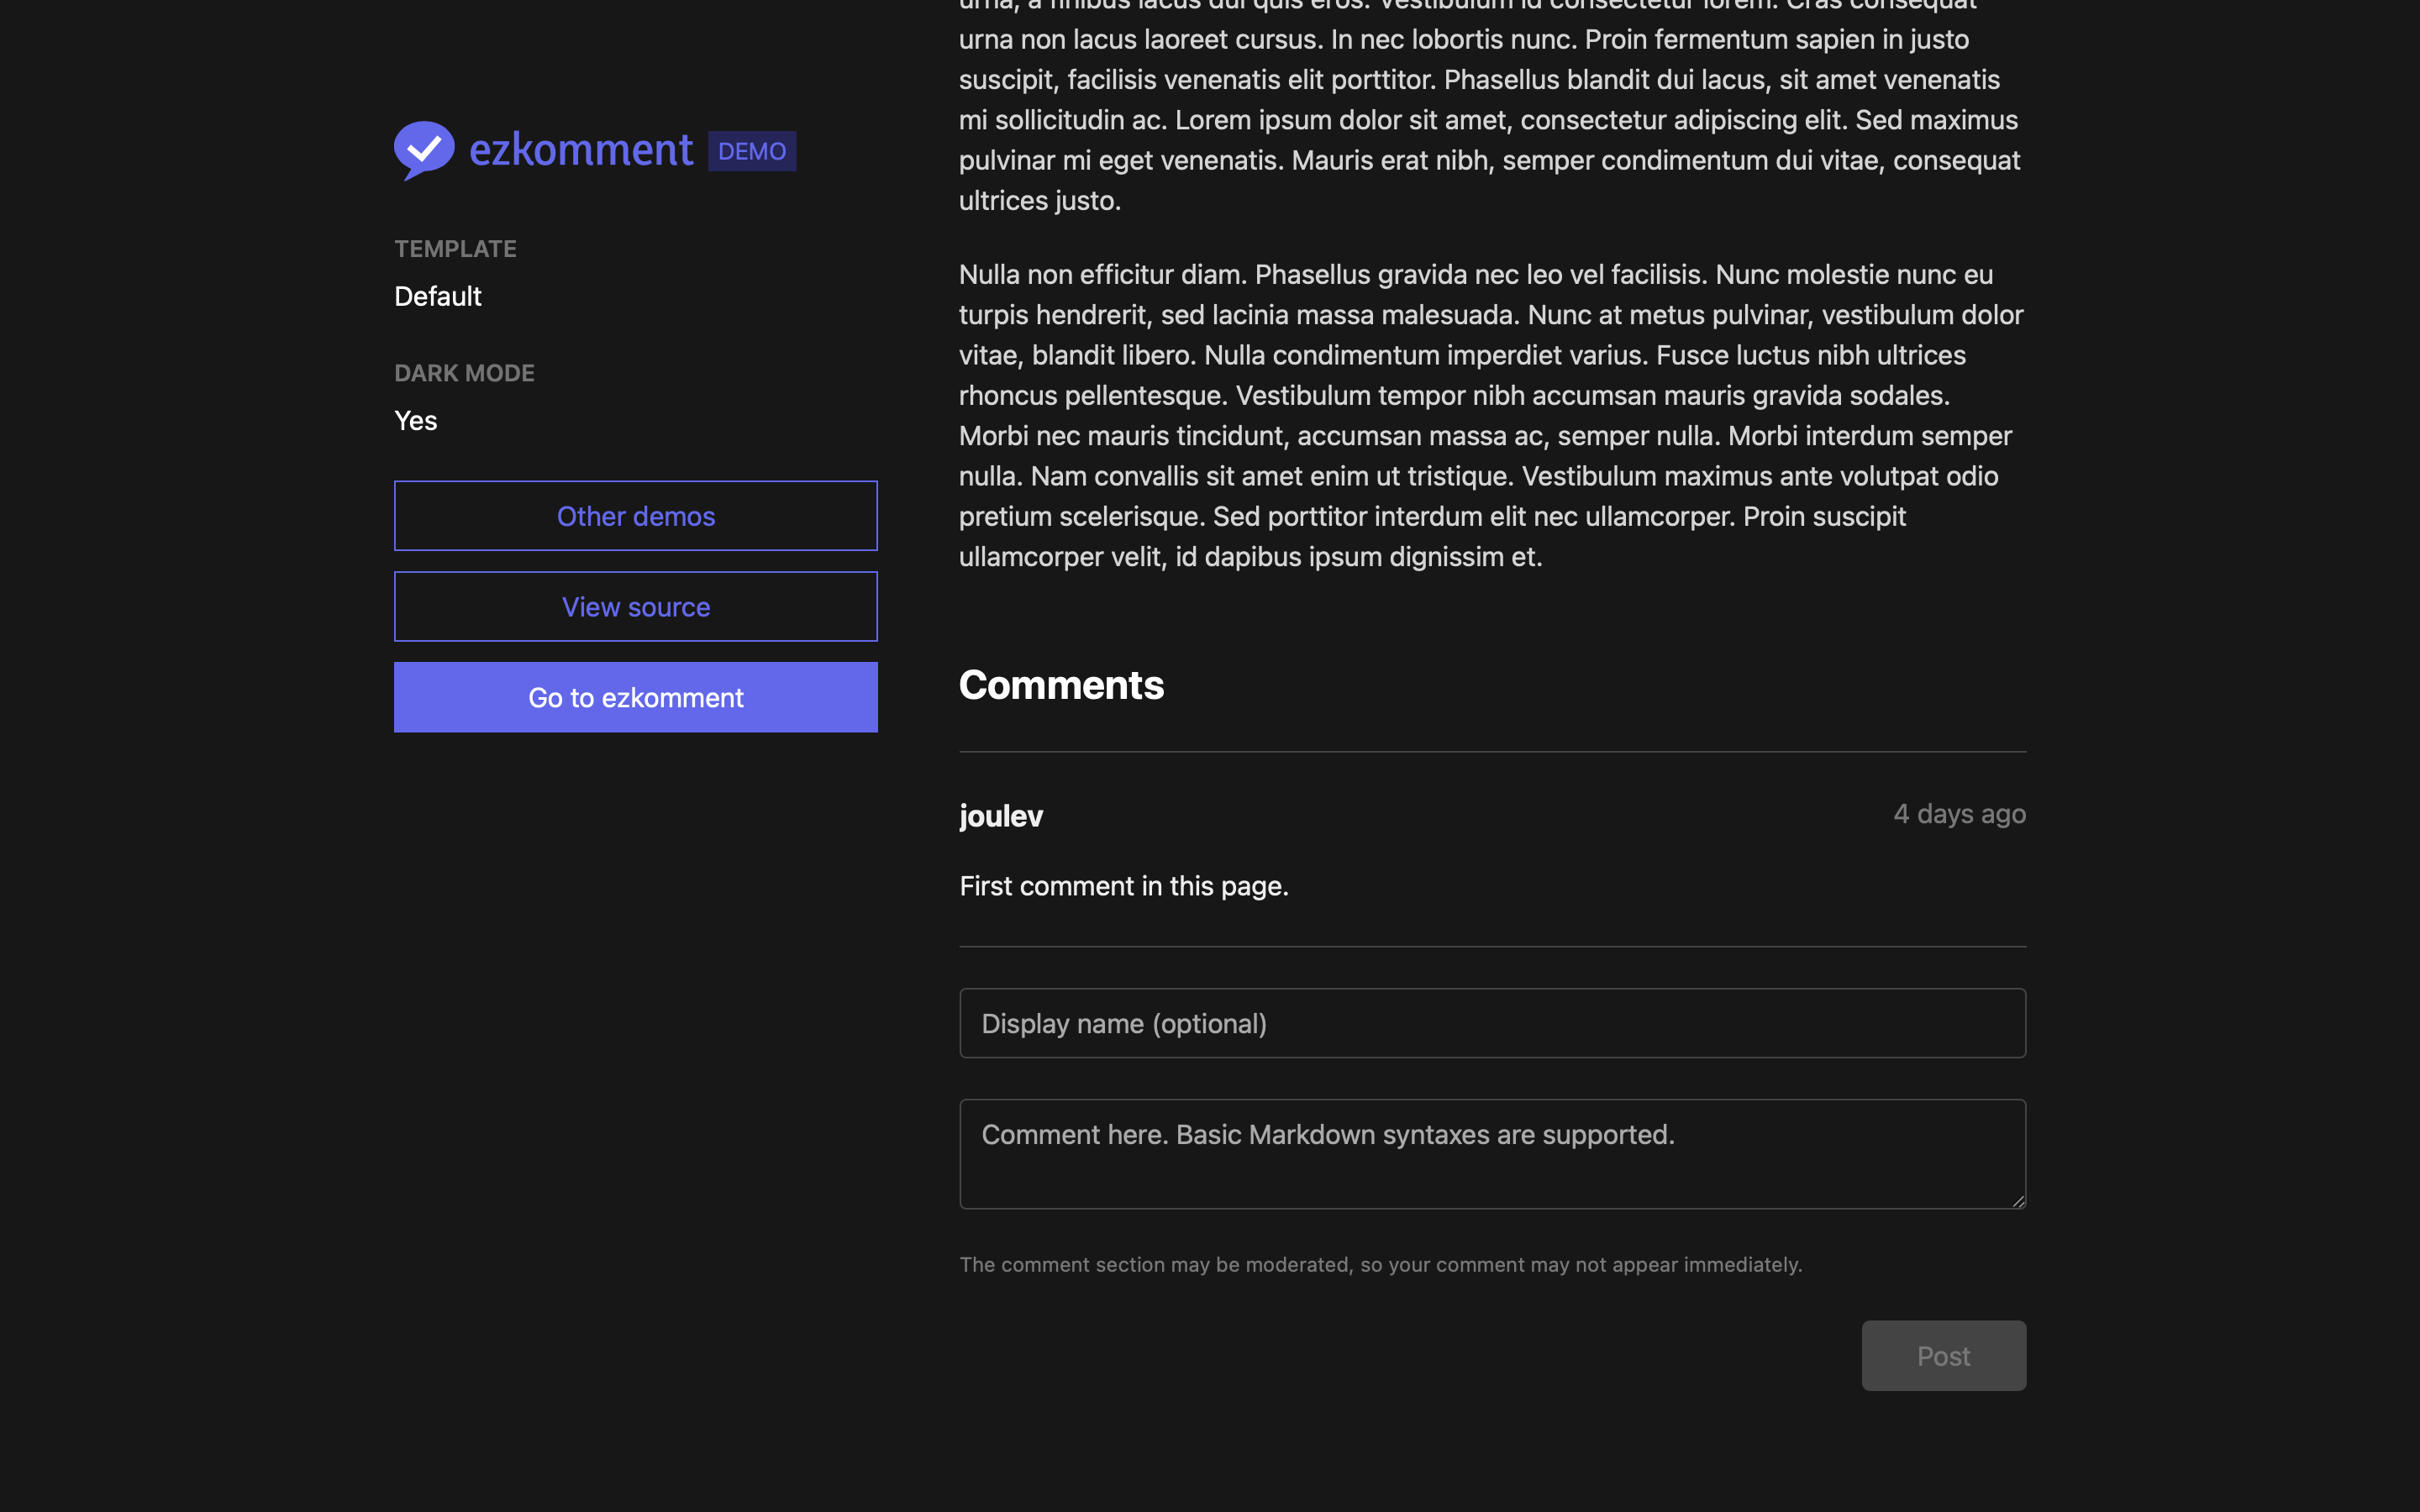 Default template, at dark mode
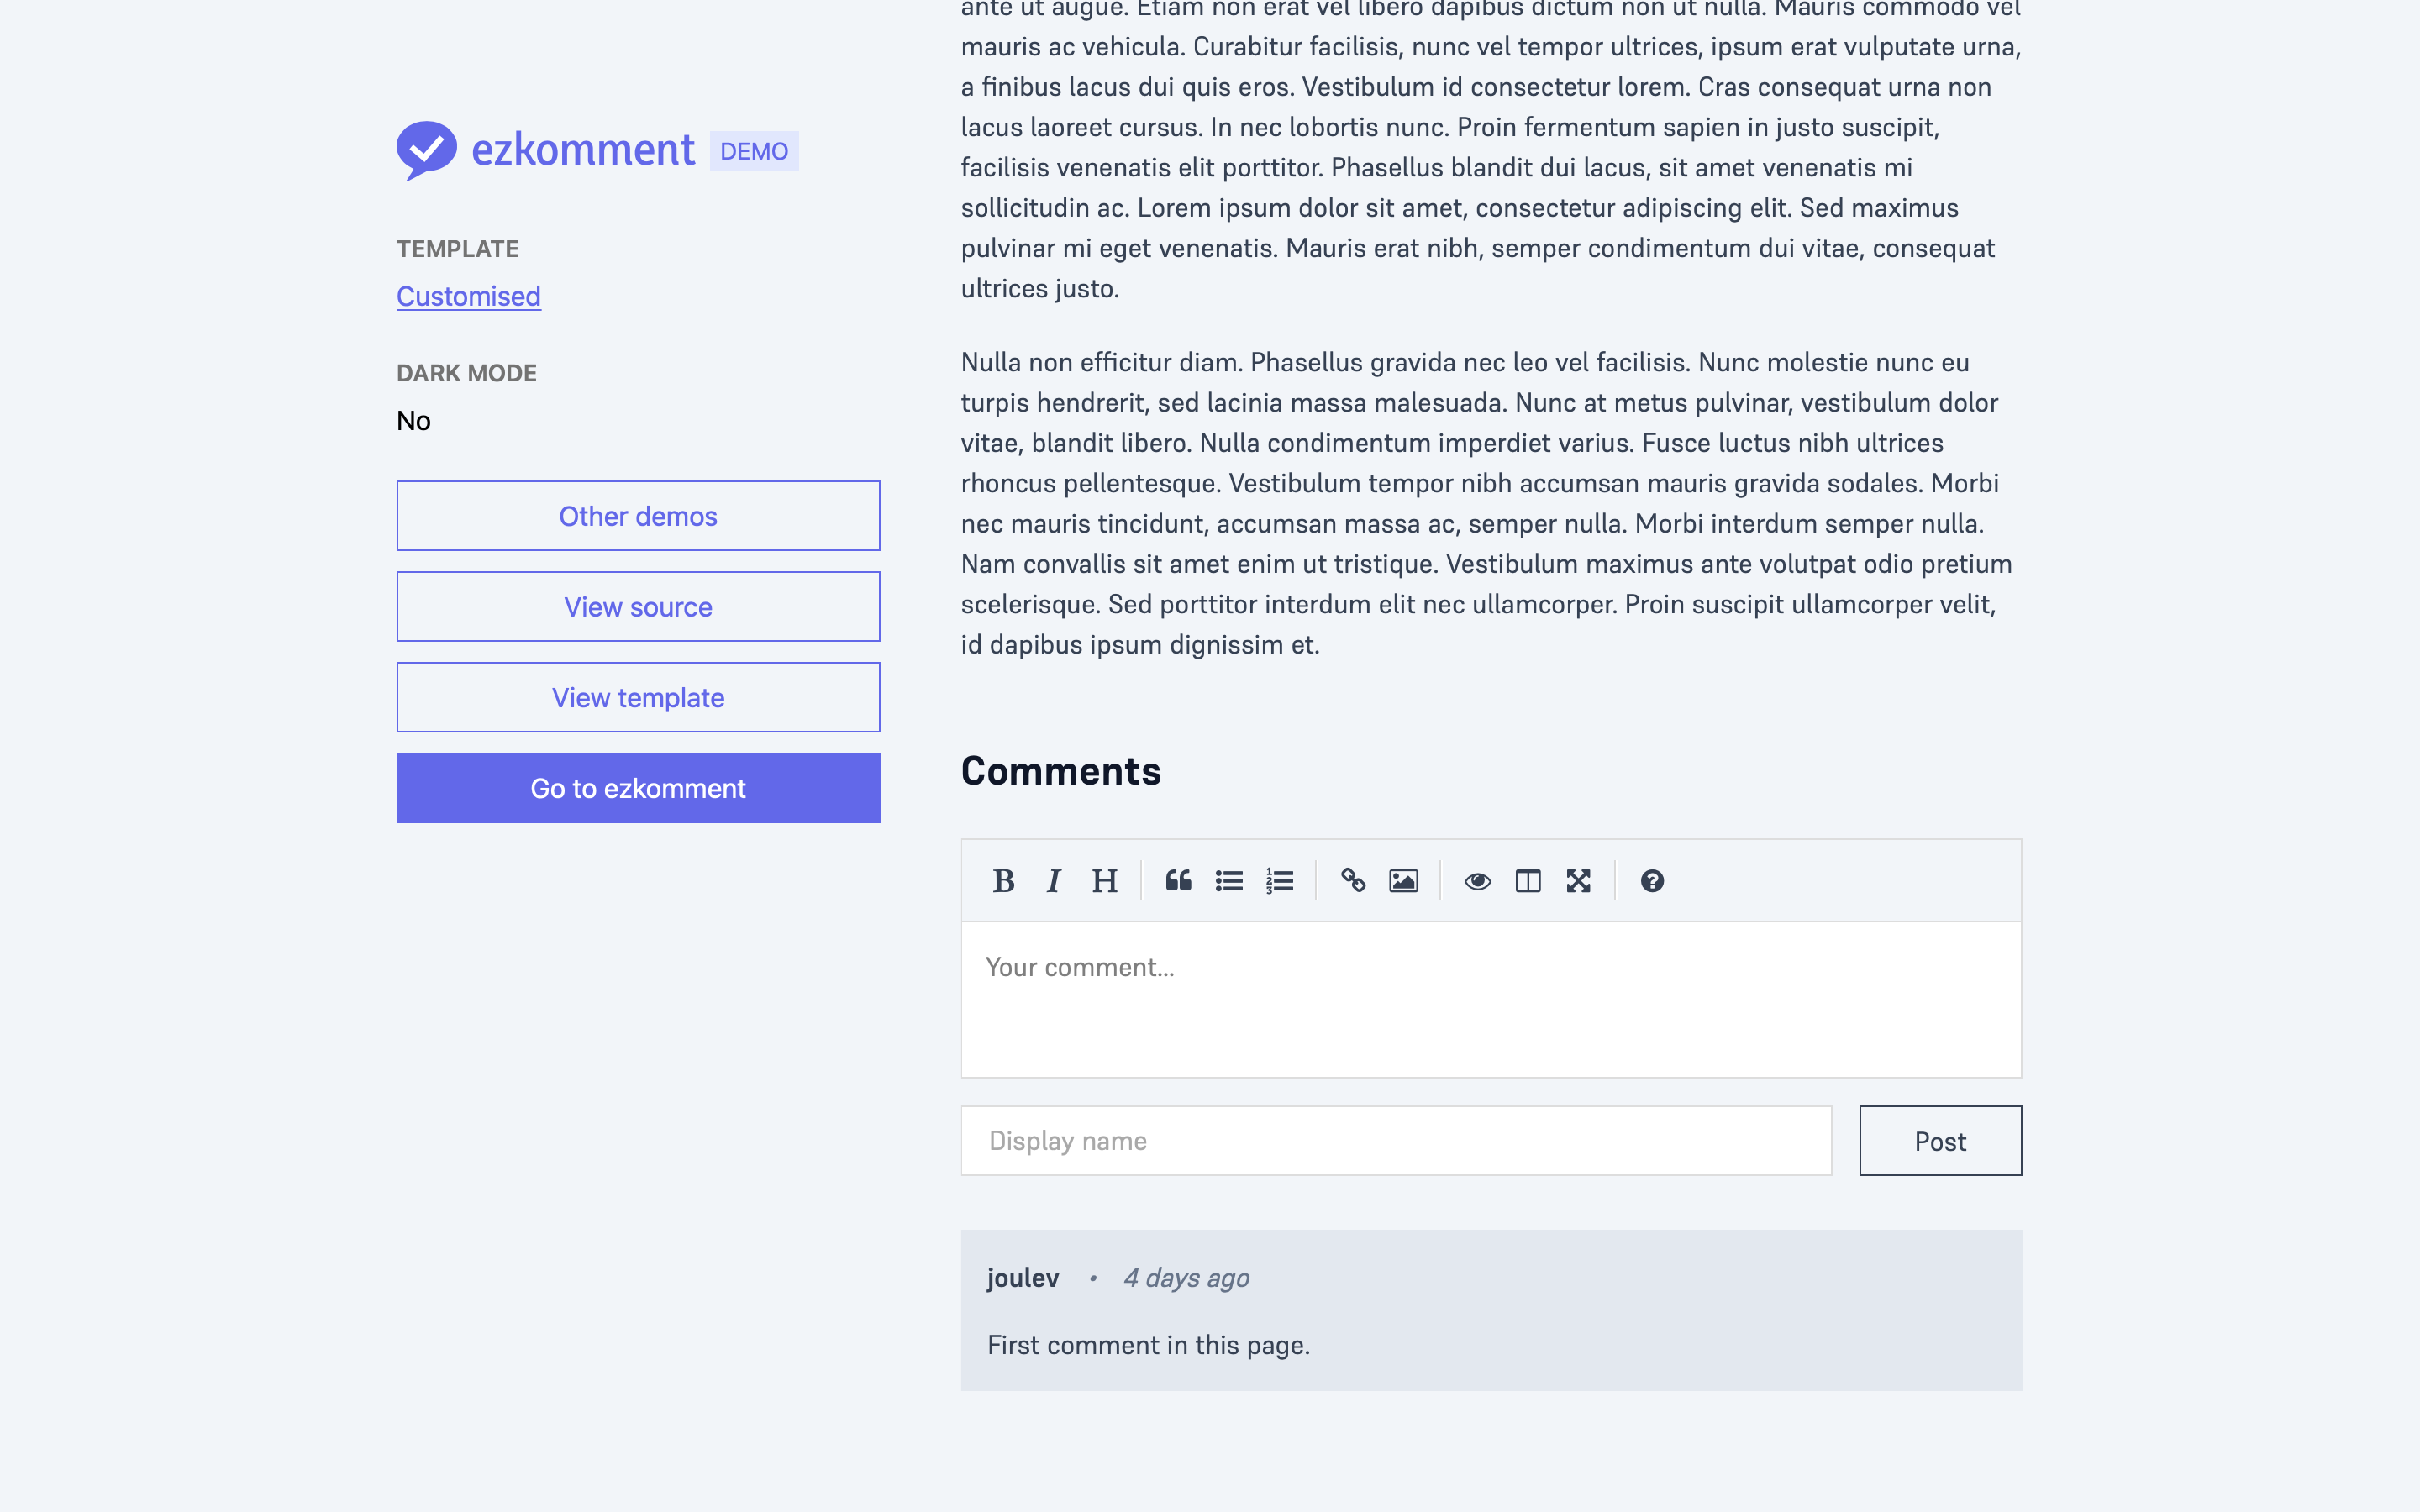 Customised template, with different design patterns and a Markdown editor
Application Programming Interface
Power users can also ignore the entire embed and customisation thing and use the API to handle comments, for the ultimate™ customisation capability. The API is designed for two purposes: fetching comments on a page and posting comments to it (for it to be sent to the pending queue).
The API is backwards-compatible with version-based endpoints (if we ever make it to version 2). The endpoint is
https://ezkomment.joulev.dev/api/v1/comments/:siteId/:pageIdFetching Comments for a Page
The GET method can be used to fetch all or part of all comments for a particular page.
const res = await fetch("https://ezkomment.joulev.dev/api/v1/comments/siteId/pageId");
const json = await res.json();
const comments = res.ok ? json.data : [];
console.log(comments);
The output is a JSON which includes all comments and their metadata (name, timestamp).
[
  {
    "author": "Author name or 'null'",
    "date": 0, // Milliseconds since Unix epoch
    "text": "Raw *Markdown* content",
    "id": "commentId",
    "pageId": "pageId",
    "siteId": "siteId"
  }
  // ...
]
The comment content is sent back as-is, i.e. there are absolutely no transformation processes happening in between. Although attackers can use this to attack XSS-vulnerable websites, we are determined not to escape anything in the content string, so that truly power users can transform it with whatever library and/or method they want, completely and absolutely freely. It is the job of the user not to fall to XSS attacks (for example, just do not blindly pass the string to eval() or put it to dangerouslySetInnerHTML).
Posting New Comments to the Pending Queue
The POST method can be used to post new comments. Depending on the page configuration, it may go to the pending queue or get straight to the approved comment list.
const author = document.getElementById("form_author").value;
const text = document.getElementById("form_comment_body").value;
const res = await fetch("https://ezkomment.joulev.dev/api/v1/comments/siteId/pageId", {
  method: "POST",
  body: JSON.stringify({ author, text }),
});
if (res.ok) showSuccessNotice();
Error is returned for requests with invalid body.
 A demo of the public API is available at https://demo.ezkomment.joulev.dev
Screenshots of the application
We encourage you to make your own ezkomment sites and pages to experience the app yourself instead of viewing these screenshots, which is taken on a macOS laptop at light mode, which may have difference in viewport size and display properties compared to your actual computer.
All screenshots have the computer version and mobile version (responsive) rendered side-by-side. In some screenshots, the page is scaled down to 90% to make the computer version screen viewport sizes better match real computer viewport sizes.
Pages
-
The landing page is the first page that is shown when the app is loaded. It is based on Stripe's landing page, with a screenshot of how the application looks like. Extra-bold fonts are used to identify the main sections of the page. Users can then click on "Get started" buttons, drawn in primray colours, to access the main application.
Some animation is handled by Framer Motion, the incredible animation library that every single React developer should know about. It is simply perfect.
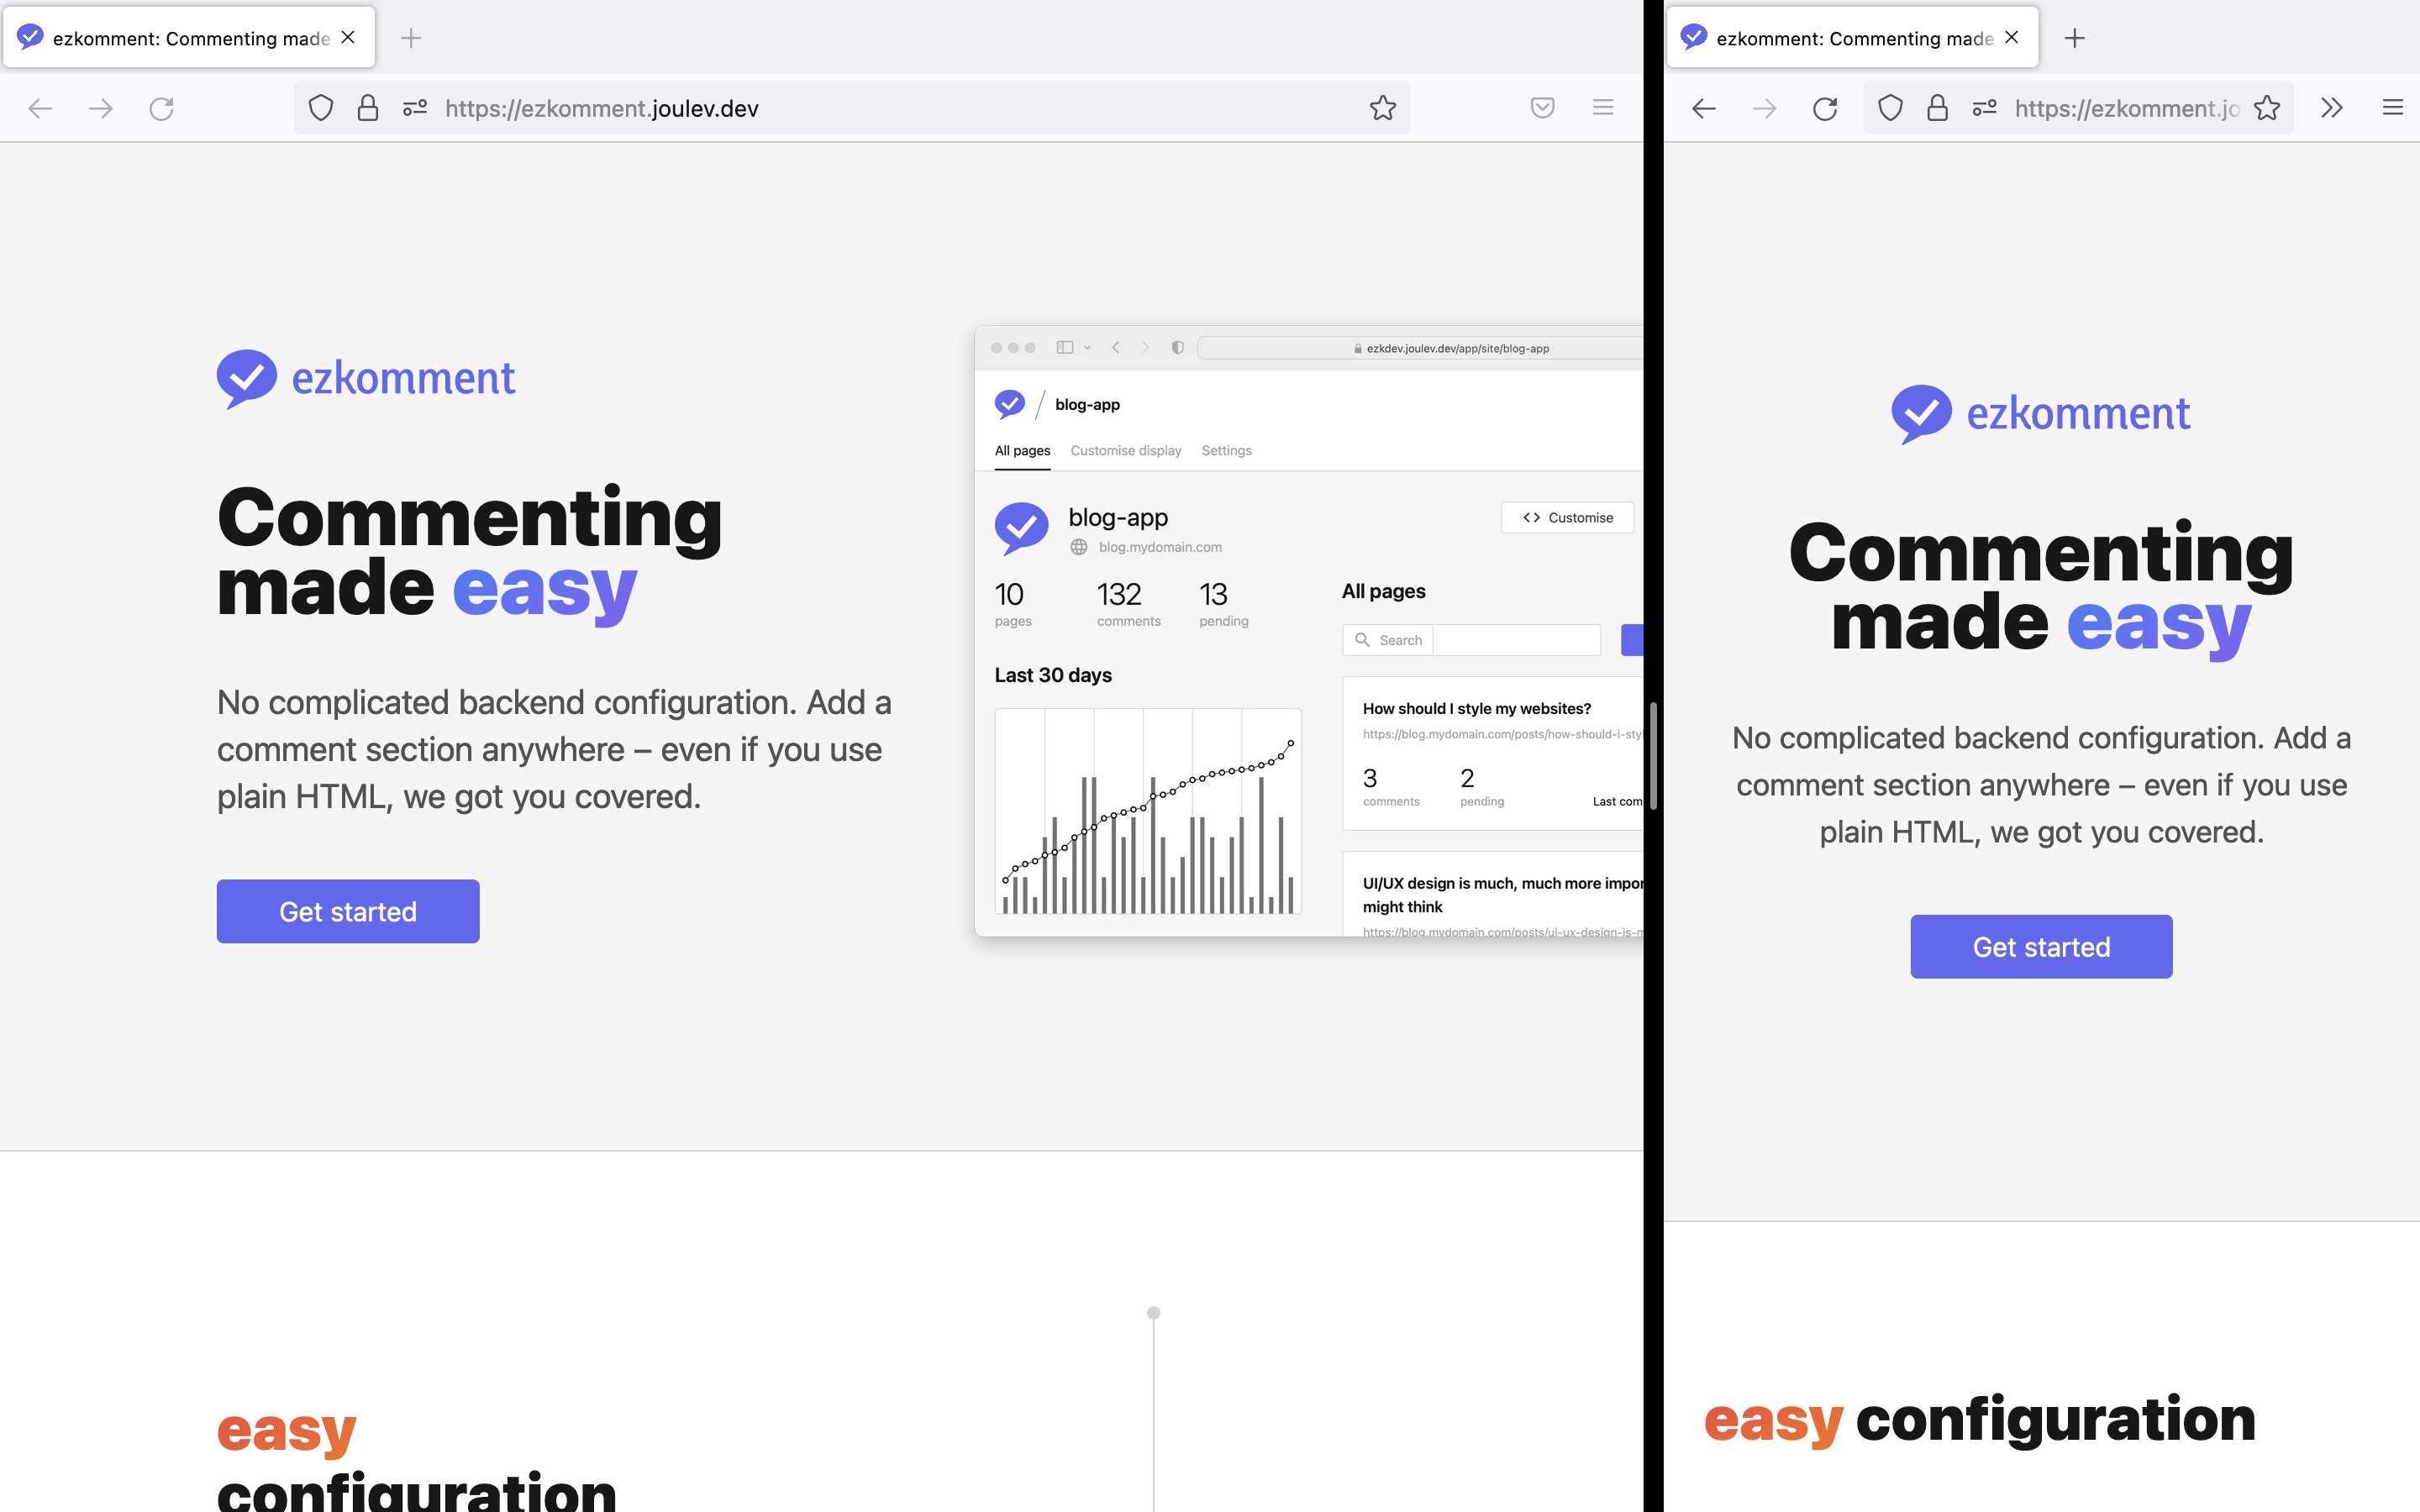 Landing page
 -
The documentation page has a sidebar acting as the navigation pane for all documentations. Users can also search for specific words inside the documentation with a search bar provided.
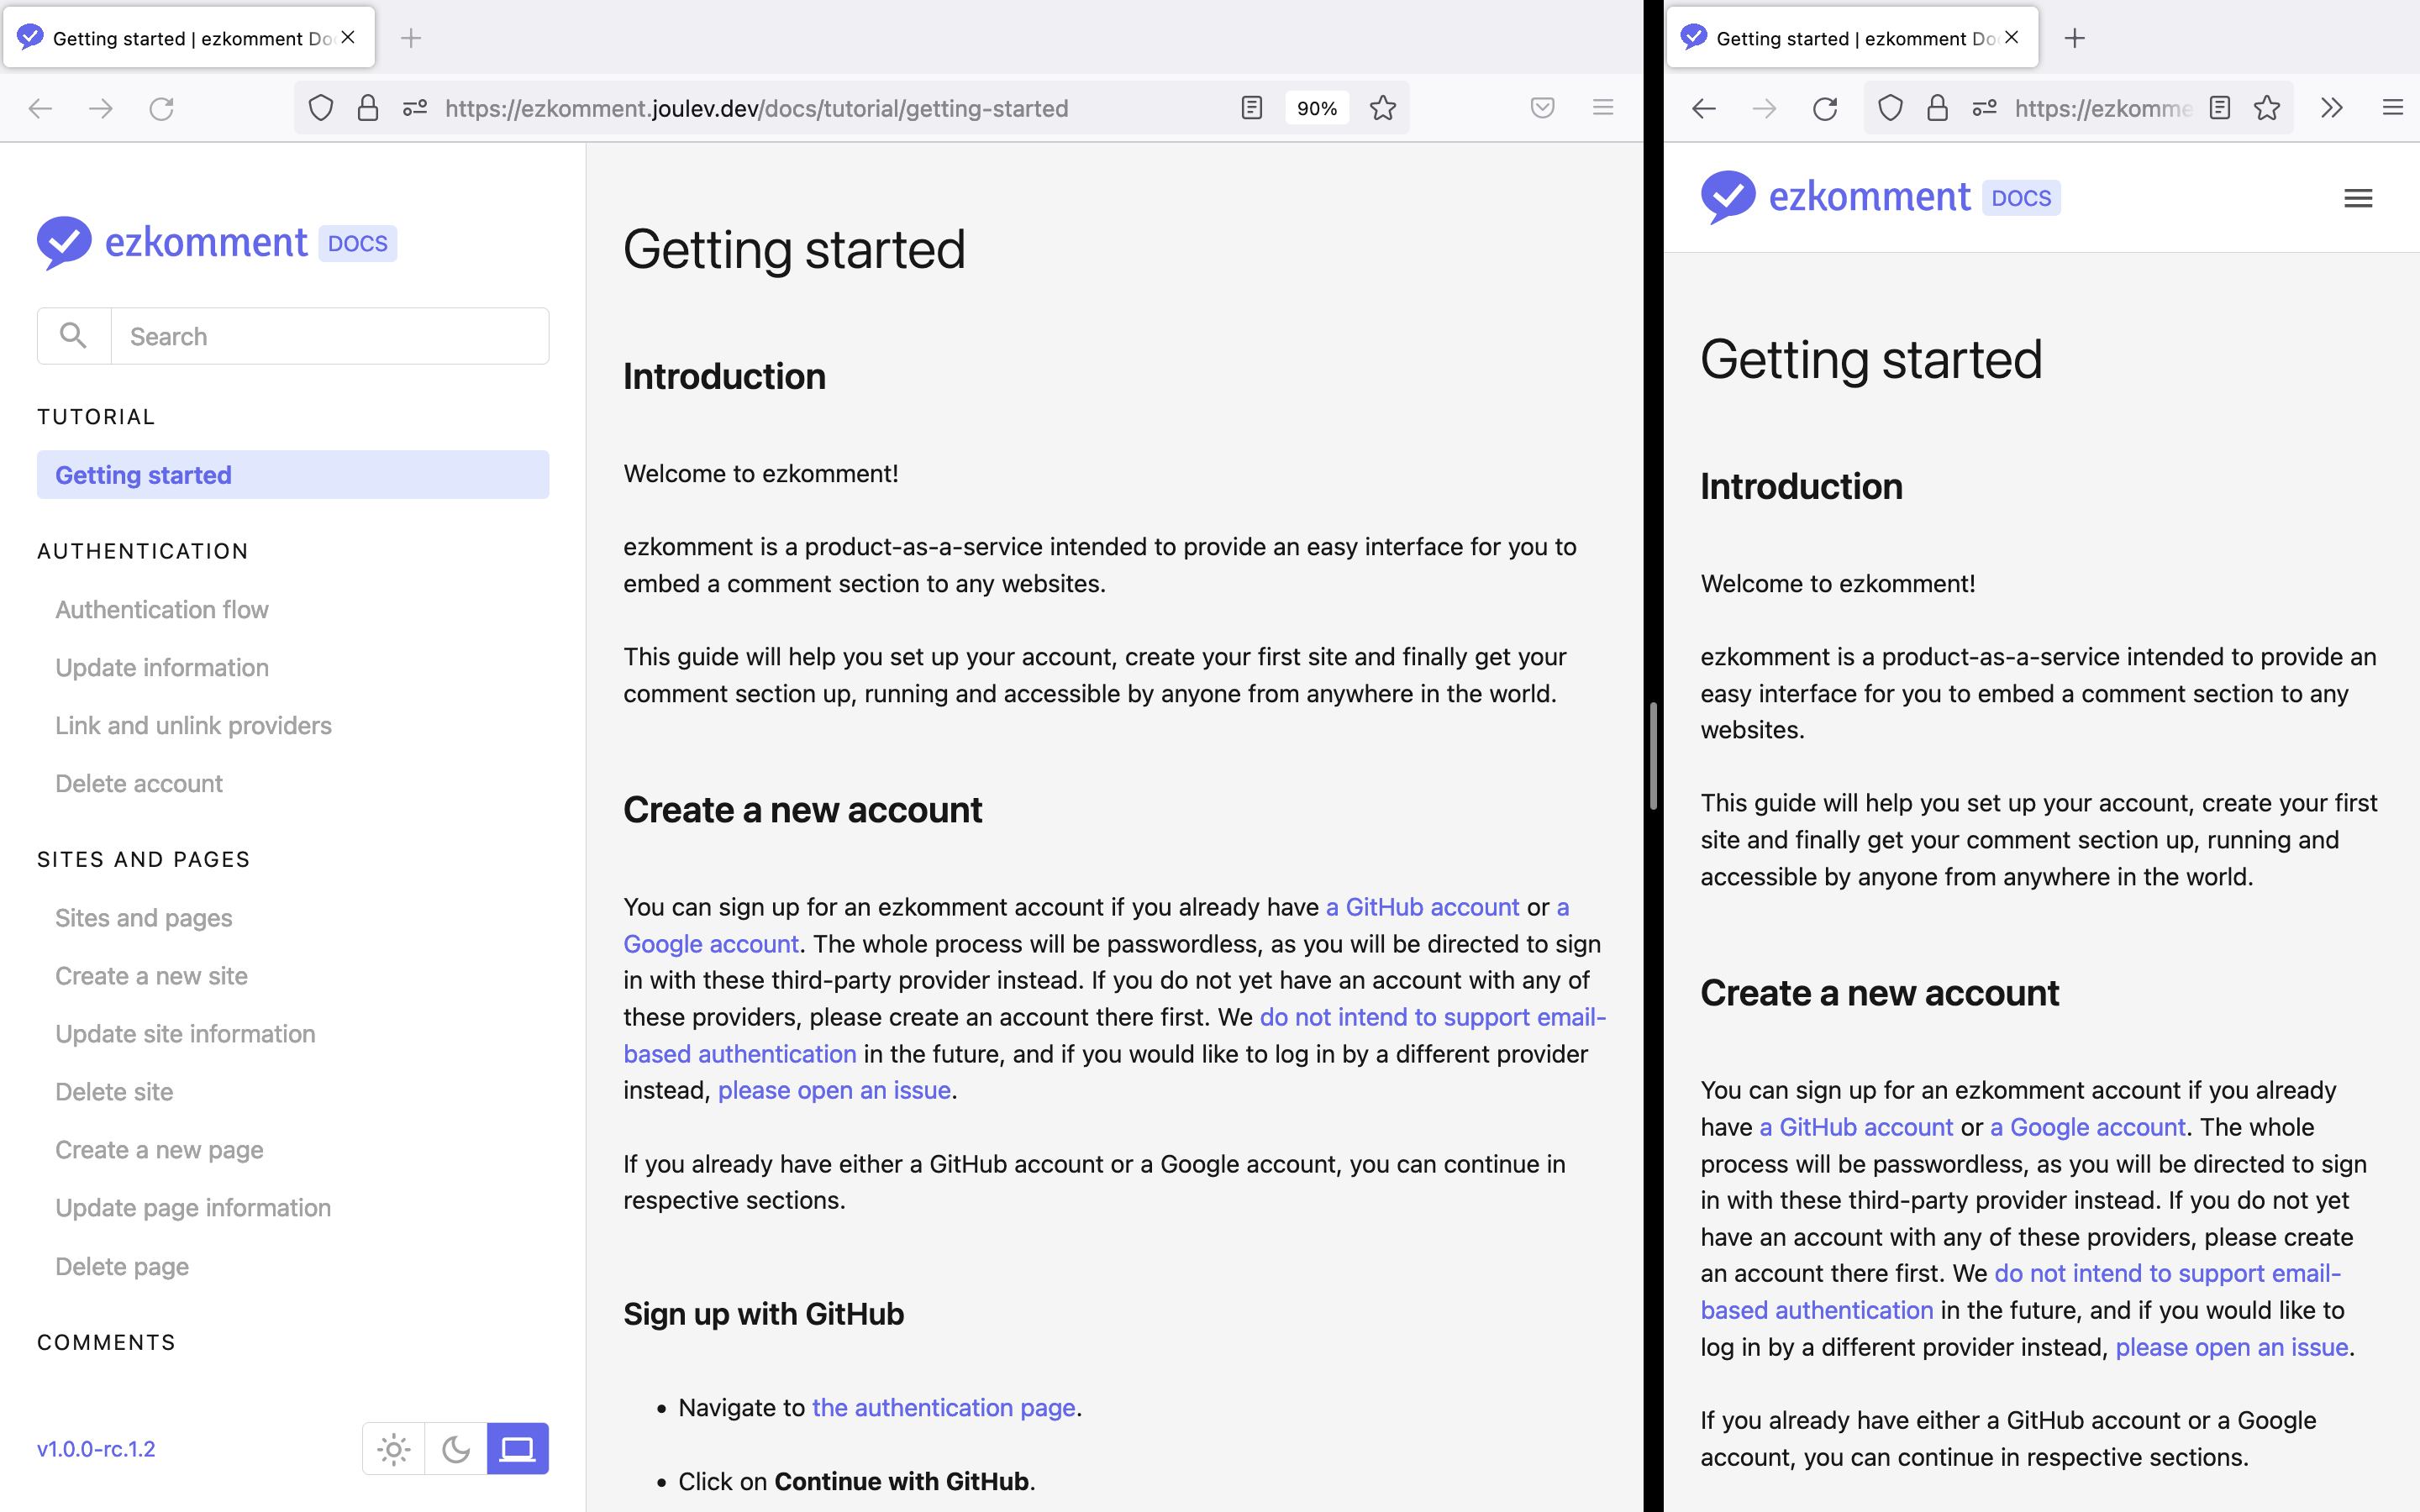 Documentation page
 -
The authentication page is used for, well, authentication. Since it is pretty boring (only some buttons to continue with supported authentication providers), we added a triangular pattern background to it to make it look somewhat more interesting (at least for me, the front-end developer). Credit to @qrohlf for
trianglify, the amazing library used behind the scenes for this background.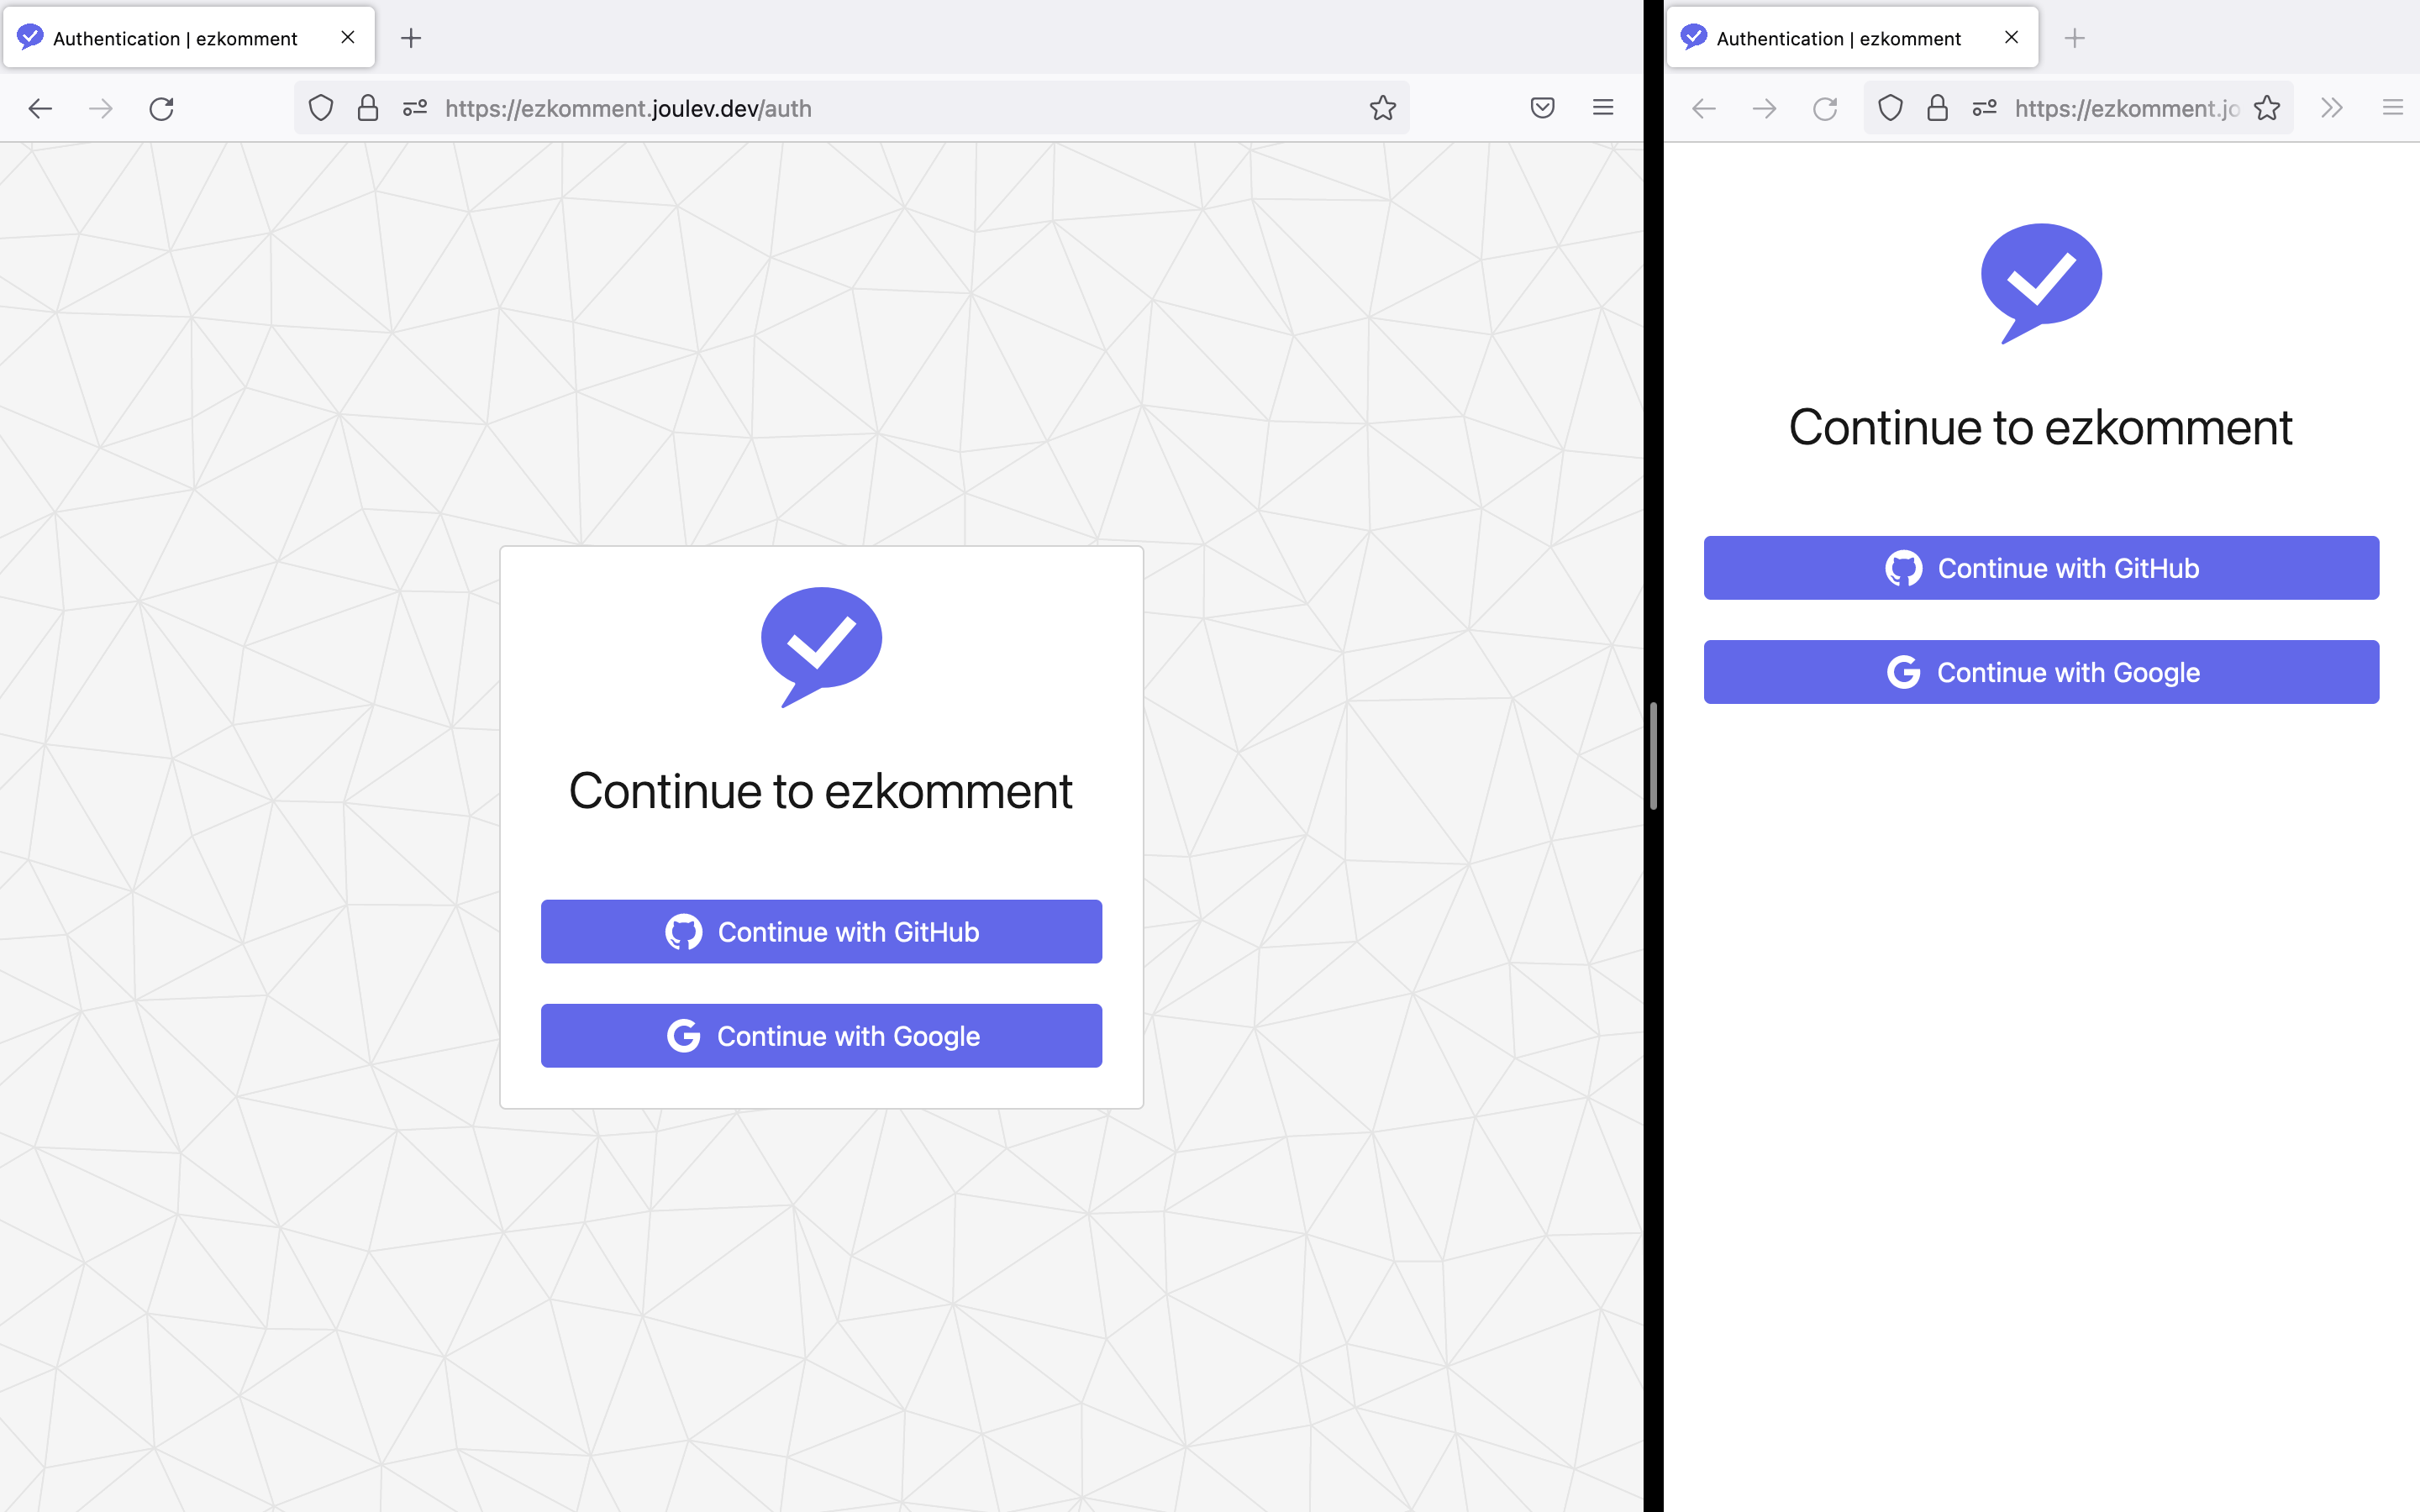 Authentication page
 -
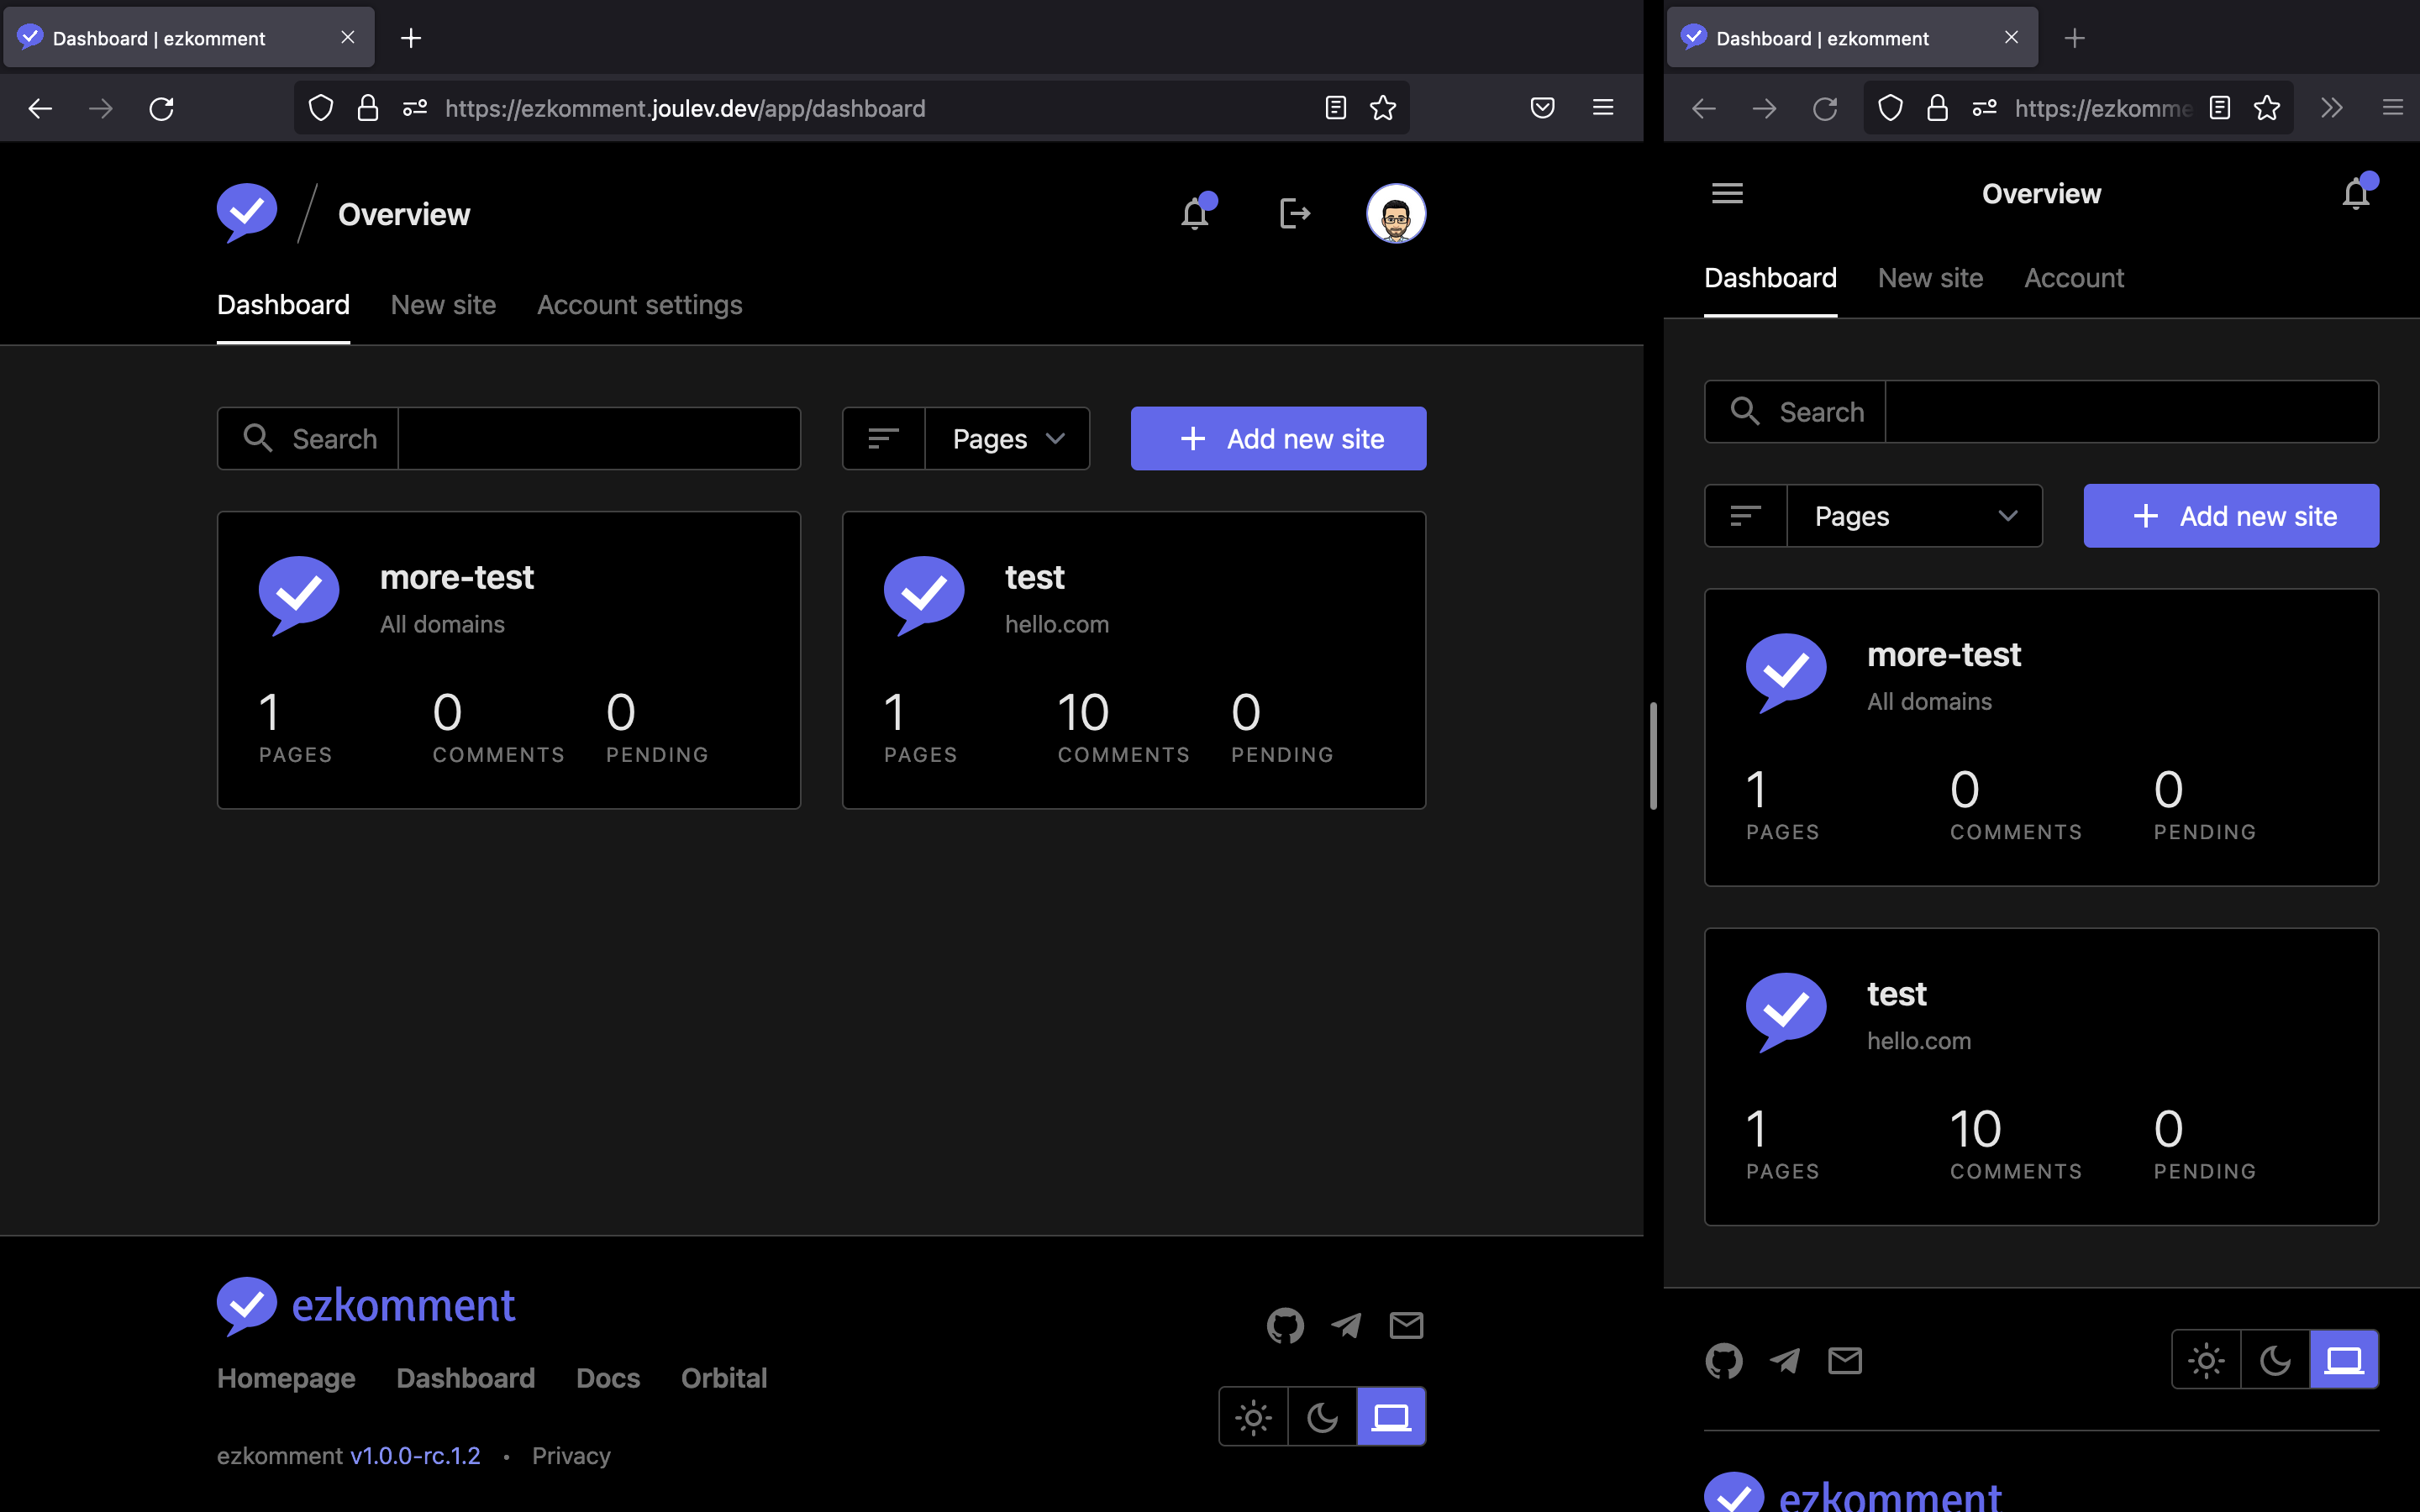
In the user dashboard, we follow how Vercel design their dashboard. With the aim of having as much white space as possible, the dashboard only contains the essential information about each site a user has, and some simple navigation assistants such as filtering and searching.
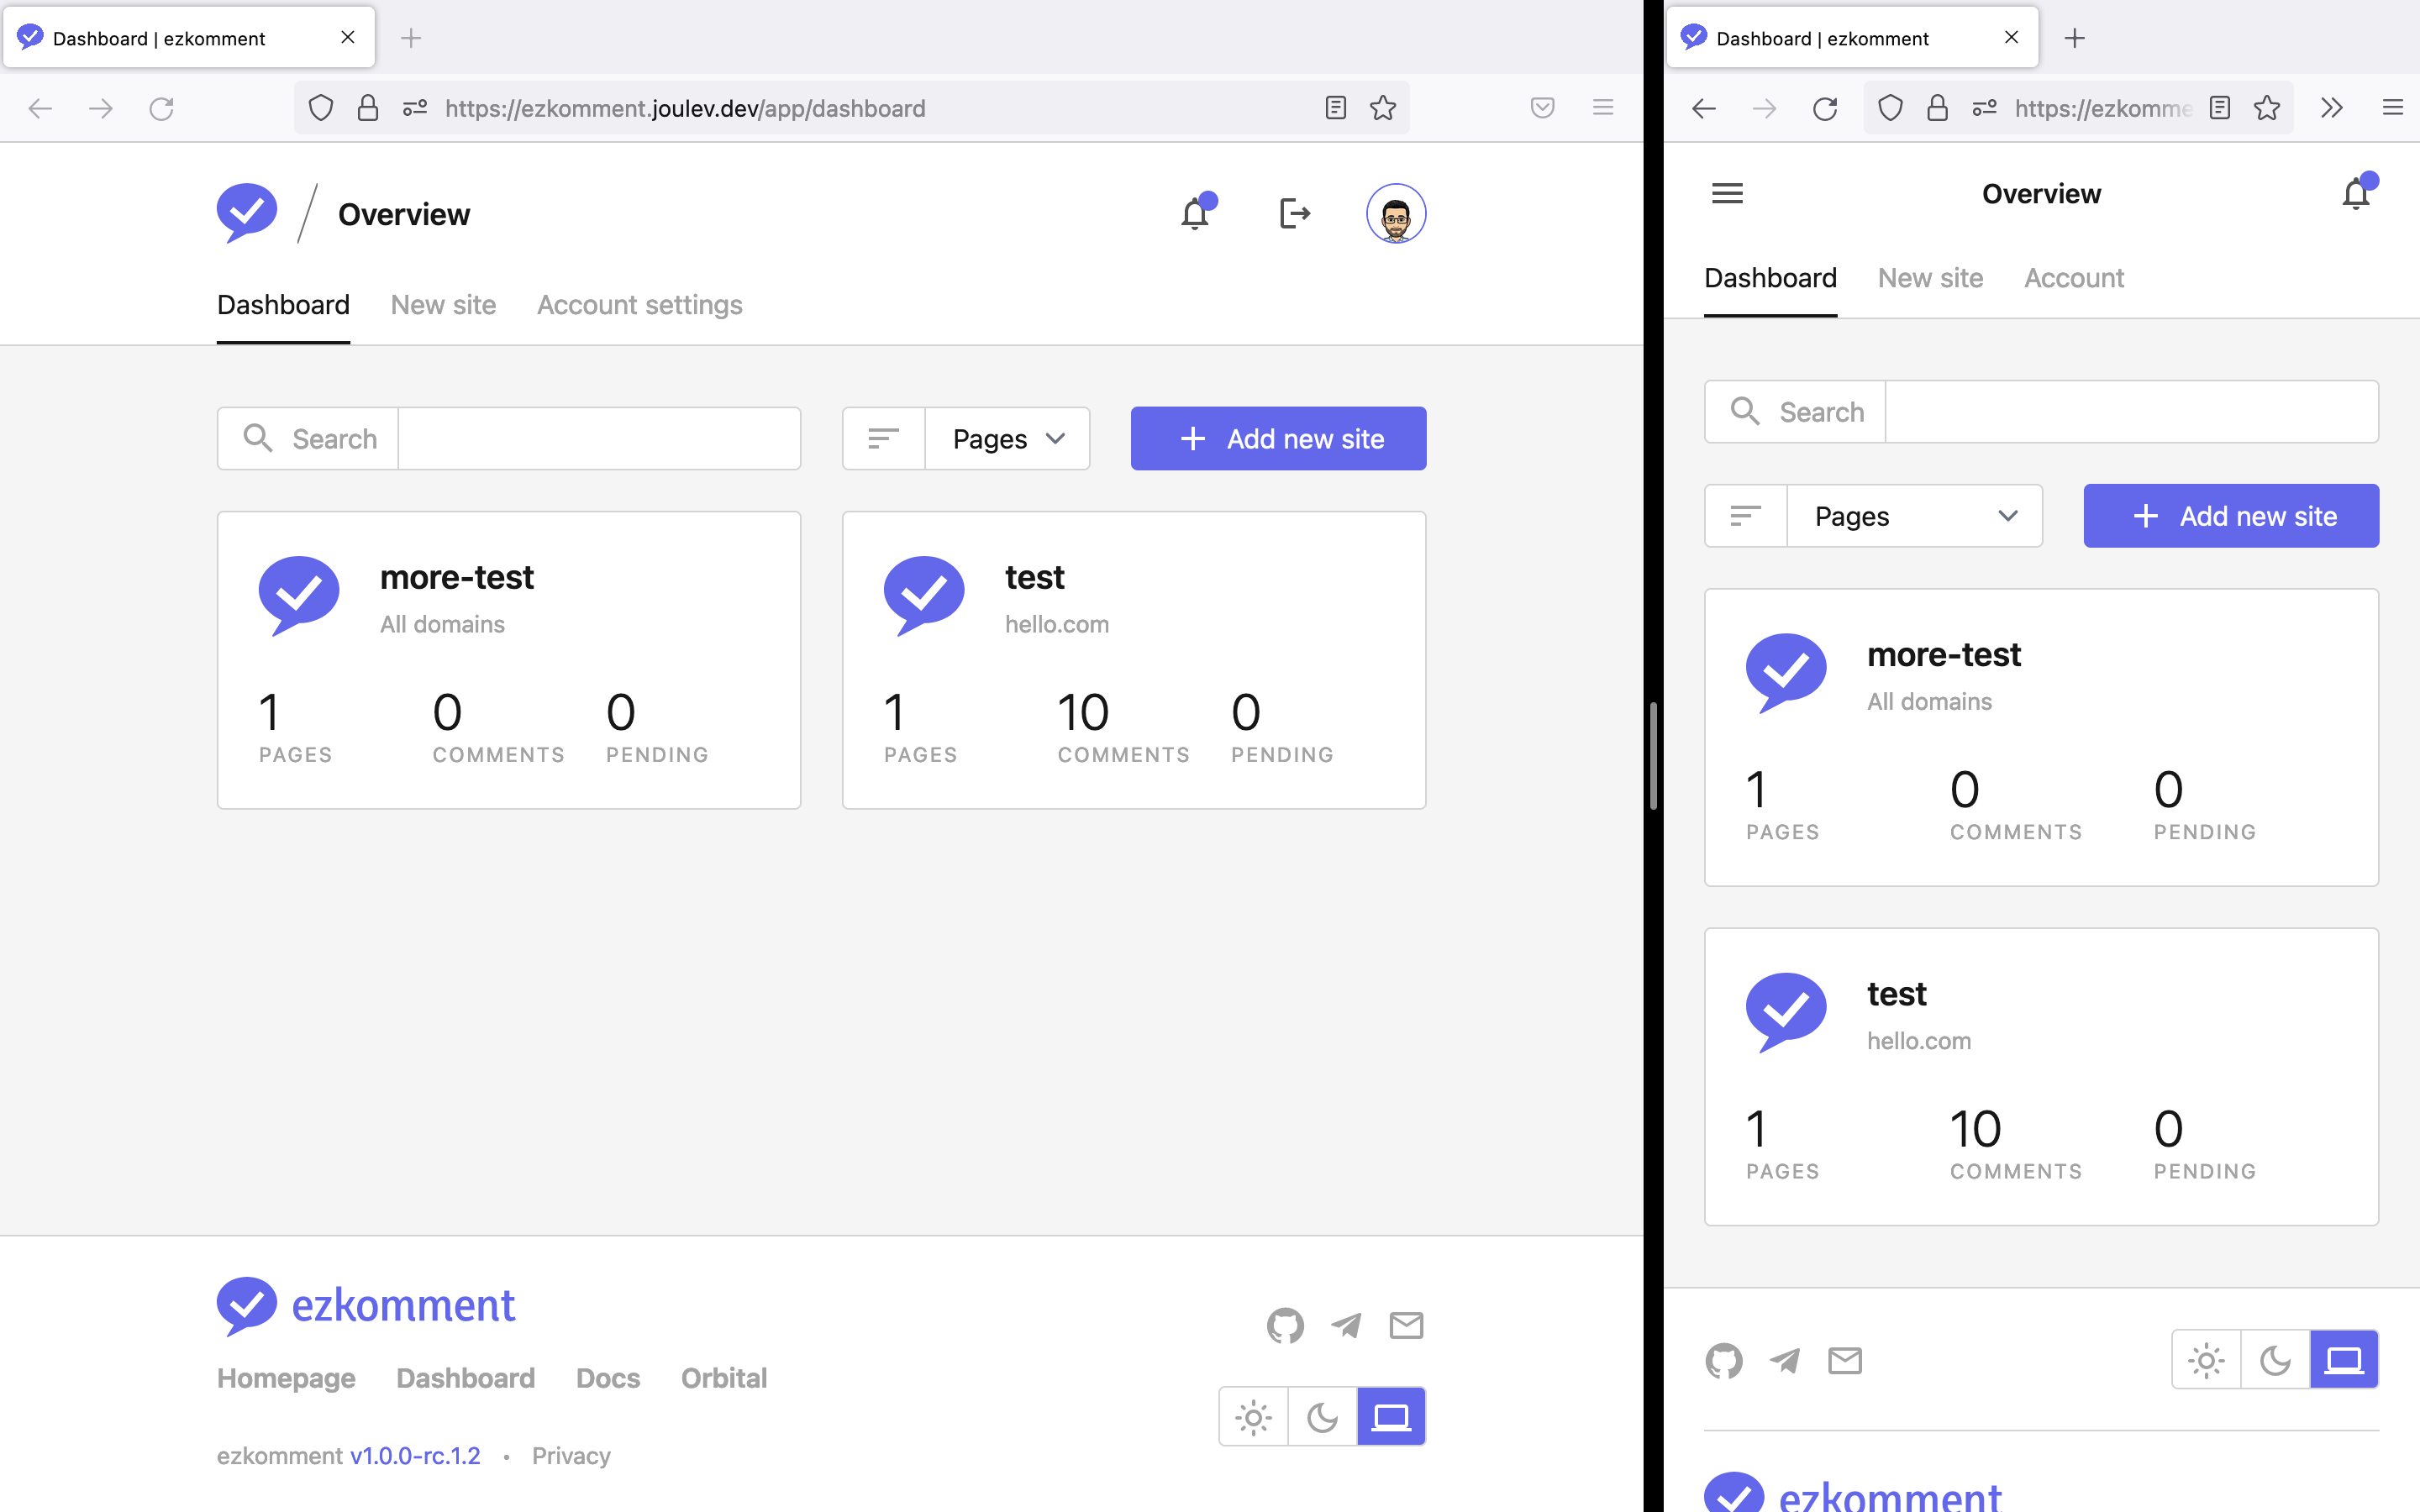 User dashboard with all sites listed
 -
In the "create a new site" page, there is really not much to render except for the form. However, since this might be confusing to first time users, we also take care to add some descriptive text.
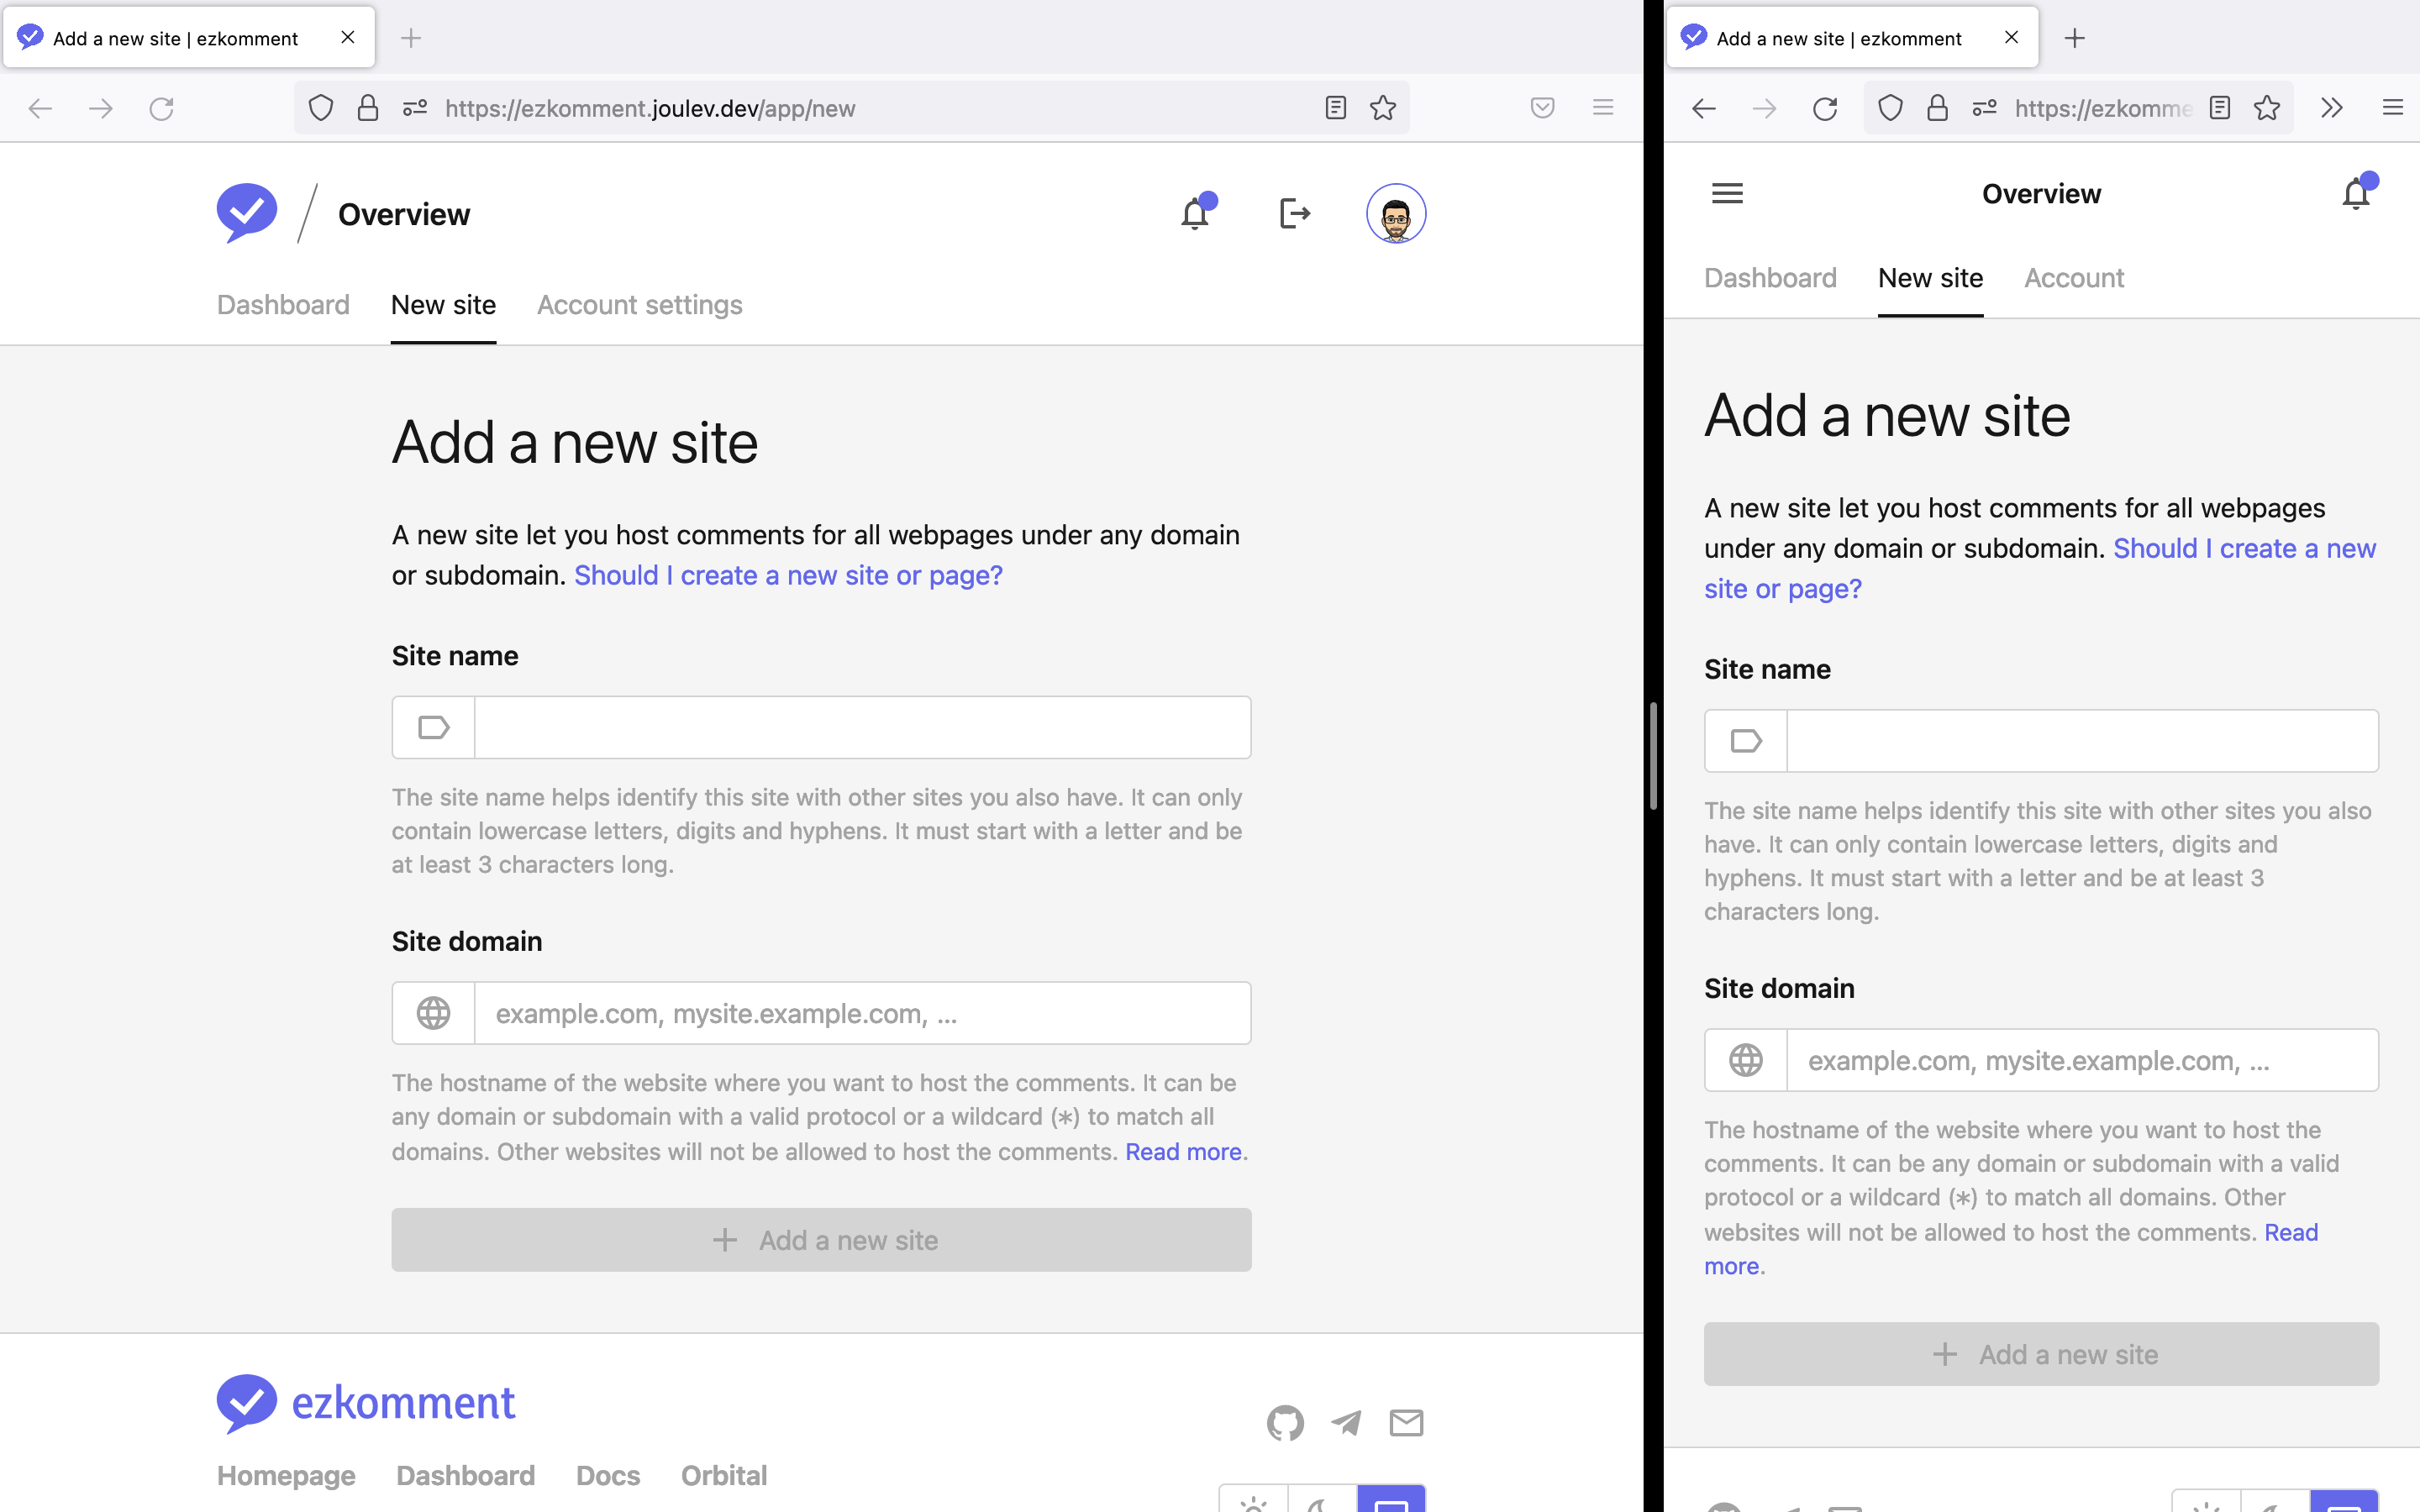 Create a new site
 -
The user account settings page is similar: we only show what we needs to show, with sufficient help text.
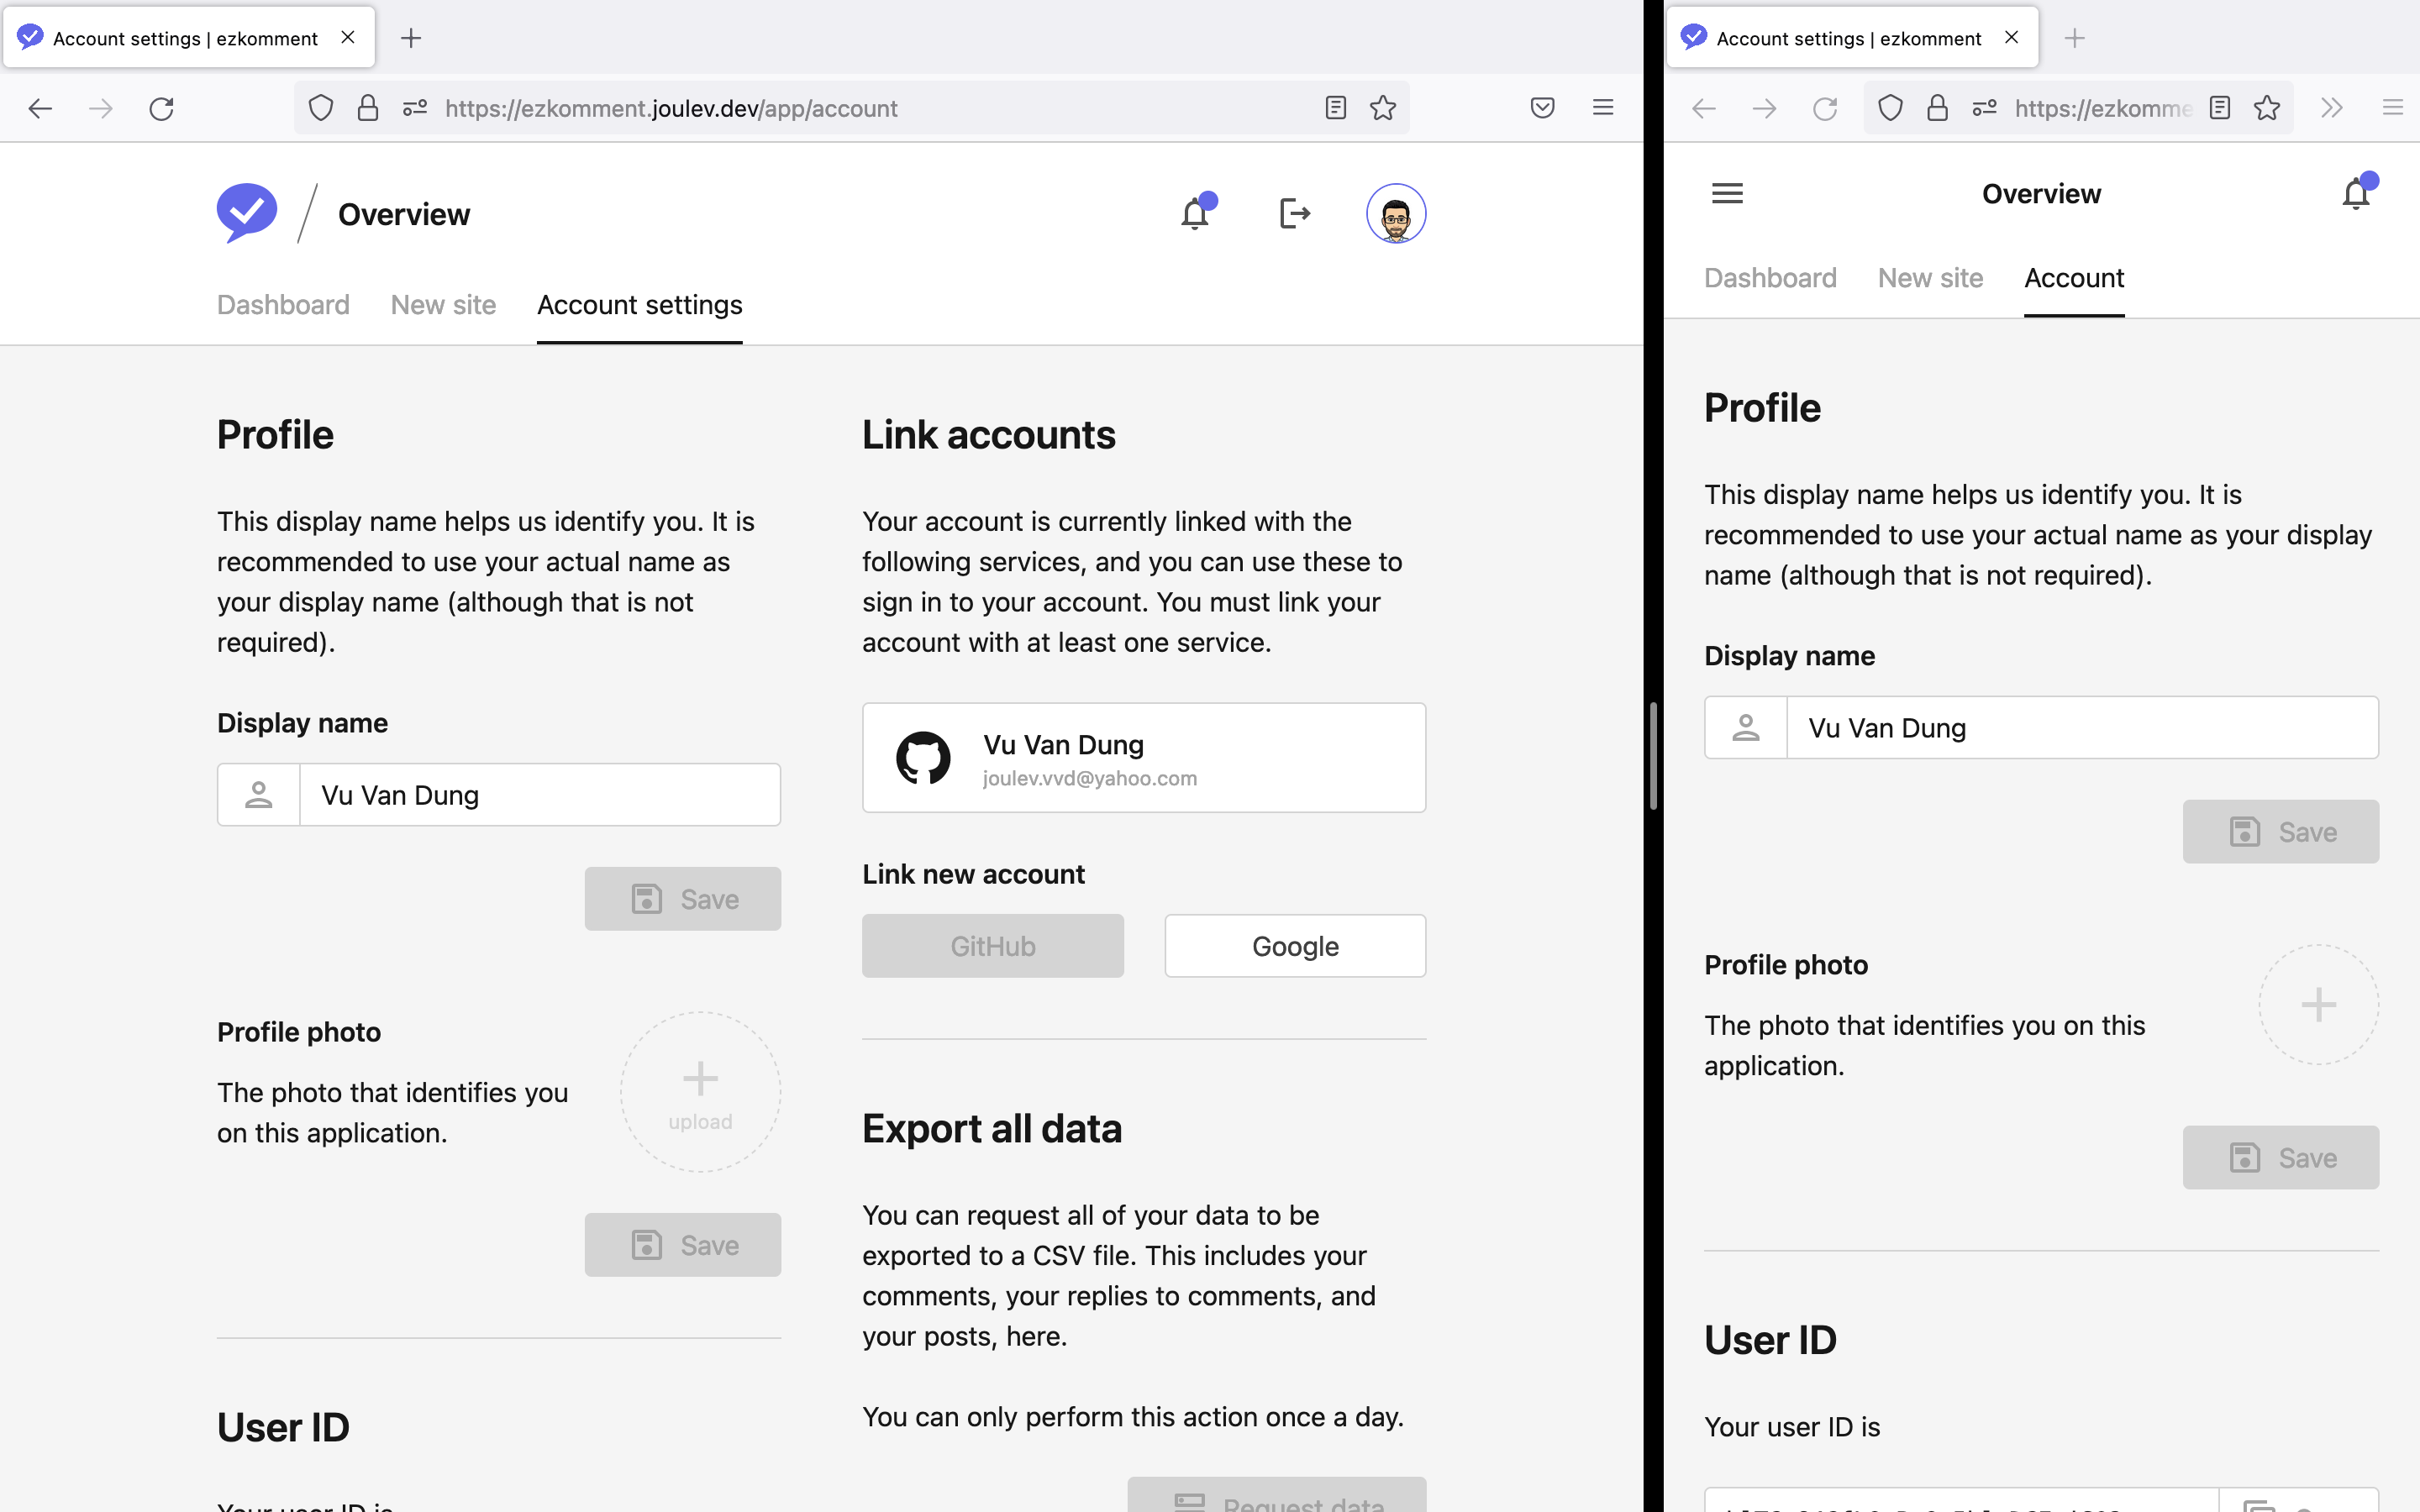 User account settings page
 -
Site dashboards are provided with basic site information and the list of all pages under that site, as expected. However, we consider it to be still a bit too boring, so we added a graph too, for the user to see how the site is performing in the last month. The graph is rendered "by hand" using SVG without any external libraries, and I have to admit it is much more work than you might imagine.
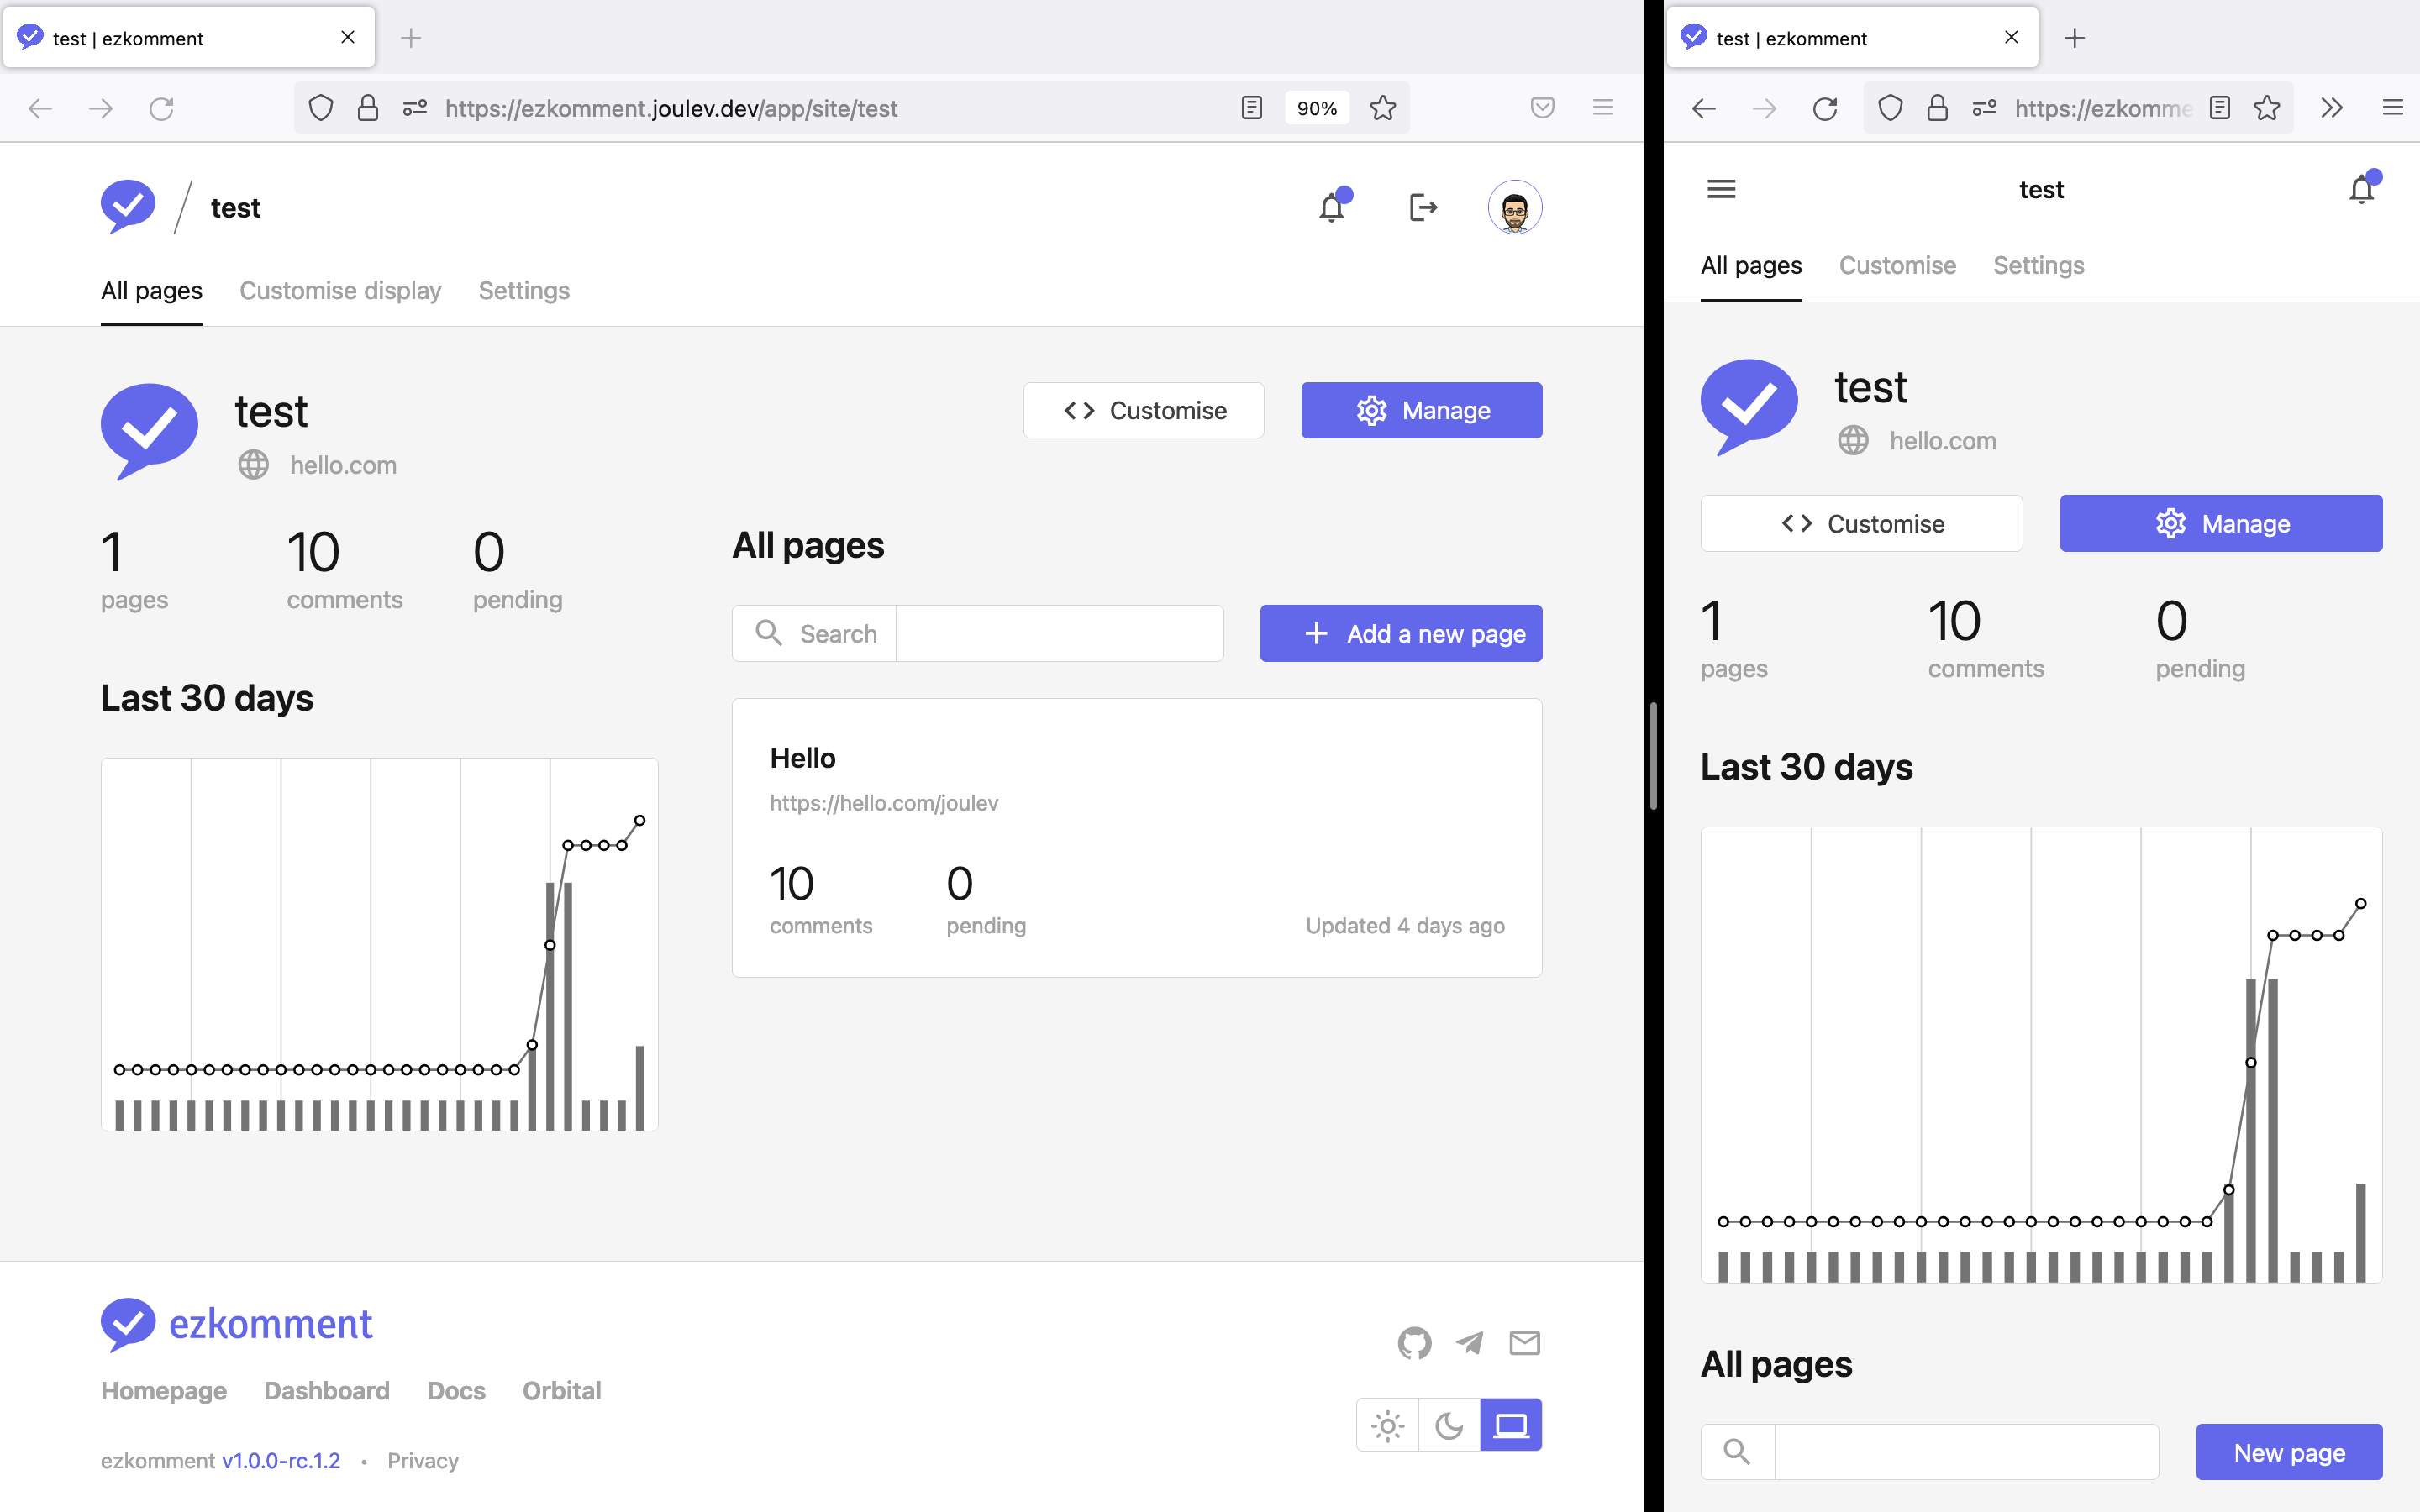 Site dashboard with statistics and all comments listed
 -
Site template customisation page is probably the most complex page throughout the app, even beating the landing page. It features a Monaco editor, the same editor that the well-loved Visual Studio Code uses, so that users can familiarise with it fast. Other than that, we also wrote our own side-by-side-resizable preview page, and our own editor theme, to make it consistent with the app design.
Note that mobile is not supported here. This is the only page throughout the whole app where responsive design is not supported, and that is an intentional decision. We think that no one codes on mobile anyway, Monaco also has poor support on mobile and tap screens, so we decided to keep it simple.
Since the preview has to be rerendered on every change, if the user uses a lot of JavaScript in the template, the rerendering will be slow and it may make the page unresponsive. We had to use modern React v18 features, such as concurrency, to reorder the importance of rendering jobs, so as to make the page more responsive and improve the user experience. Given that React v18 was only released a few months ago, we wonder how we would even make this page if we were in Orbital 2021 instead. Sometimes the stars simply align together.
 Site template customisation page (note that mobile is not supported in this page)
Full screen is also supported. No one (including us) wants the scrollbars to get in the way, so many people will find this full screen feature helpful.
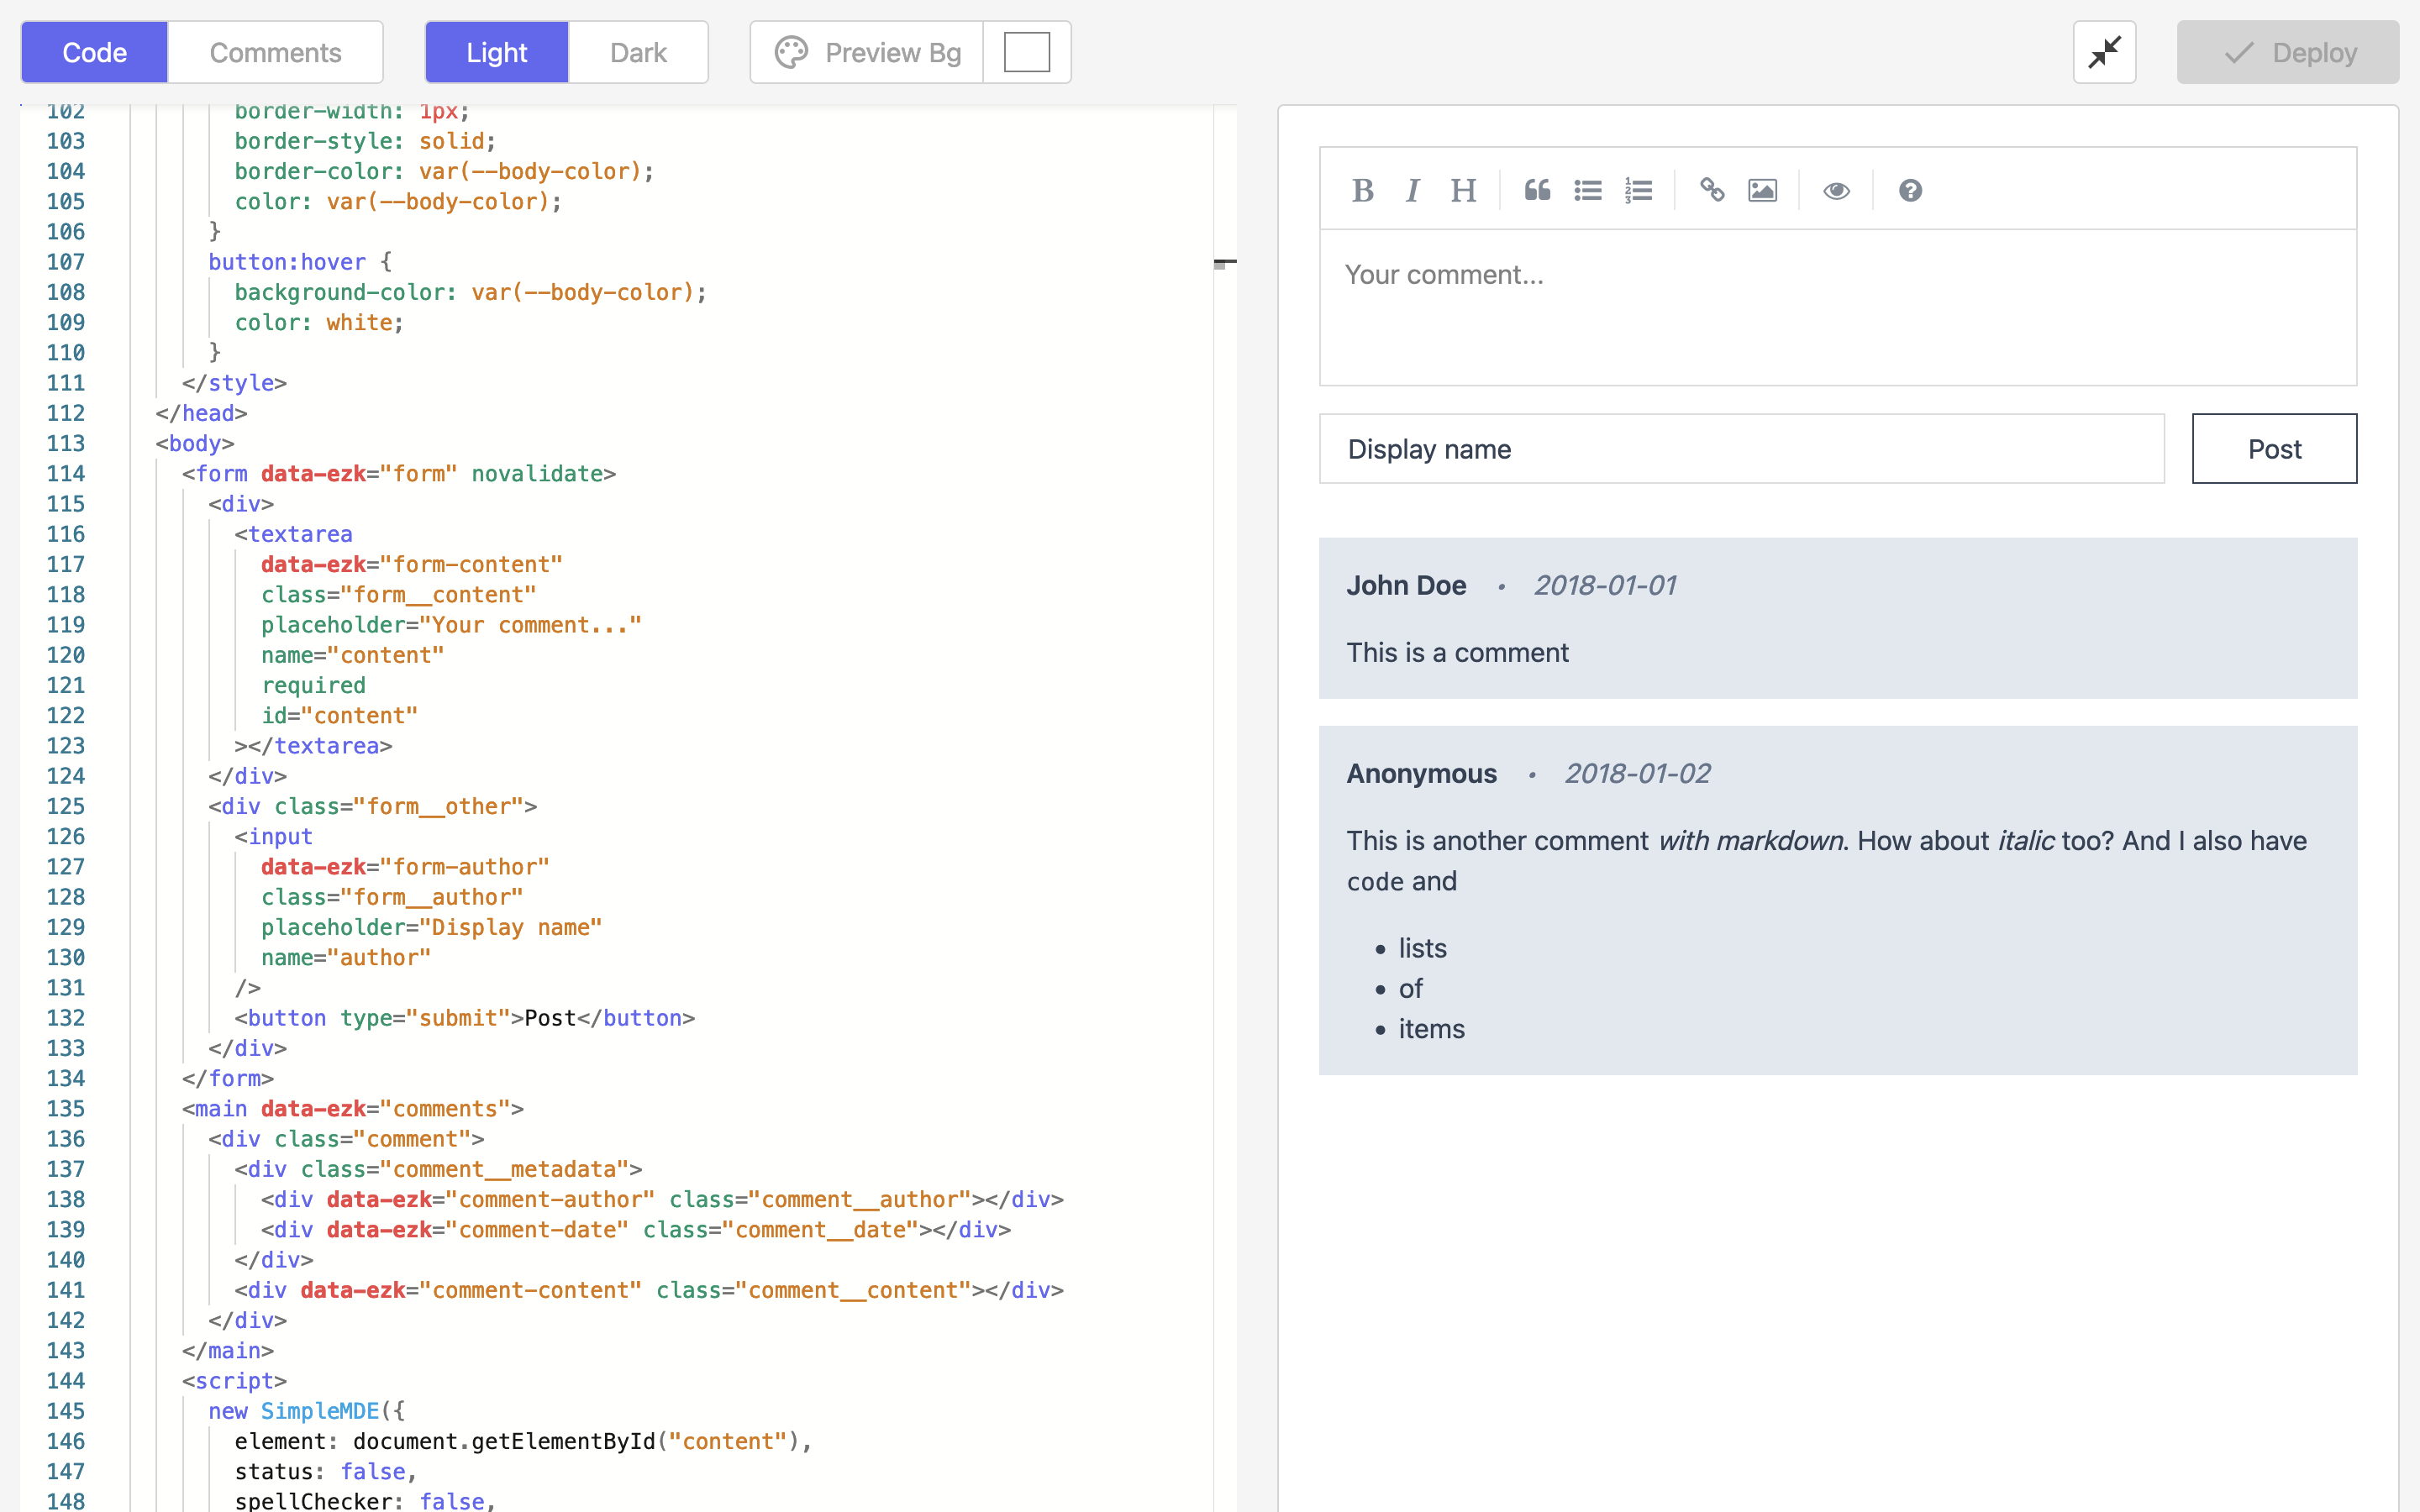 Site template customisation page, full screen
 -
Site settings page is similar to user settings: there is not much to write about.
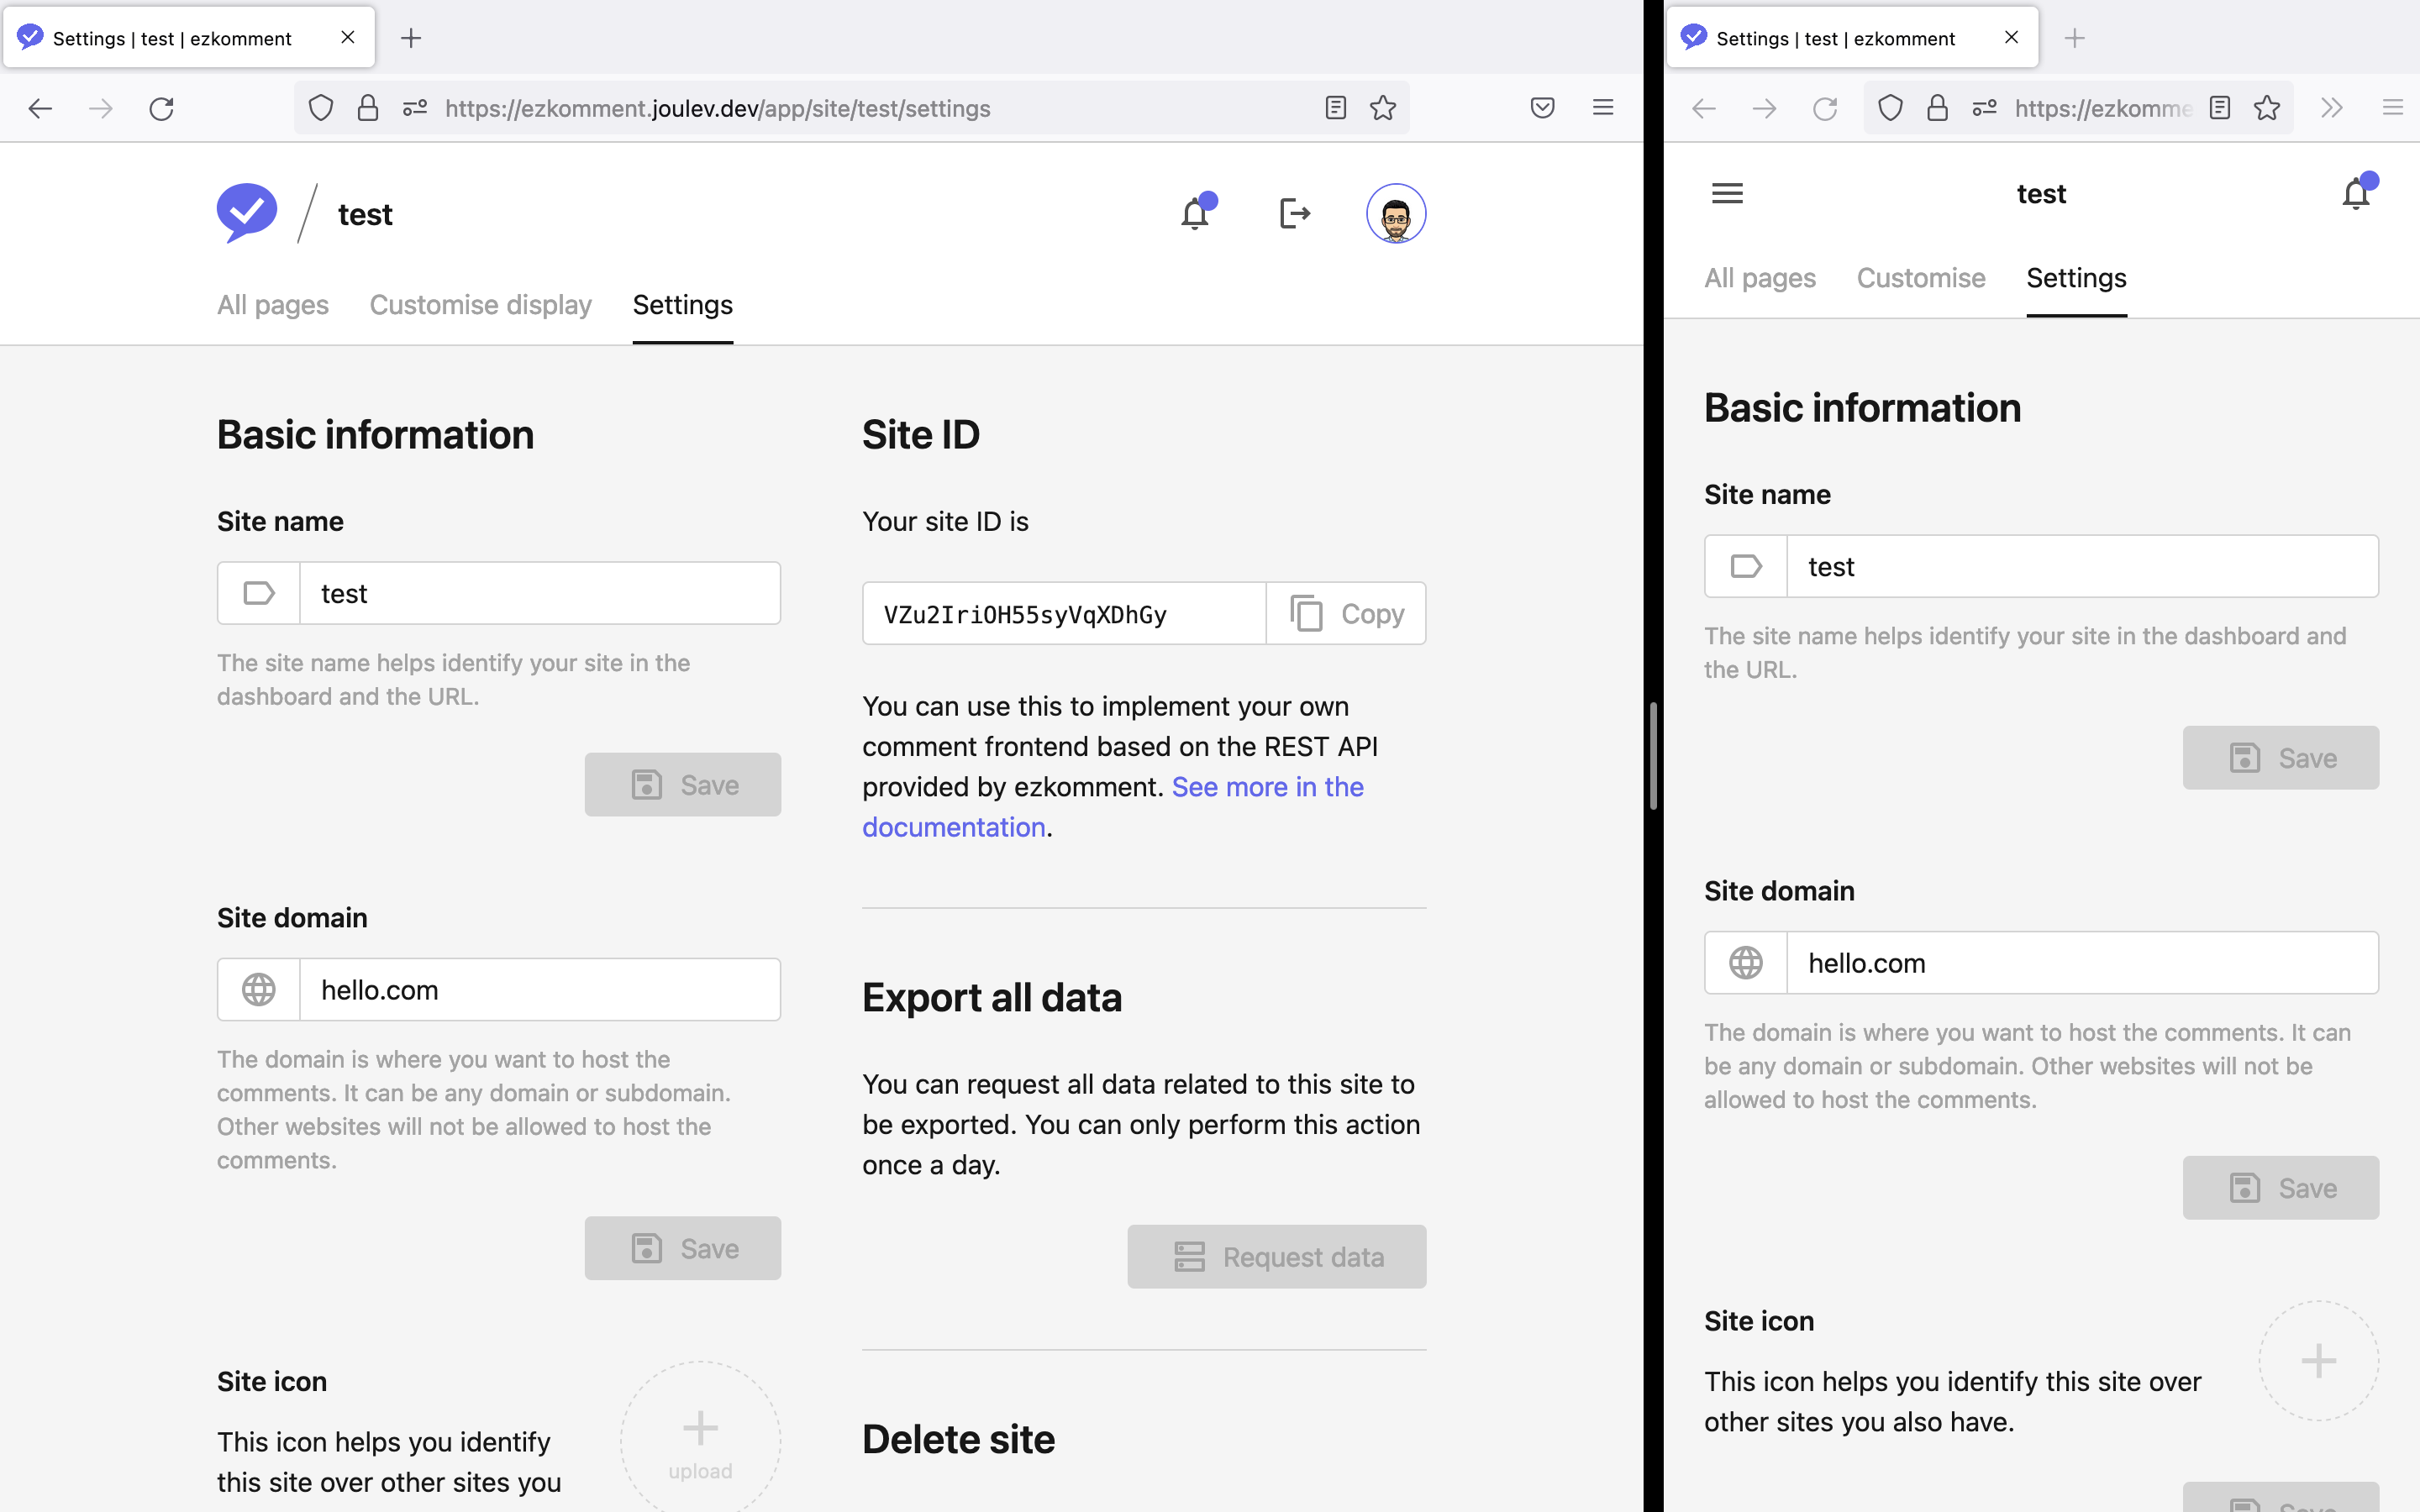 Site settings page
 -
The page dashboard has a slightly different width compared to other pages we see above. Since on this page there may be very few information, we decided to increase the horizontal margin by a lot, so as to create more white space, leading to better readability.
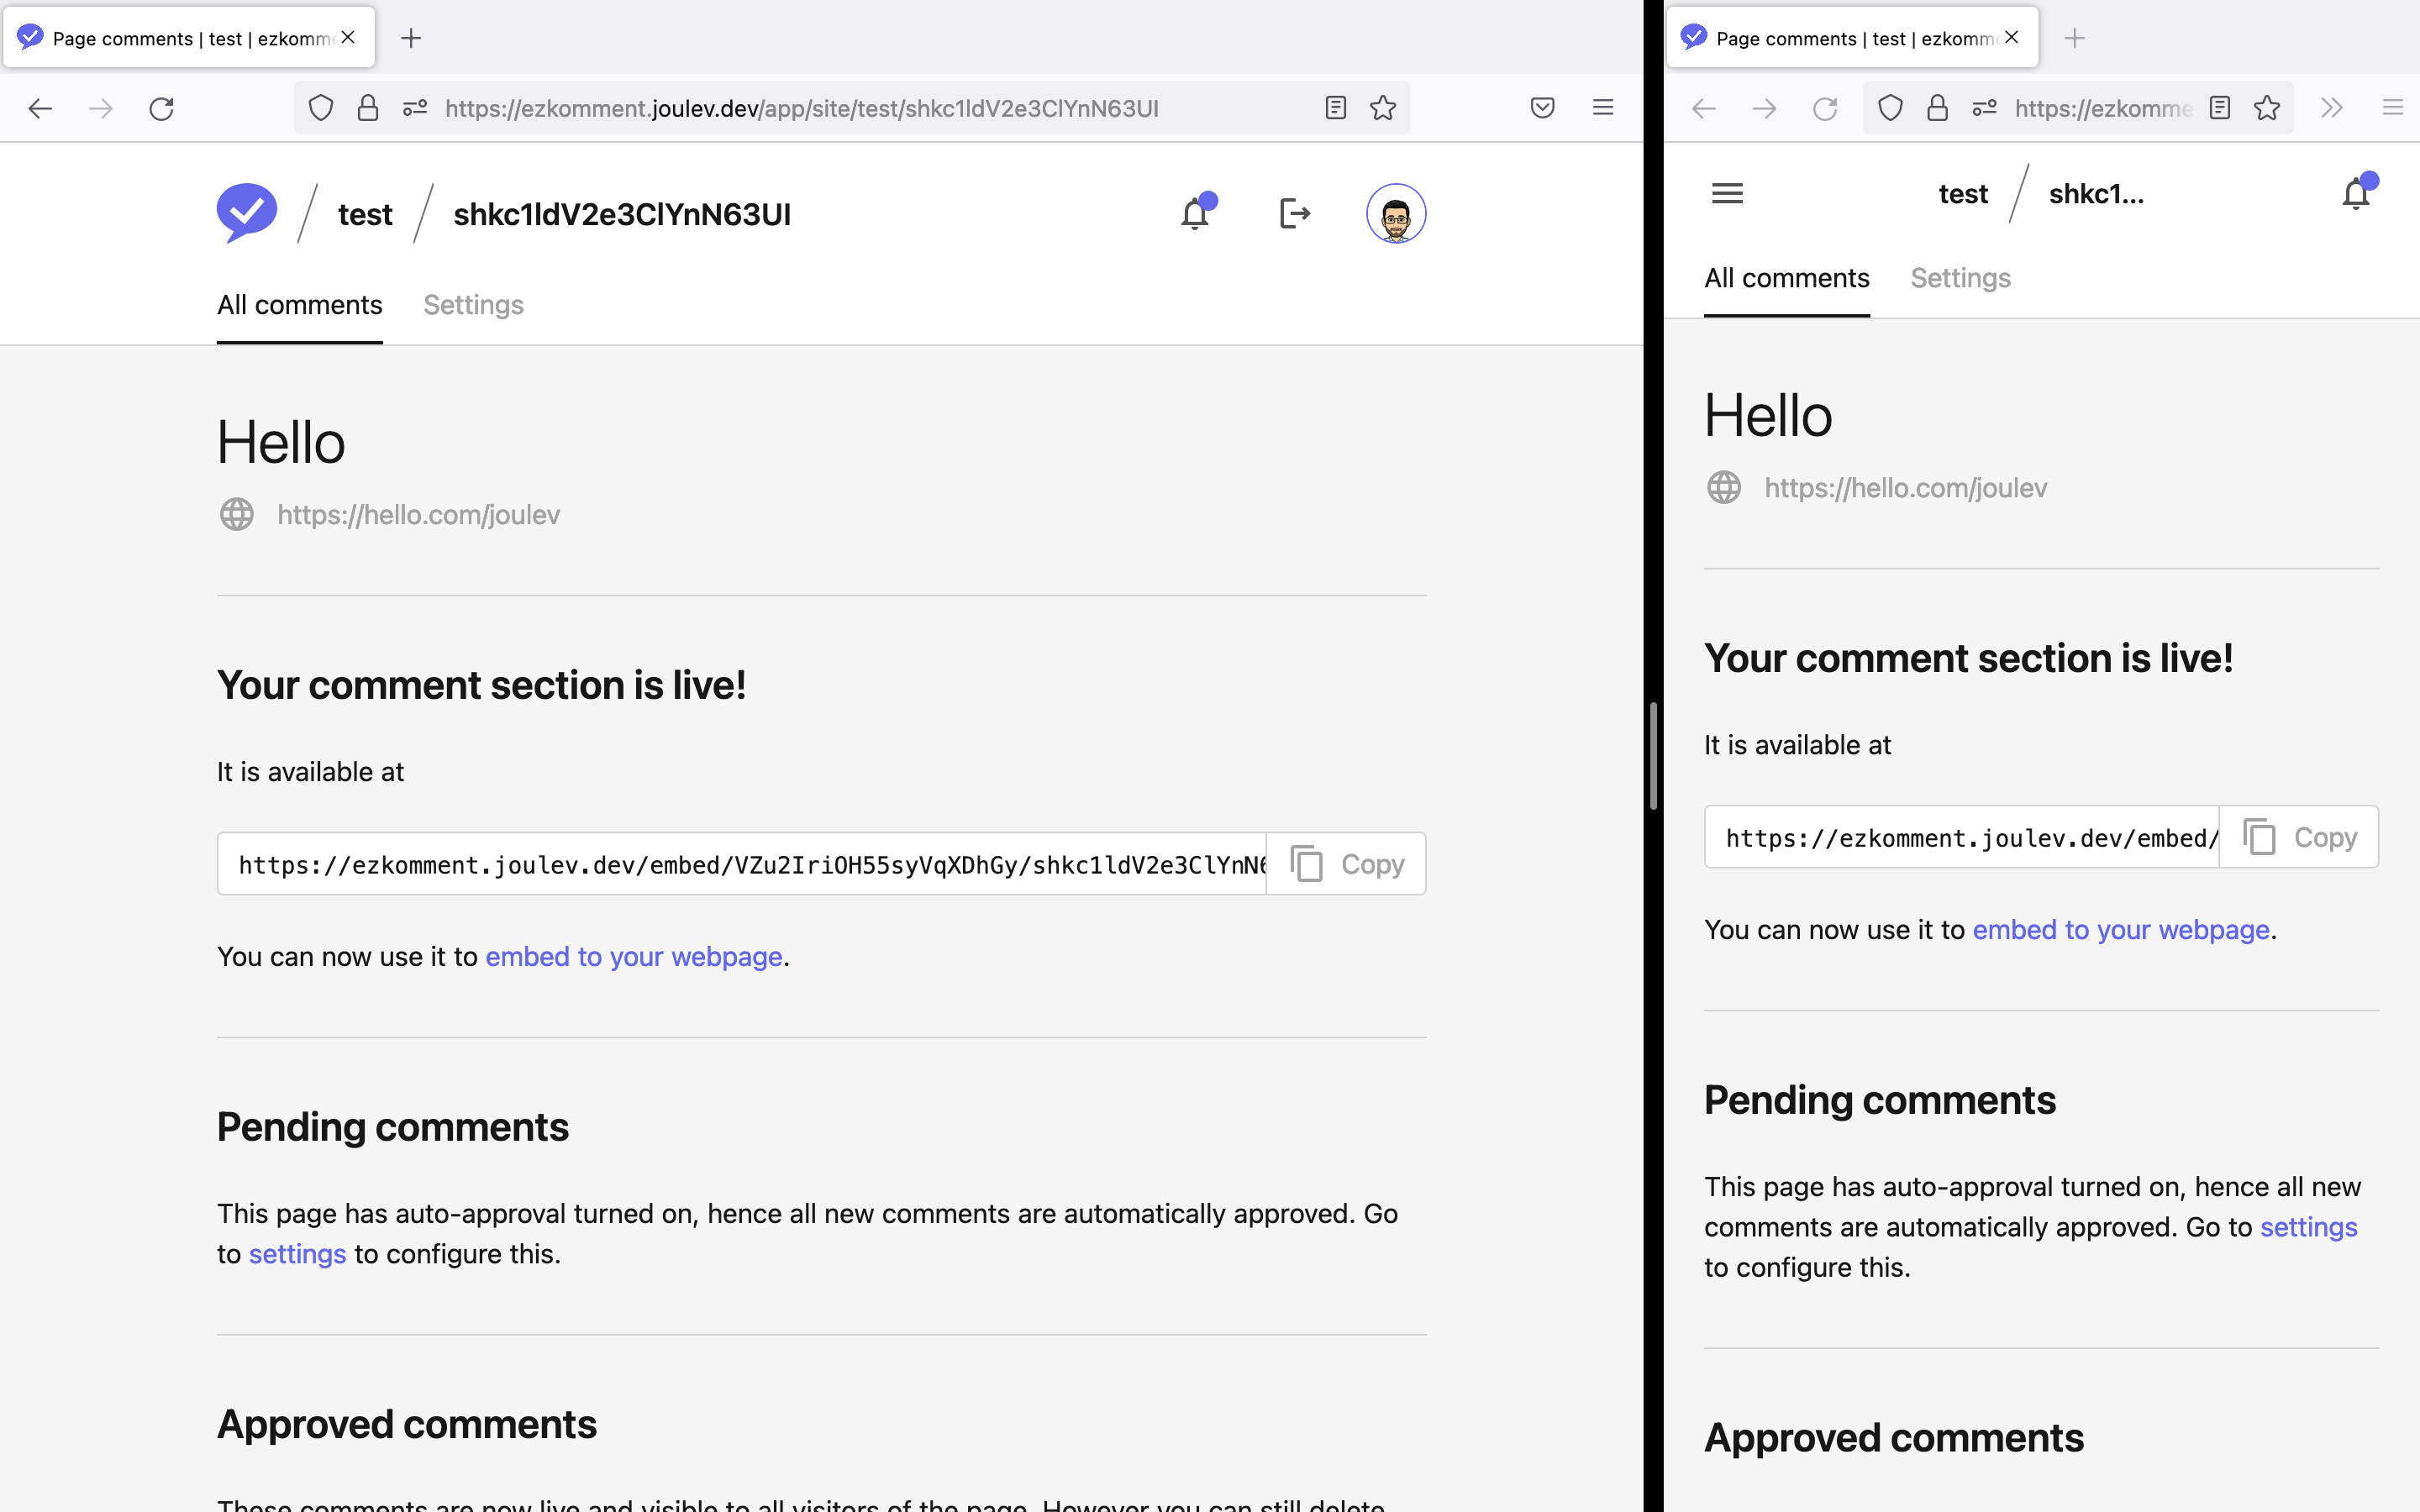 Page dashboard with all comments
 -
The page settings page is similar to all other settings page in the application.
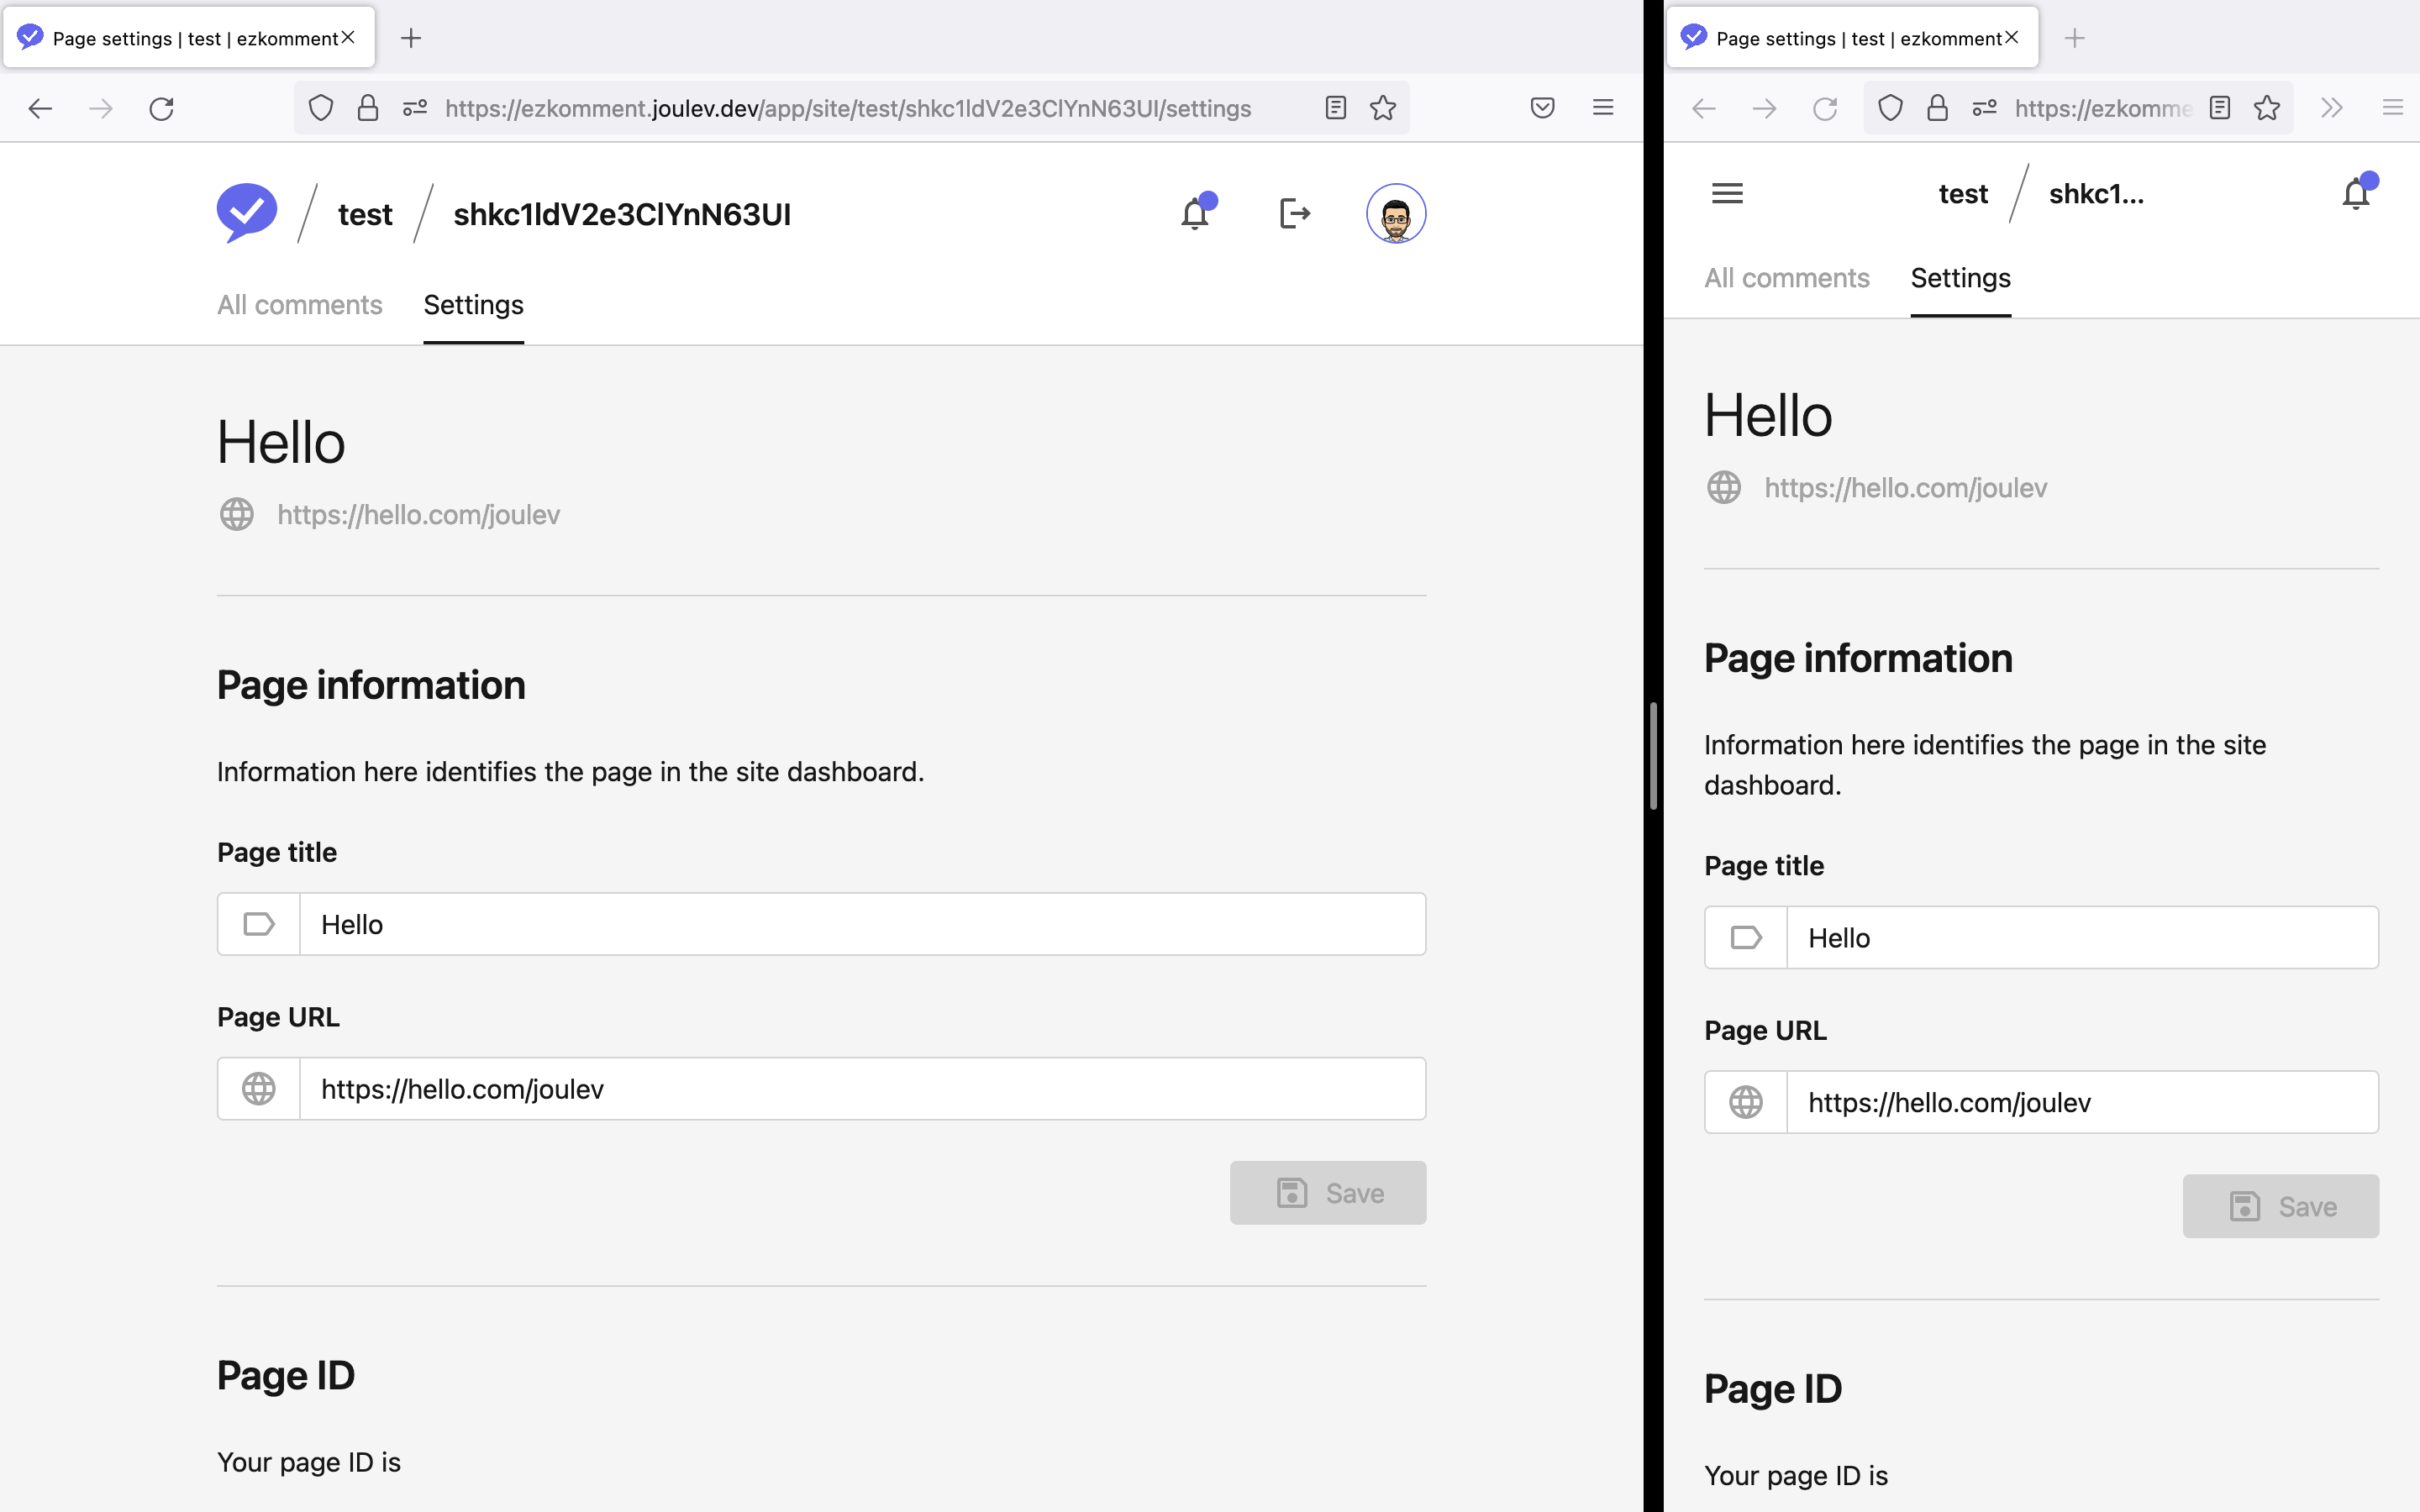 Page settings page
Some Notable Components
These components also follow standard design practice and the design system used throughout the application.
 Modal component
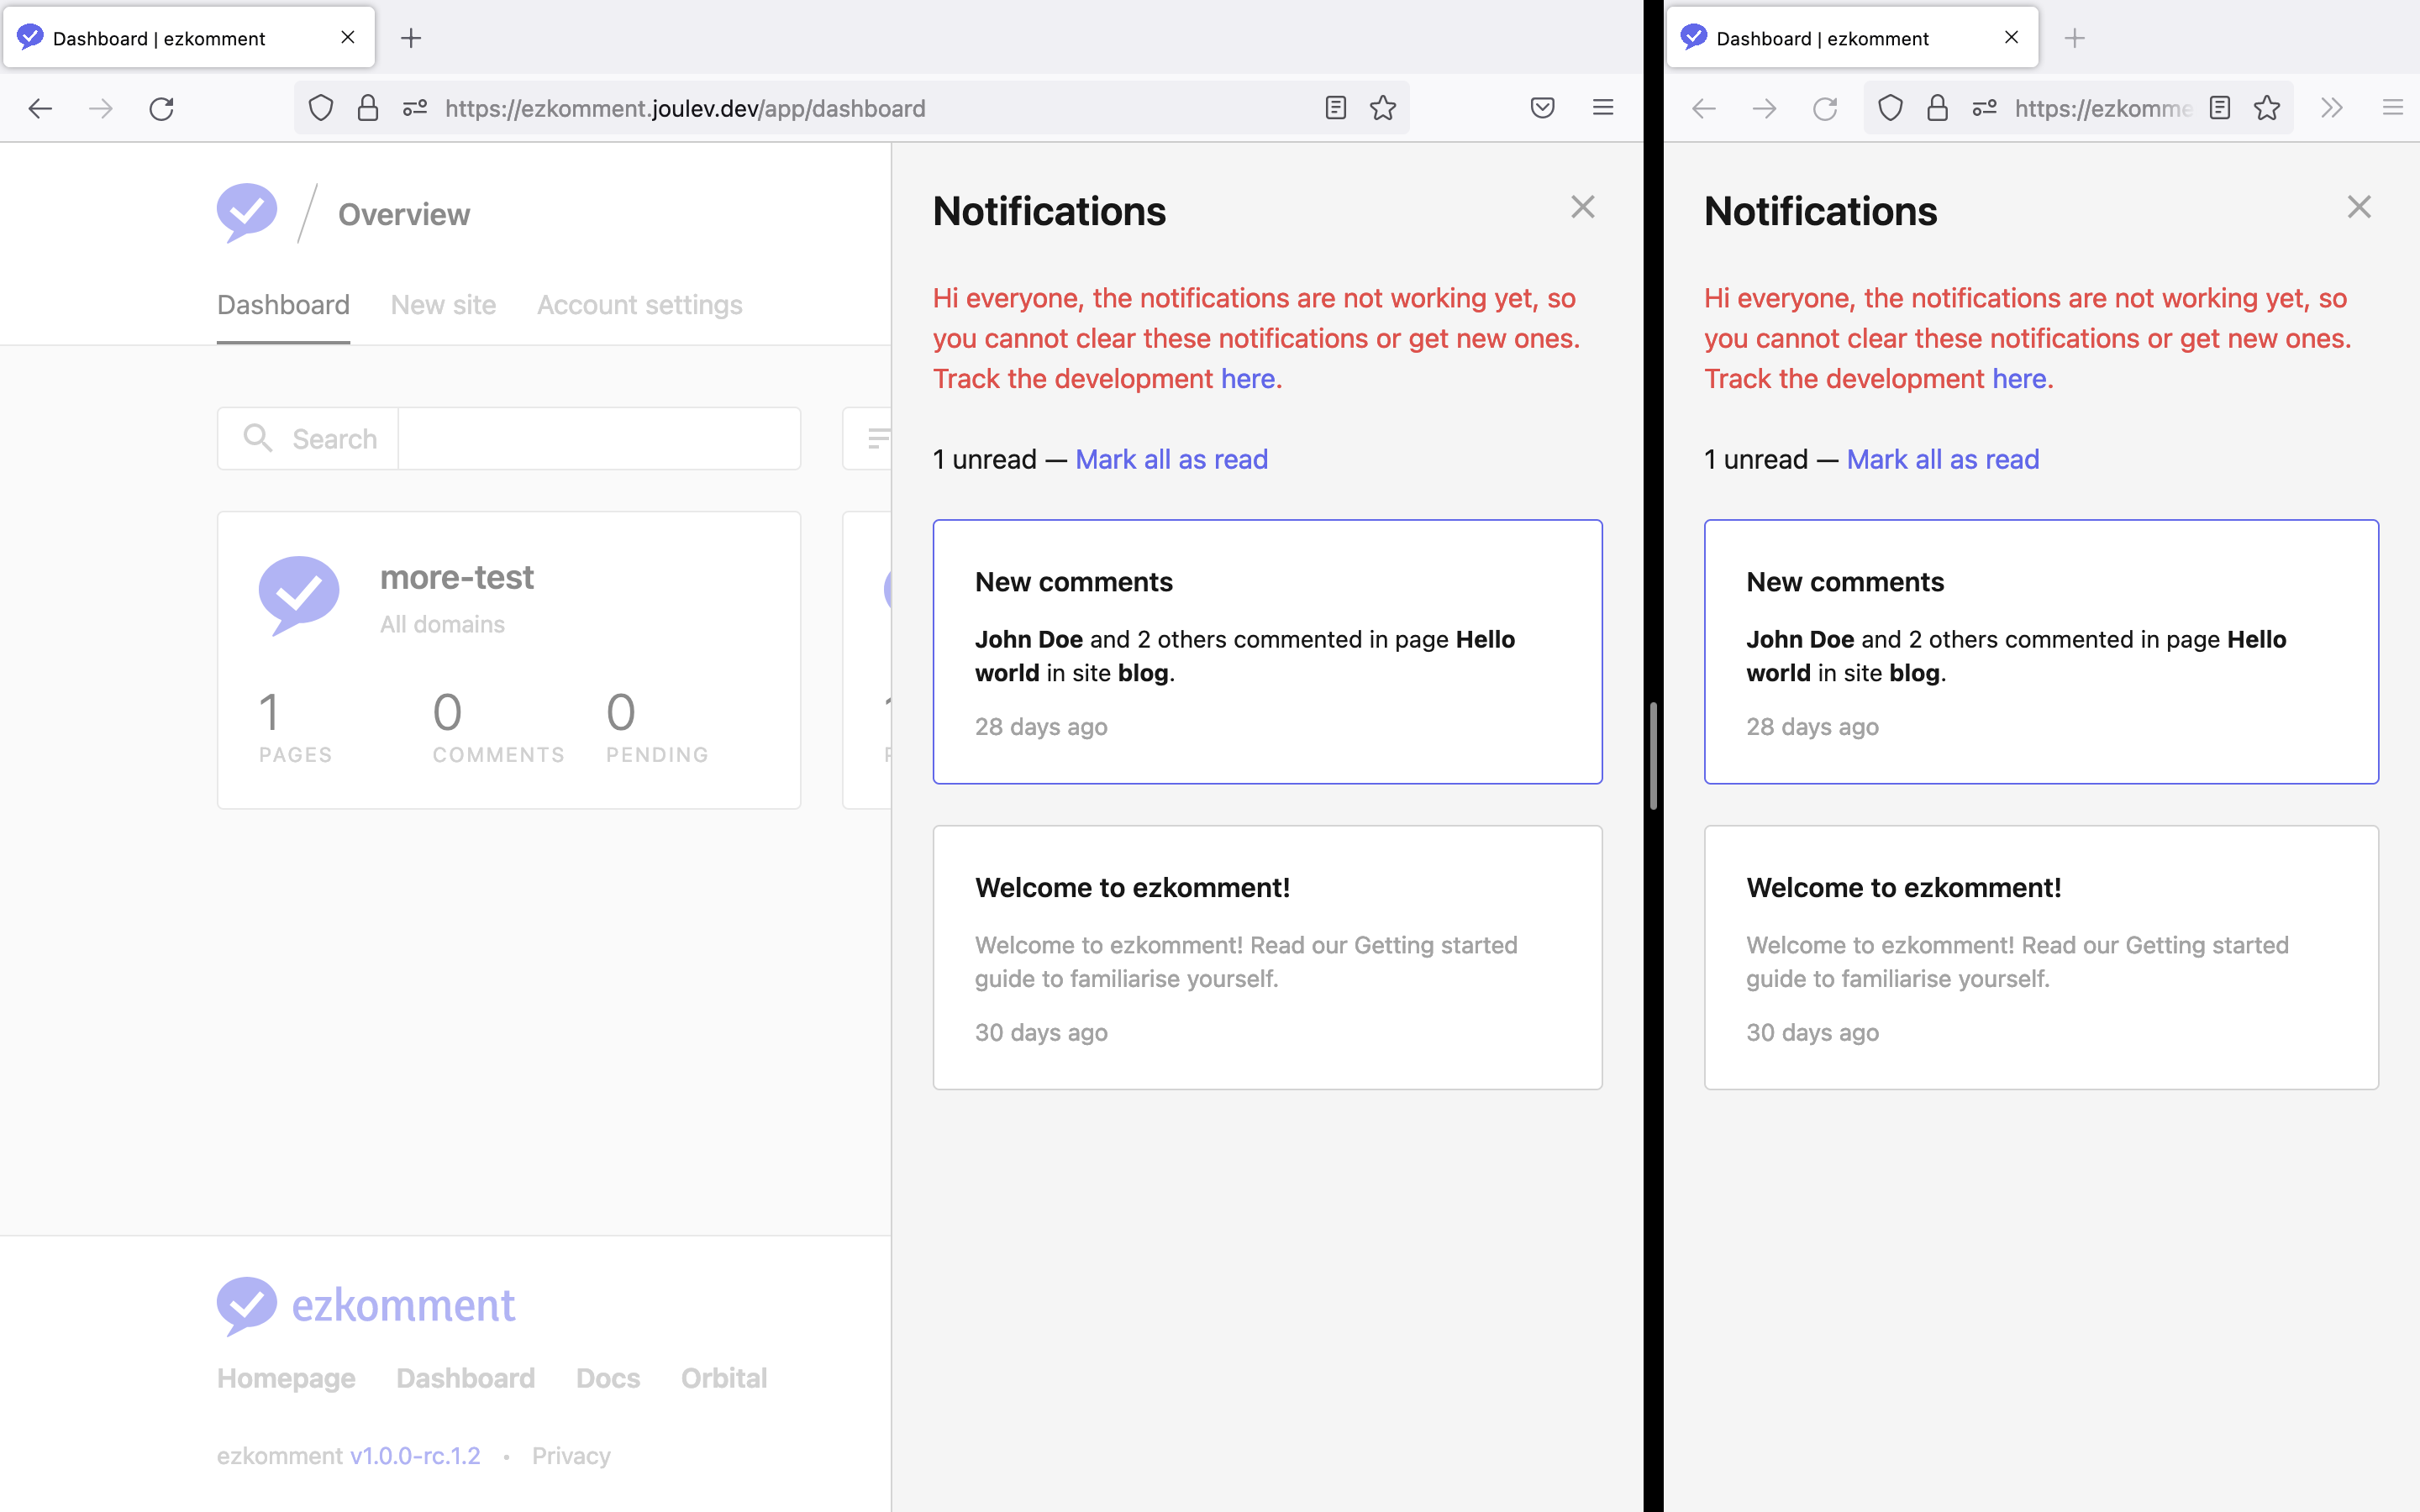 Notifications sidebar
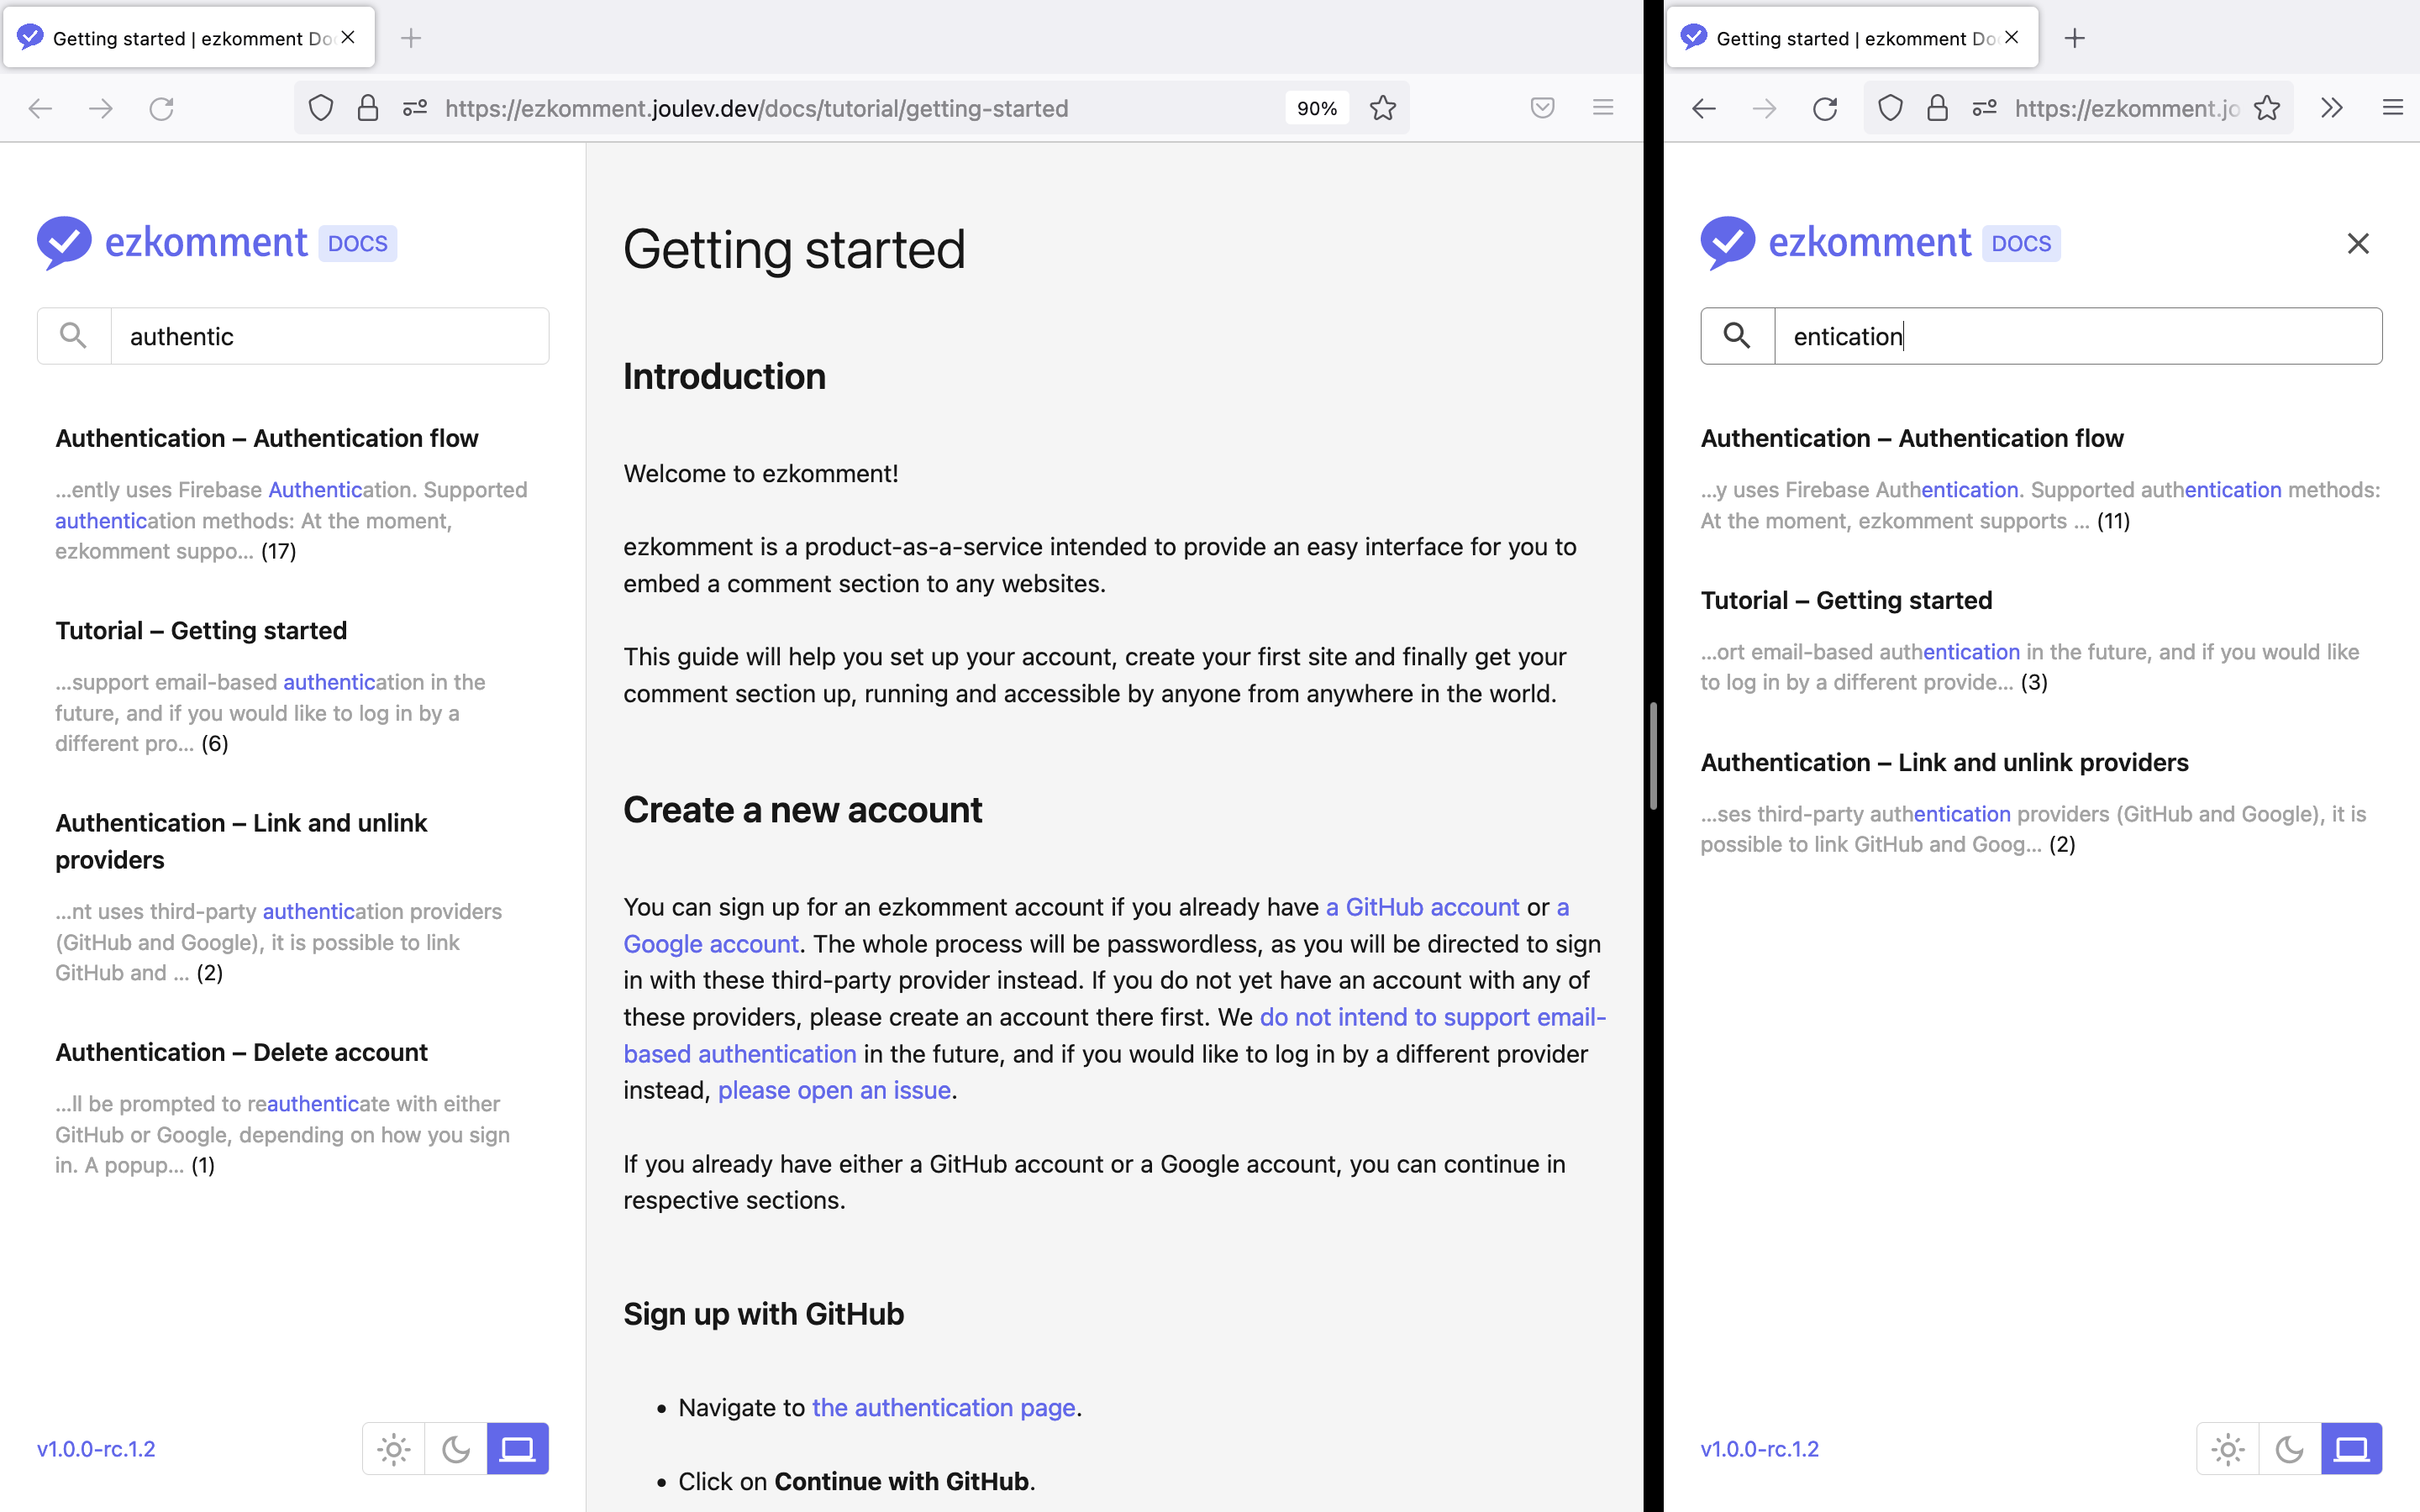 Documentation search functionality
Application Design and Implementation
How the App Works, In a Nutshell
Technology Stack
The front-end is built using Next.js, which is a popular React framework. Especially after version 12 was released last year, it is the most popular React-based framework right now in the medium and is almost as popular as Vue and Angular (source). After trying it out, we found it to be very powerful and have excellent developer experience.
While Next.js is a primarily front-end-based framework, its serverless API routes are well enough for our use case for a back-end, therefore we decided that the entirety of the app would be implemented in Next.js.
Vercel is used for hosting, because you simply cannot say Next.js without Vercel. While the front-end is very performant with image optimisations working exceptionally well, the back-end is also very fast, and we have seen no cold-boot time at all. Moreover, Vercel offers insights into app performance, which helps us a lot in improving the app.
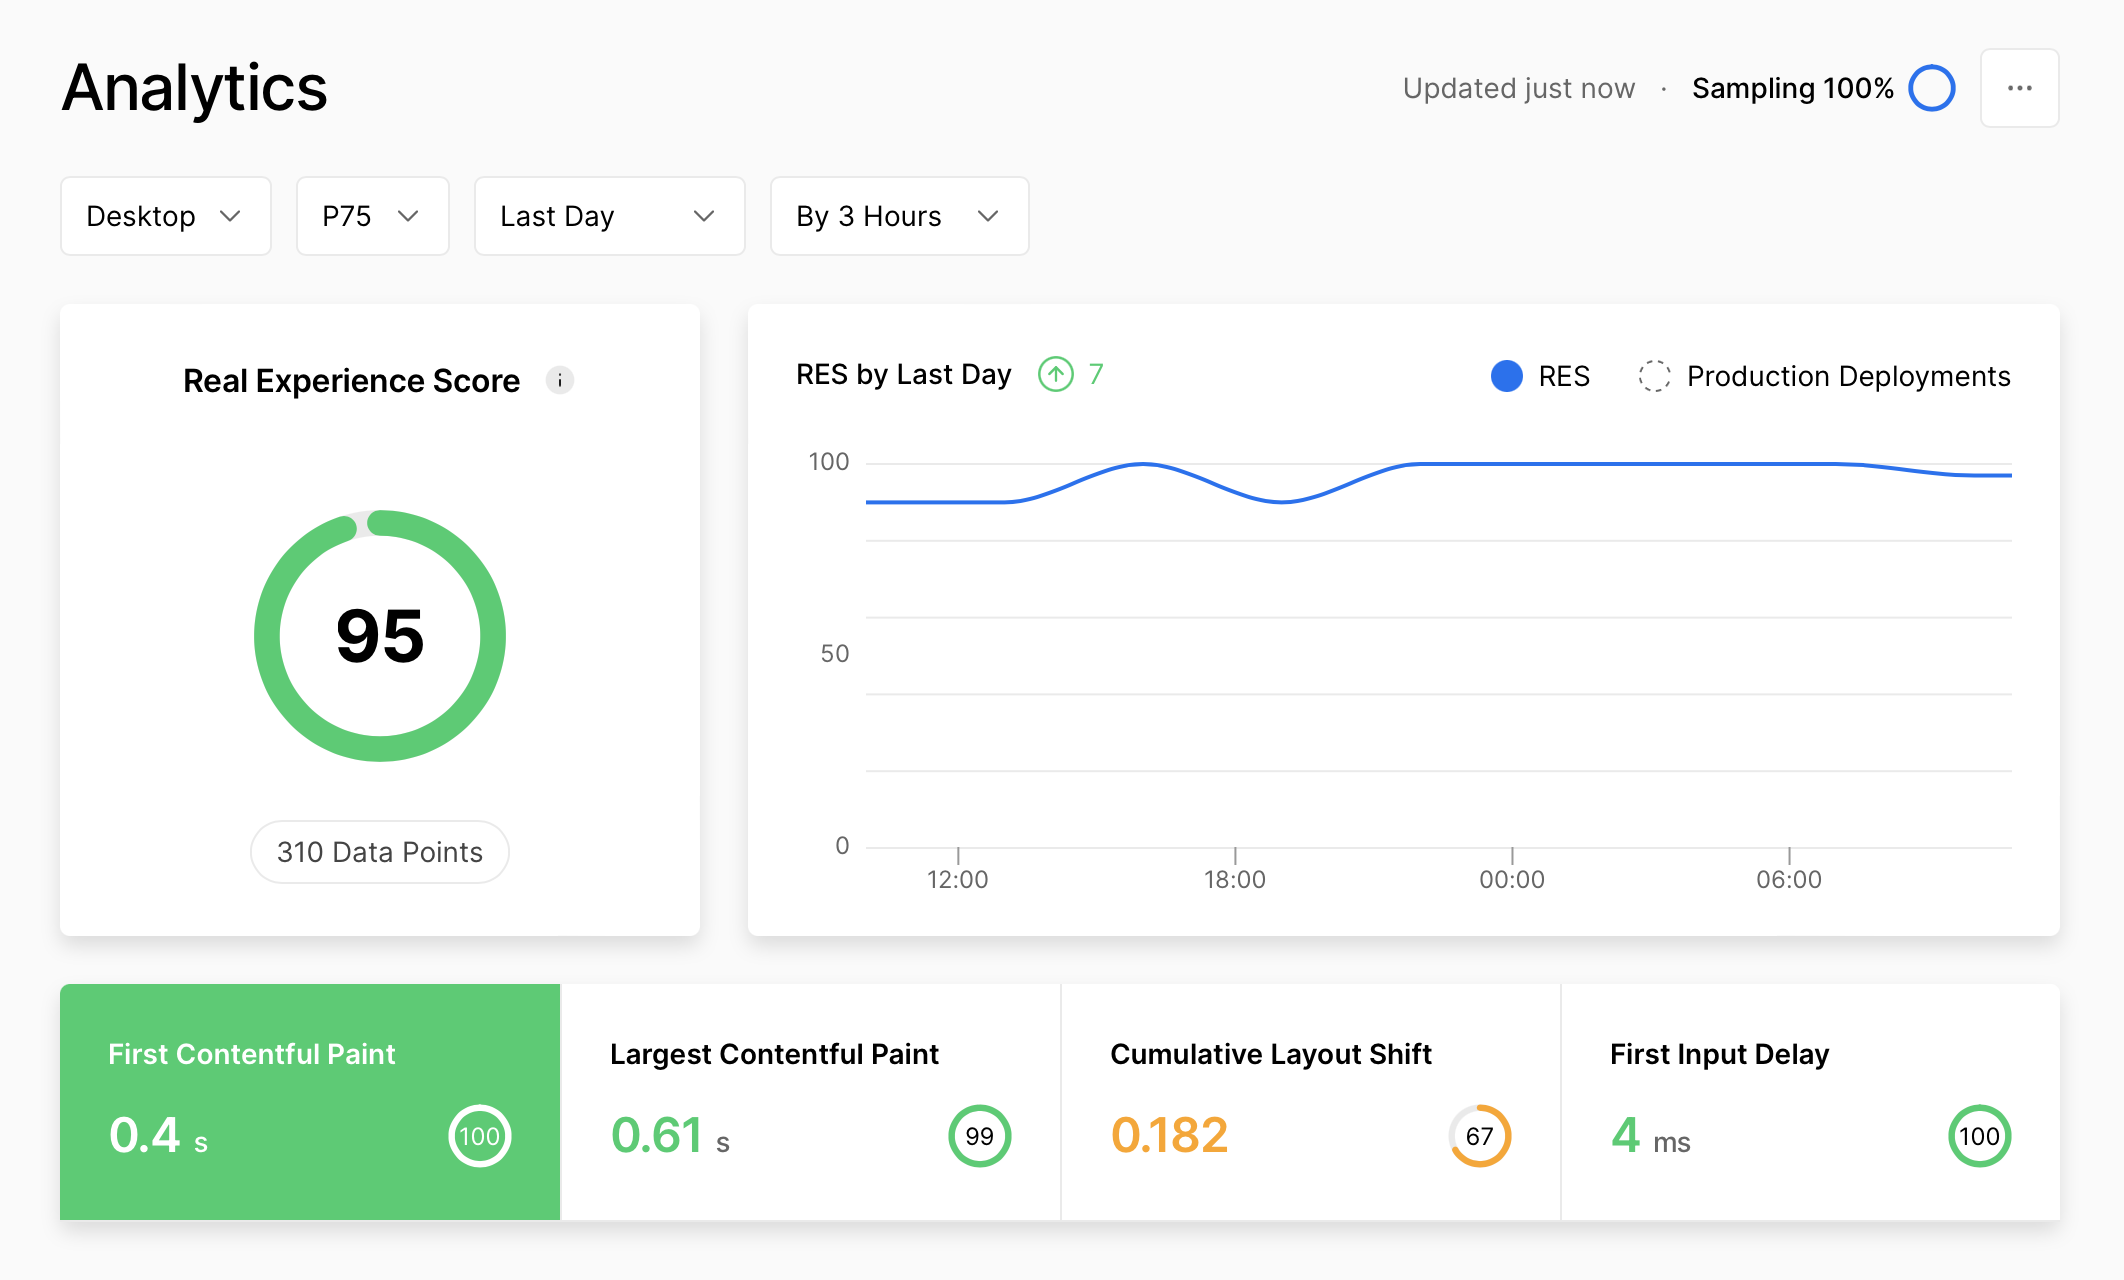 Vercel Analytics page for the ezkomment application, 24 June 2022 at 11:50am (SGT)
We decided to use TypeScript for the entire project for easier management. After using TypeScript, we simply cannot imagine how we would use pure JavaScript for any serious projects ever again. Typescript's type system ensures correctness and provides IntelliSense when using Visual Studio Code, which is absolutely vital for our development speed.
On the back-end side, Firebase Admin SDK is used. It is relatively easy to use, and we think it is a good choice for the project. Naturally, we use Cloud Firestore as the database and Firebase Storage for storage. However, we do not implement the whole authentication system with Firebase Admin, instead, we outsource most of it to the Firebase Client Library to have the best security.
On front-end, we use Tailwind CSS for styling. Compared to the CSS/Sass mess, we prefer the HTML mess. Also, since Tailwind CSS has a very low bundle size on production compared to, say, Bootstrap, it helped make the app very performant (in the analytics screenshot above, you can see FCP and LCP scores are very good).
For data fetching on the client-side, we decided to use SWR instead of the normally used Fetch API or Axios. The first reason is that SWR is like a part of the Vercel family, and integrates very well with Next.js. Another reason is that it has a pretty clever revalidation technique that makes the user experience on the front-end very good.
Communication between Front-end and Back-end
As usual for web applications, the communication between two ends of the app is done by RESTful API routes. The data format is JSON whenever possible.
To authenticate, we retrieve the user's ID token from the Firebase client library. This ID token is sent in the request header to identify the user.
Authentication Providers
We only support authentication with third-party OAuth providers (currently GitHub and Google), since we think password-based authentication is unnecessarily complex and is now a thing of the past. Passwordless "email link" authentication was also in the roadmap, but we eventually decided against supporting it.
Front-end Page Structure
-
/: The landing page for the whole app, with introduction and core features showcase -
/orbital: Everything related to Orbital 2022, including all versions of the poster, video and README -
/docs: The documentation pages for the application -
/auth: The unified page for all authentication-based actions -
/app: The main application pages/app/dashboard: The dashboard, listing all sites/app/new: Adding a new site/app/account: Account settings/app/site/:siteName: The dashboard for site with namesiteName/app/site/:siteName/customise: The page to customise all comment sections for the site/app/site/:siteName/settings: Settings for the site with namesiteName/app/site/:siteName/:pageId: The dashboard for page with IDpageId/app/site/:siteName/:pageId/settings: Settings for the page with IDpageId
Back-end Internal API Endpoint Structure
-
/users/:uid: The endpoint to get, update and delete a user using their IDusers/:uid/photo: The endpoint to upload a user's photo
-
/sites: The endpoint to create a new site-
/sites/:siteId: The endpoint to get, update and delete a site, using its IDsite/:siteId/icon: The endpoint to upload a site's iconsite/:siteId/customisation: The endpoint to handle a site's customisationsite/:siteId/statistic: The endpoint to get statistic about a site during the last 30 days
-
-
/pages: The endpoint to create a new page-
/pages/:pageId: The endpoint to get, update and delete a page, using its ID/pages/:pageId/comments: The endpoint to get all approved comment of a page
-
-
/comments: The endpoint to create a new comment/comments/:commentId: The endpoint to update or delete a comment
-
/embed/:siteId/:pageId: The endpoint to generate HTML for embeded comment sections
Application Structure Diagram
The following diagram can be used to see how everything in this application integrates together.
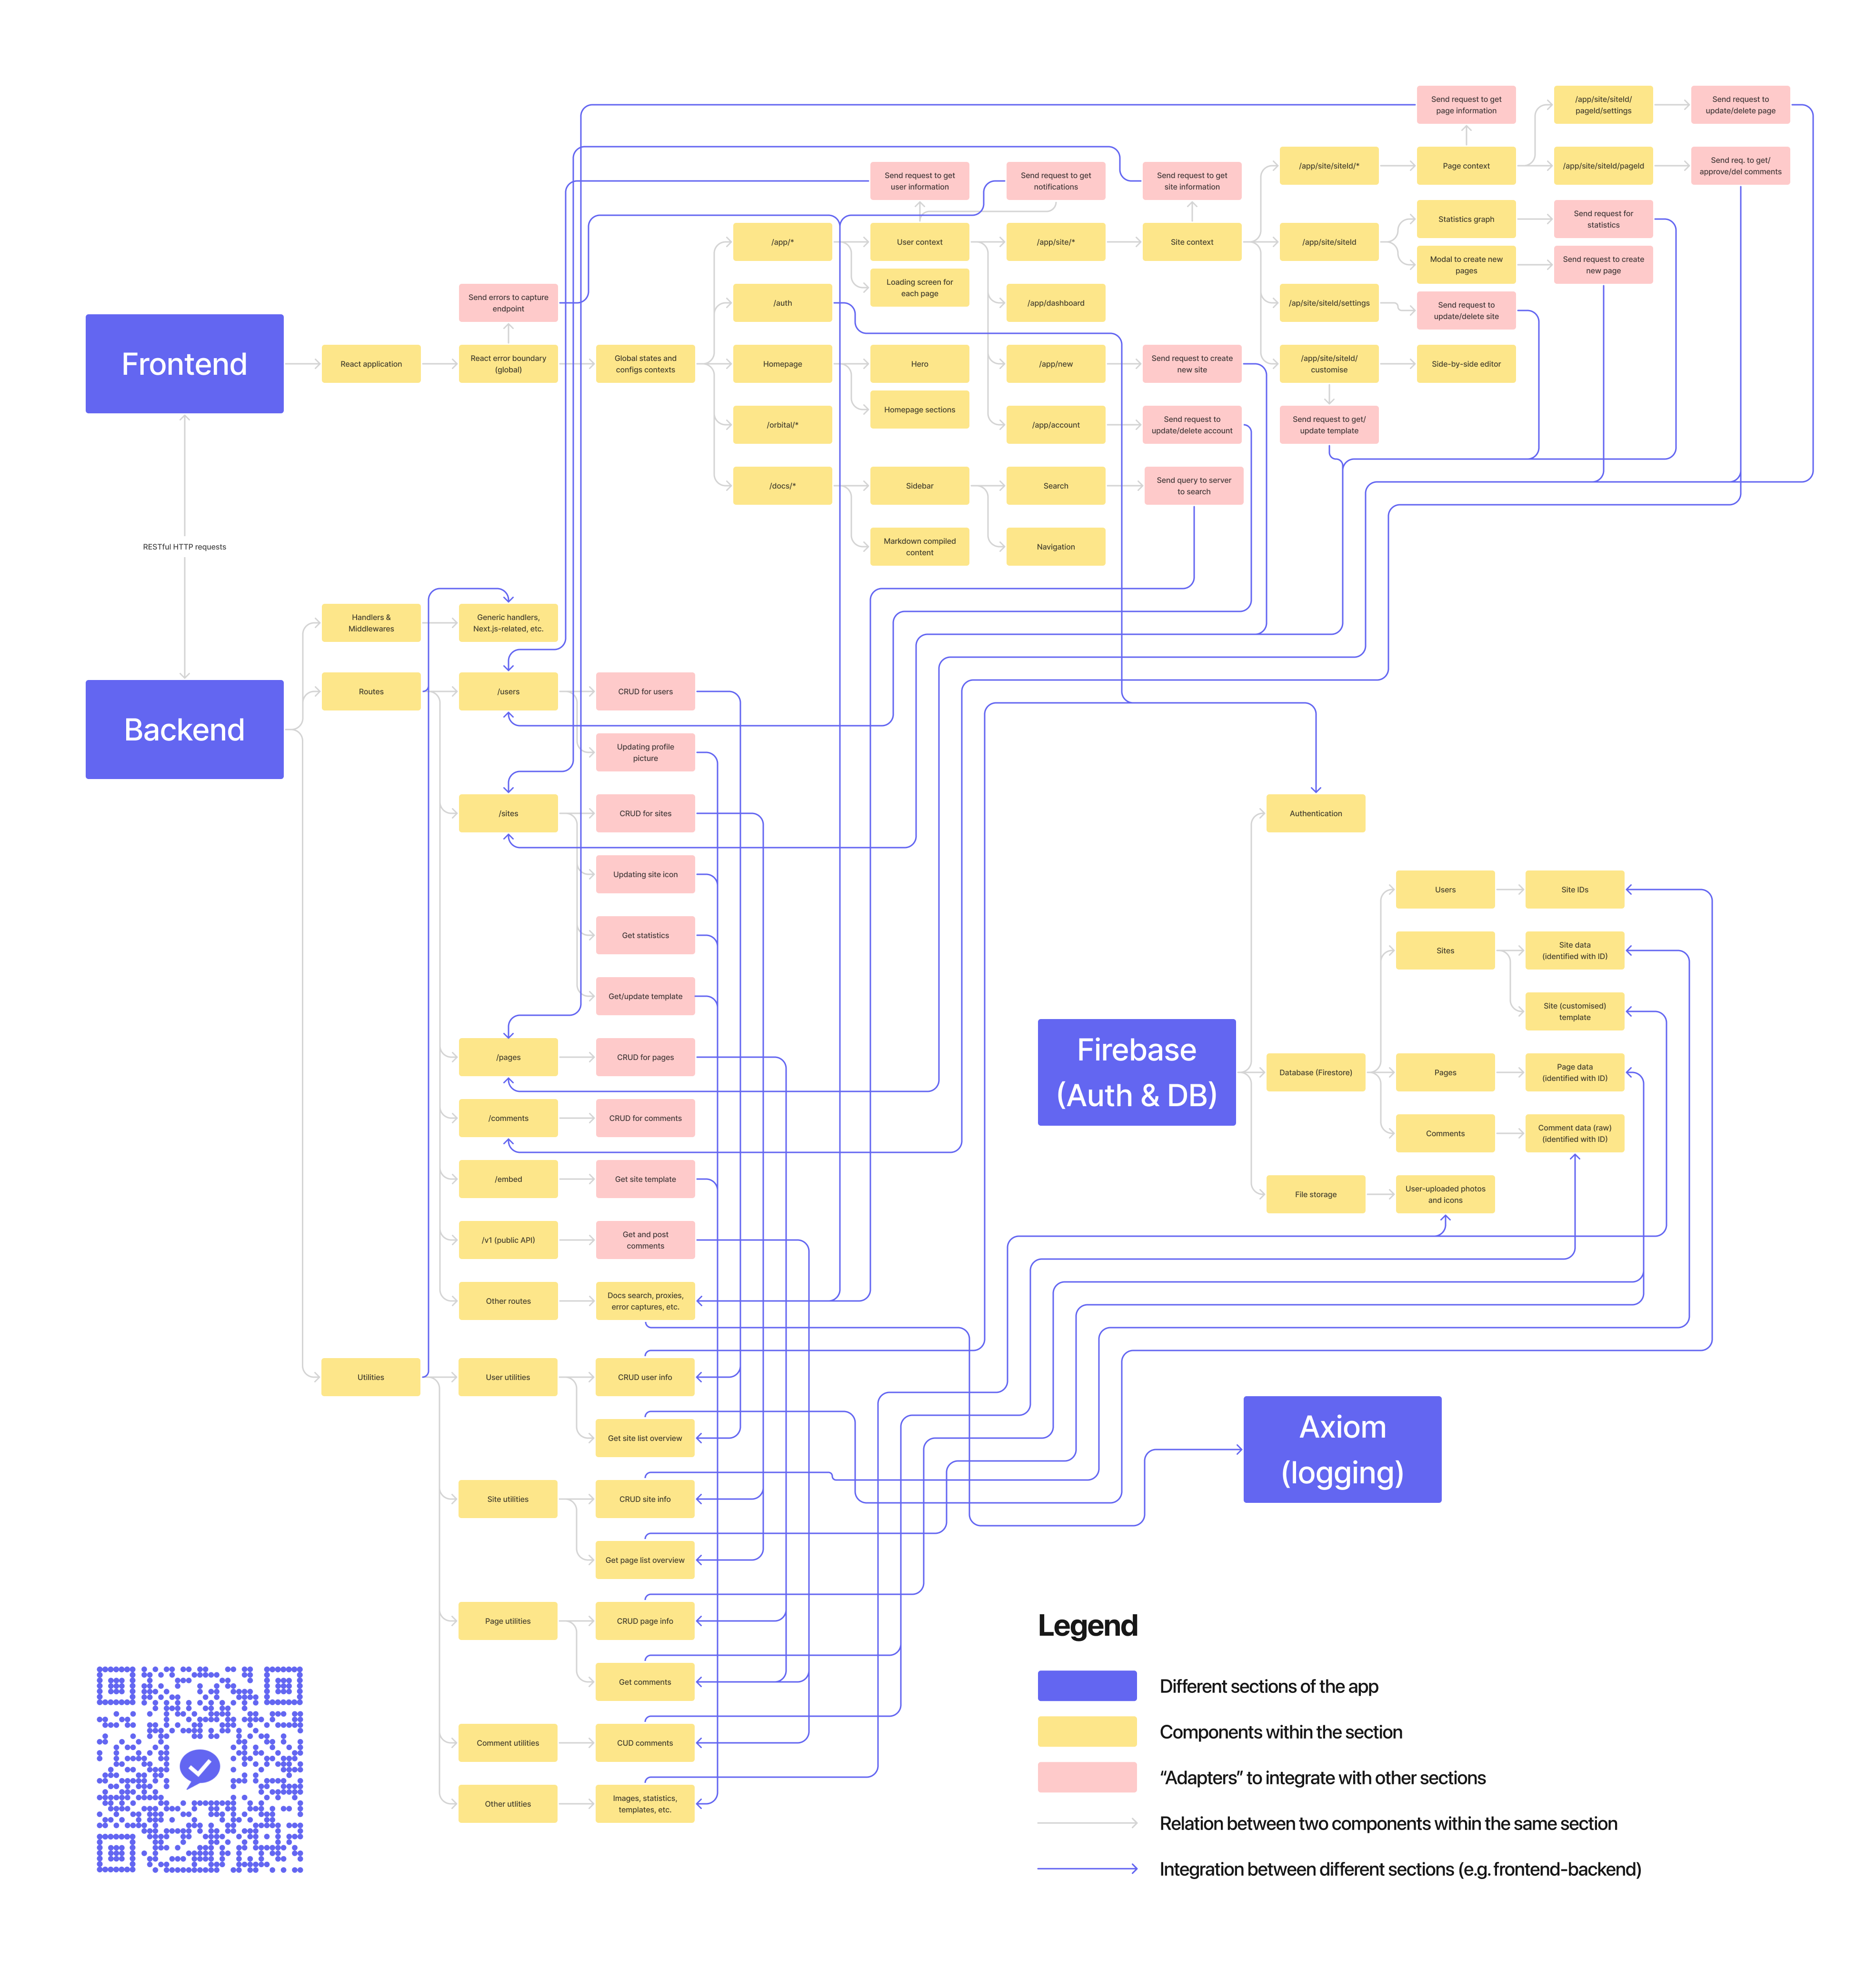 Application structure
It is a very big file and most likely is too big to be readable without zooming in. You can view the image file in full (3940 × 4137), the PDF file (2.81 MB) or the Figma prototype from which the image is exported.
It consists of four main sections: the front-end, the back-end, integration with Firebase and error logging with Axiom. Below there are some more details about the two main sections, the front-end and the back-end.
Front-end
In the front-end, other than the obvious page components and other utilities components (labelled yellow below) required for each page, we make use of several React contexts (labelled green below) for state management. These contexts handles data fetching, hence making it no longer necessary to fetch data on every route change, or rerender everything when the user navigates to a different page. That improves not only performance but user experience as well.
We also make use of the React error boundary to handle errors. It helps us log all client-side errors that we forget to catch or do not know about.
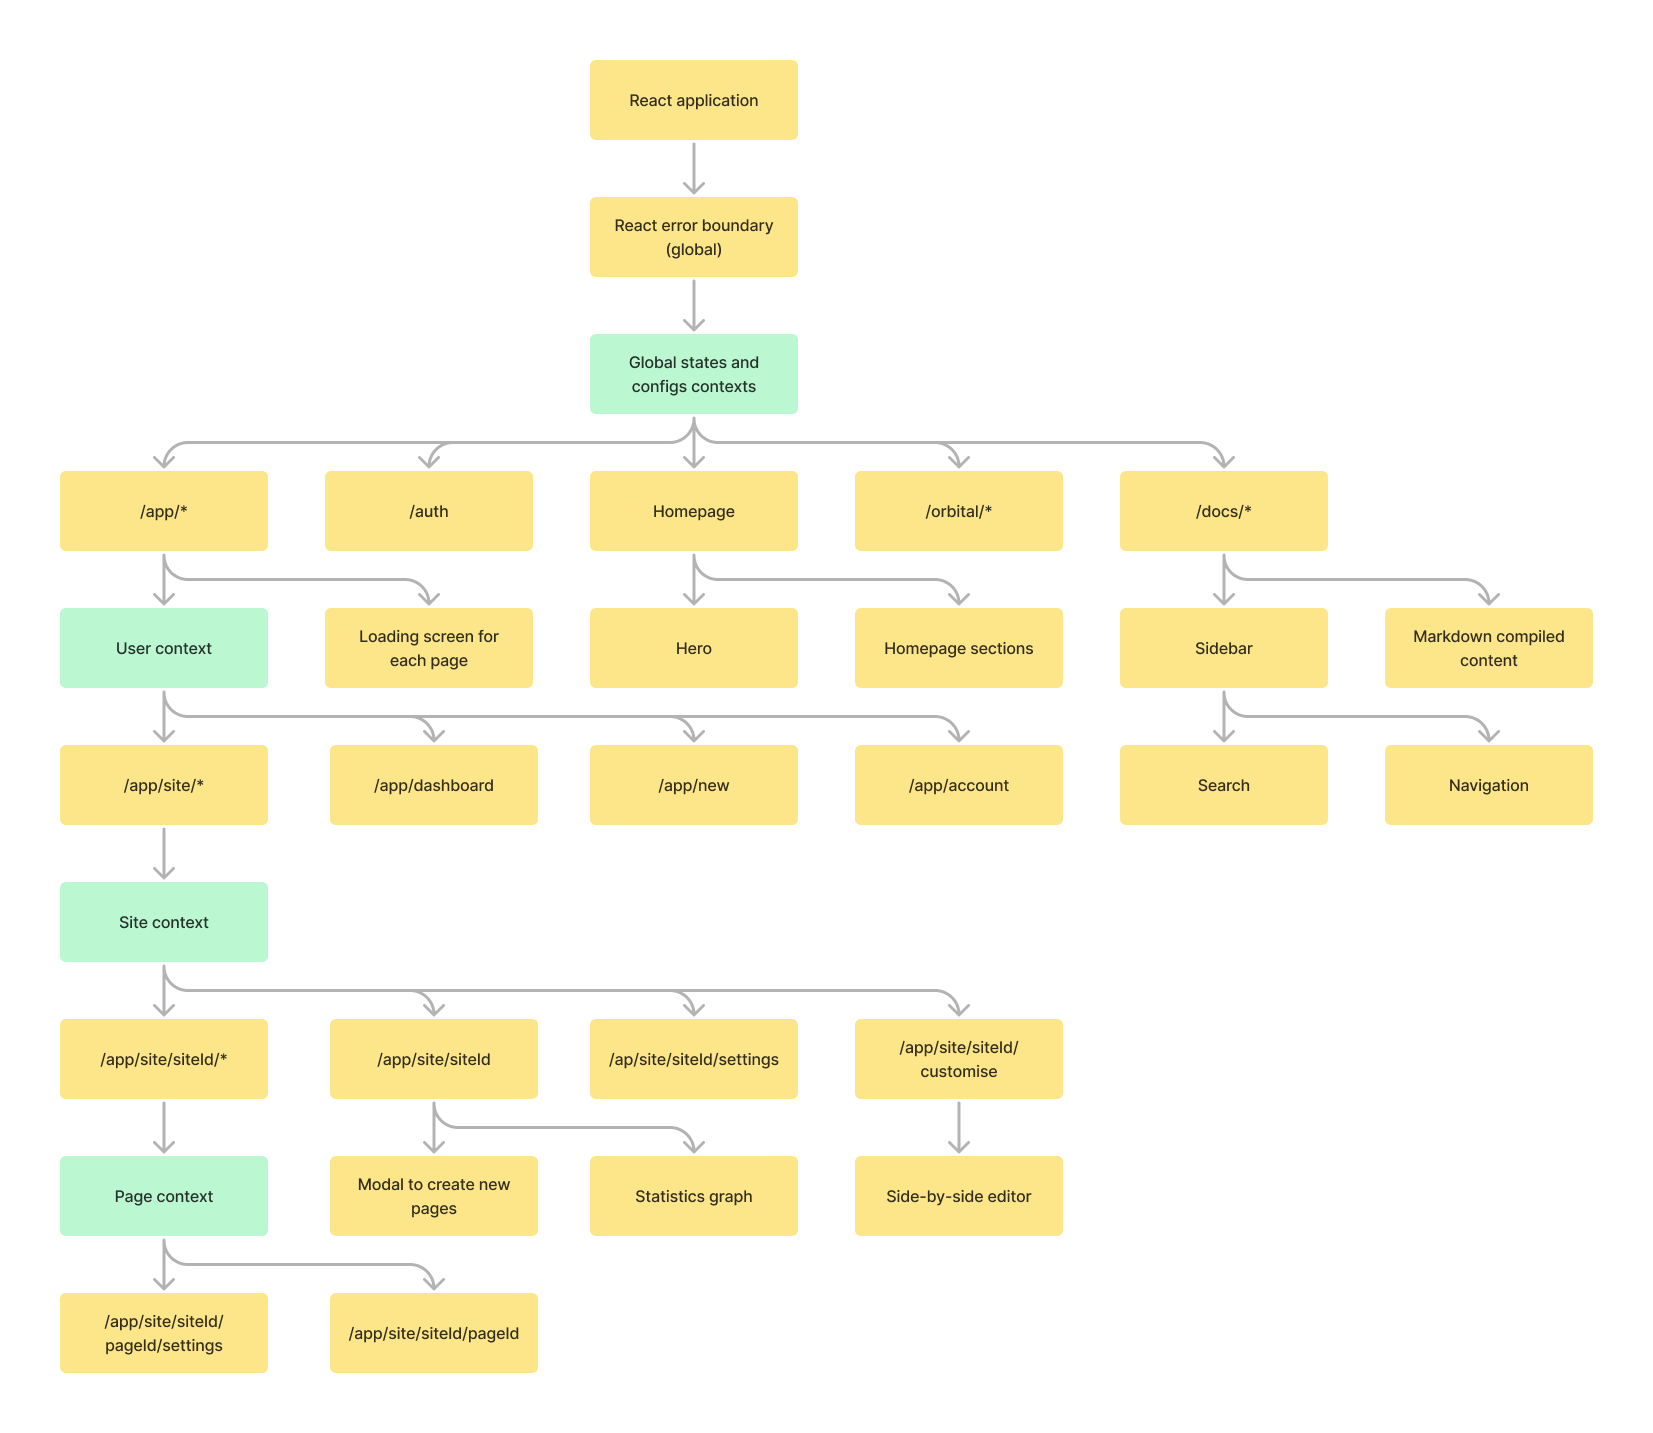 Front-end application structure
Back-end
In the back-end, we separate the "business logic" to individual utility functions (on the right below), grouped by their scope. API routes (on the left) simply call these functions instead of maintain any logic, which makes it easier to maintain and organise the whole application.
The purple arrows in the middle indicates how these routes and utilities interact together.
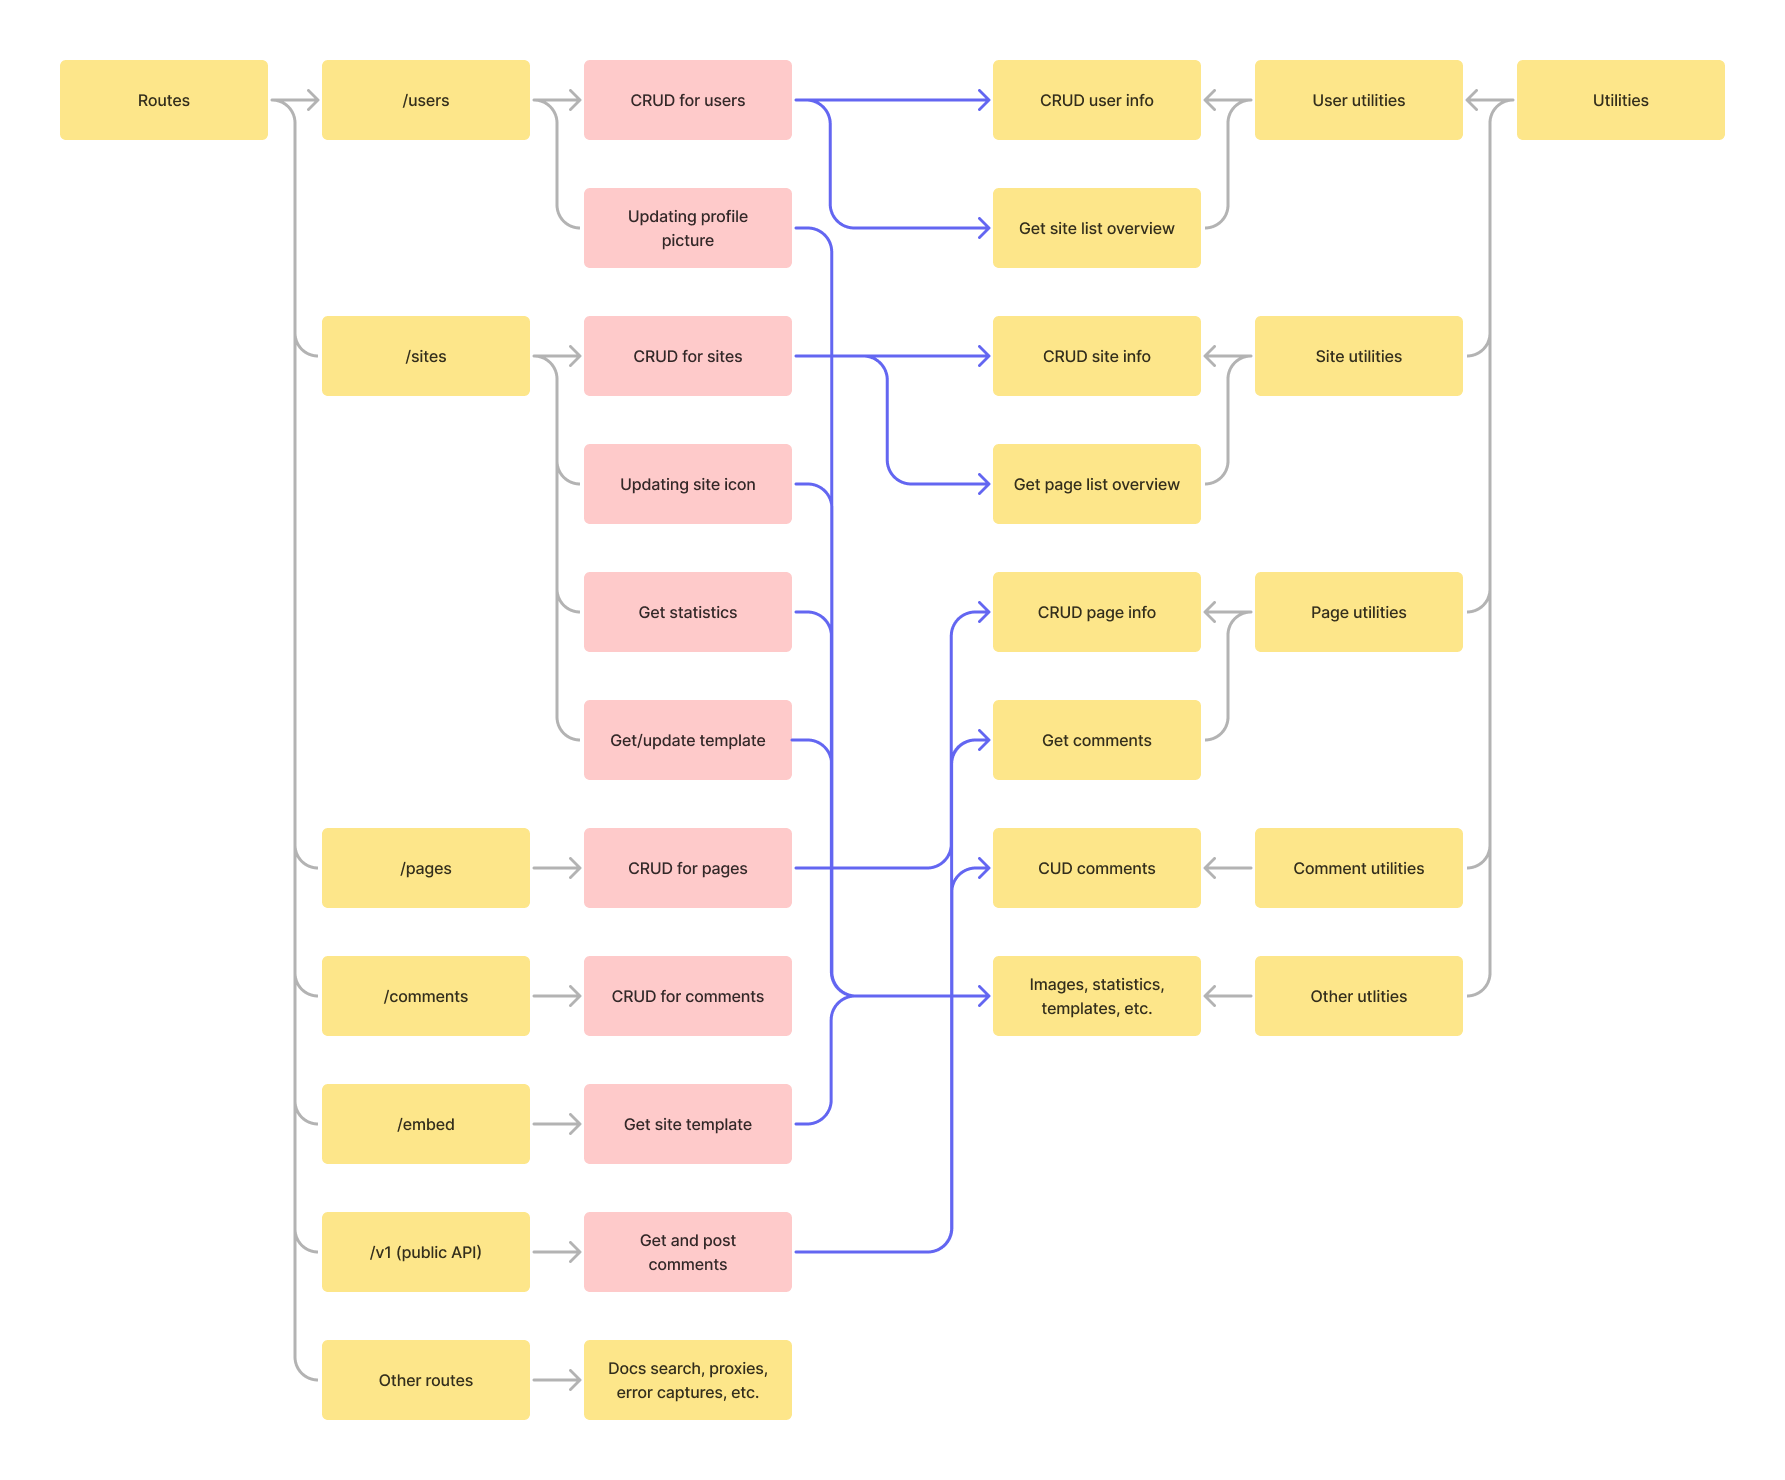 Back-end application structure
Activity Diagram of How the Comment Section Works
Rendering the Comment Section
The ezkomment user is given a URL that looks like this
https://ezkomment.joulev.dev/embed/:siteId/:pageIdWhen he embeds it to his webpage, this is what happens when the webpage is loaded:
-
The browser sends a request to
/embed/:siteId/:pageId(for conciseness we will be removing the domain here) -
Under the hood, ezkomment proxies this URL to
/api/embed/:siteId/:pageId, since it is impossible to not use React anywhere other than/apiin Next.js. -
The app then checks the
siteIdand thepageId; if it is not available or invalid, an error will be returned. Technically we only need thepageIdto get all the data we need, however we validate thesiteIdtoo for security reasons – the URL is more randomised, that is all. -
If everything is valid and ready to go, the site template is fetched from the database.
-
We then add a JavaScript snippet to the template to handle client-side data fetching, see more
-
Everything is then sent back to the browser, which will render the HTML.
-
The JavaScript snippet will then fetch data again by calling internal REST endpoints. The comments are pulled from the database, and the approved ones will be compiled and sent back to the browser for it to be rendered.
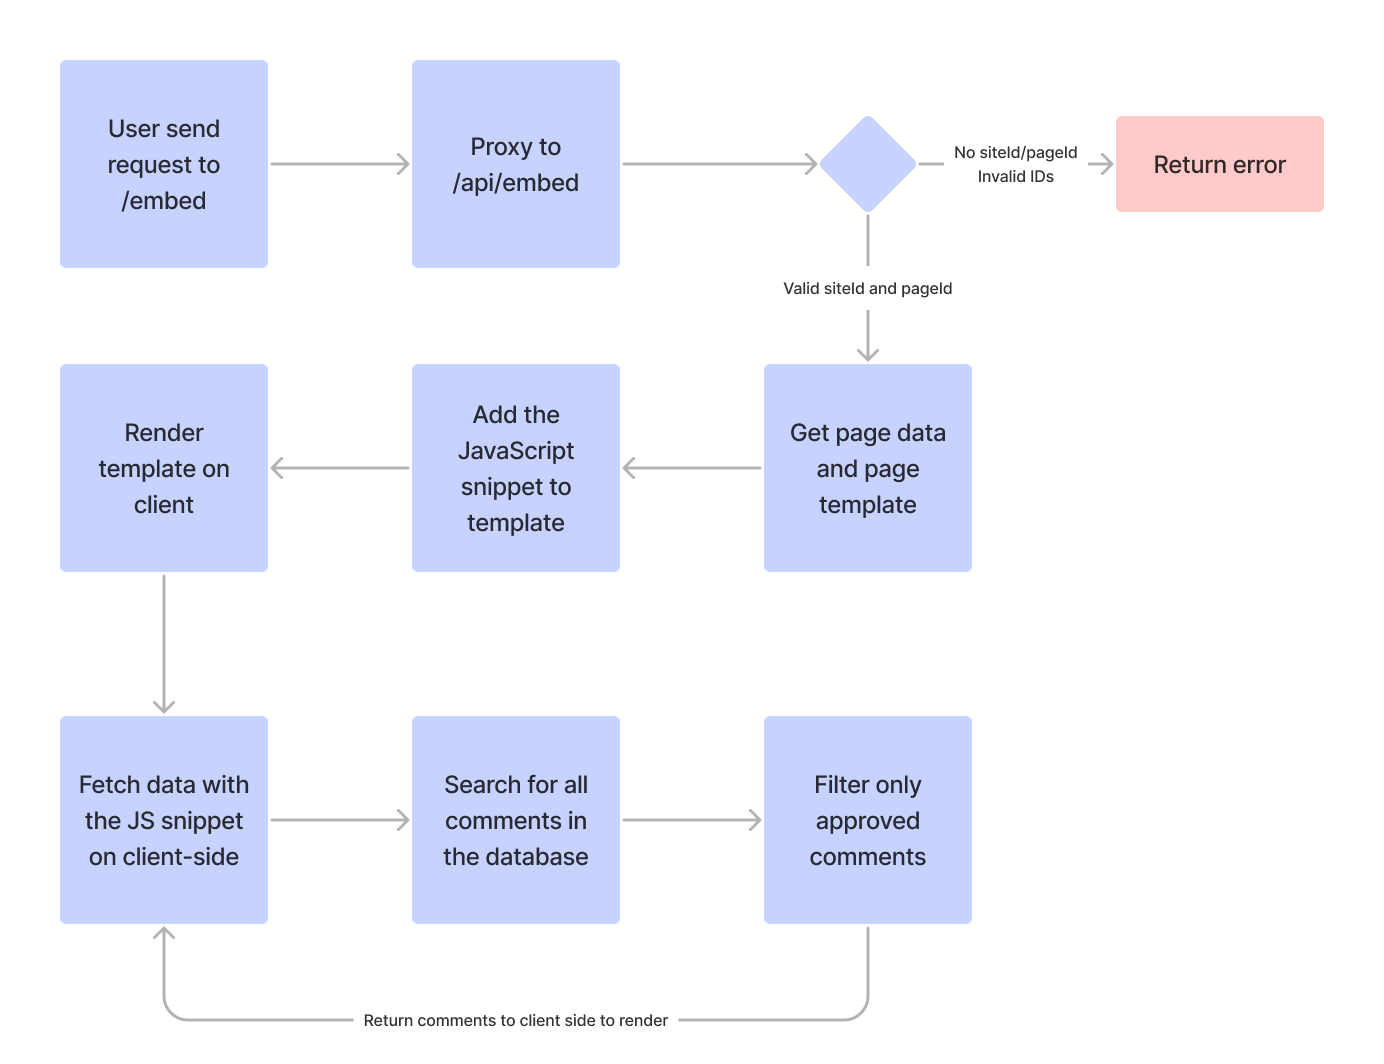 How the comment section is rendered, in a nutshell
When a New Comment Arrives
-
A new comment is posted on the form. Yay!
-
The form then submits the comment to another internal REST endpoint.
-
On the server, the auto-approve configuration of the page is checked. If auto-approve is enabled, the comment is automatically approved, otherwise it has a "pending" state.
-
The set of all approved comments is then sent back as response for the browser to rerender the comment section (with updated data).
-
When the notification (in progress) is completed, the ezkomment user will be notified of a new comment.
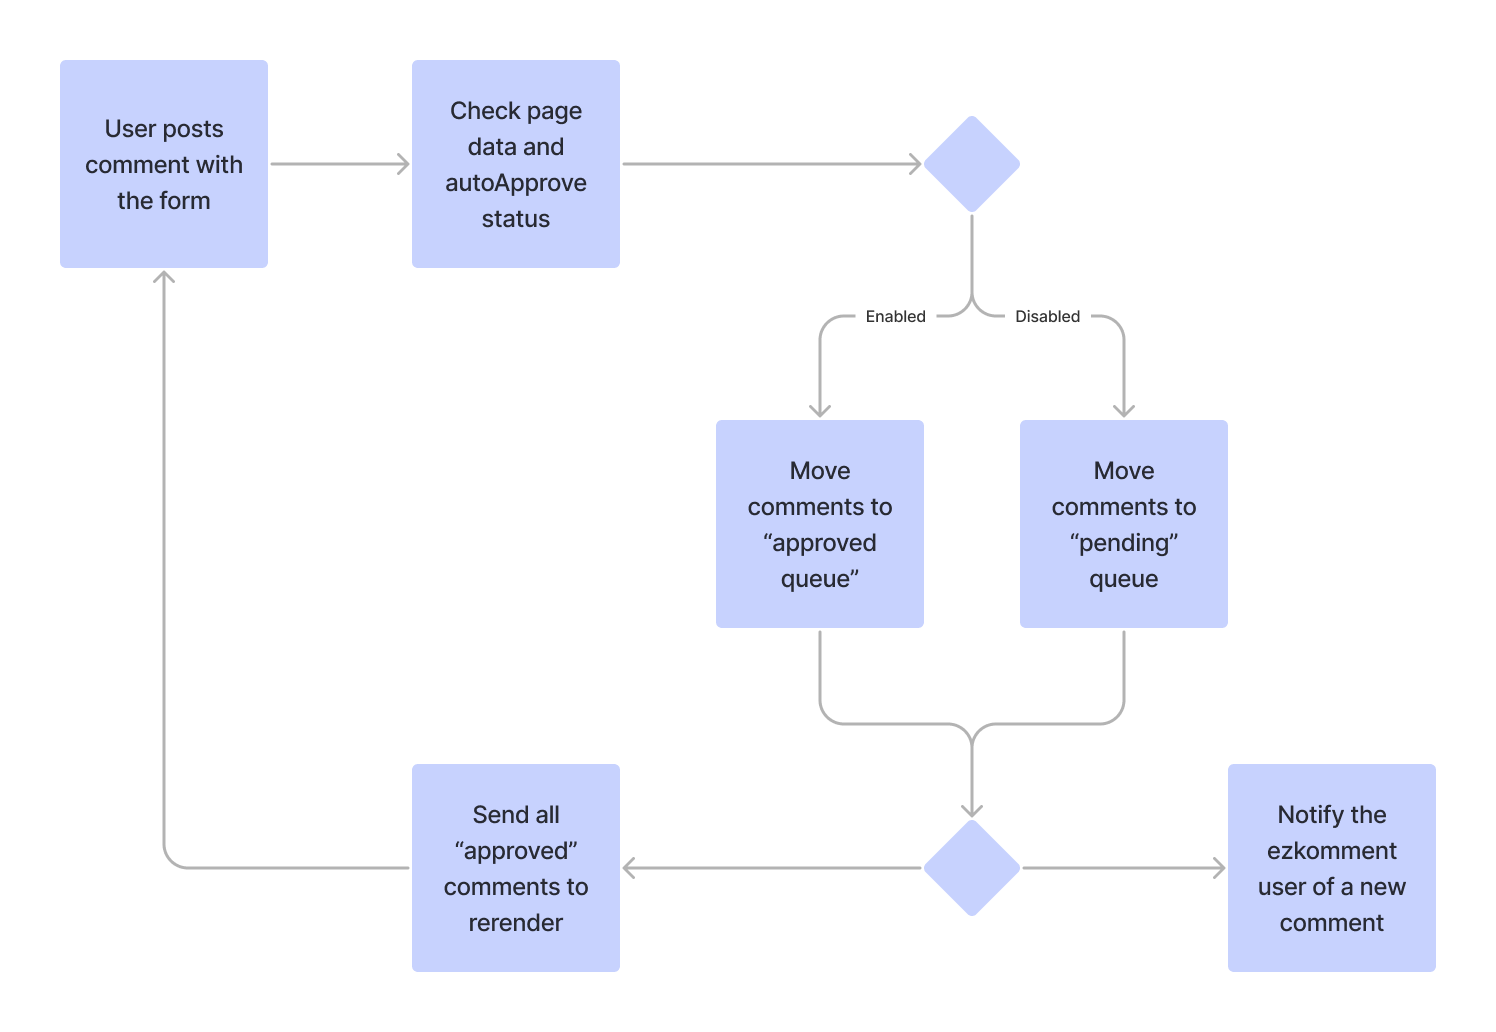 What happens when a new comment is posted, in a nutshell
User Interface Design
The overall design is heavily inspired by Vercel. @joulev is very impressed by the UI design of the Vercel website, and decided to implement that himself. Of course, dark mode is fully supported.
 ezkomment in dark mode
The logo was drawn with Figma. SVG versions can be found in the repository.
We decided to use the default Tailwind CSS colour scheme, since it is sufficient for our need. indigo variant is the primary colour, with indigo-500 (#6366f1) being the main colour and features in the logo. The background/foreground colours are based on the neutral scheme. Other accent colours are red (for danger actions), emerald (for success status), amber (for warnings) and sky (for information banners).
We also use the default Tailwind CSS spacing scale, and pick all spacing entries whose values are divisible by 3. Hence, most spaces in the application are a multiplier of 0.75rem.
User Experience
We take a lot of effort to improve the user experience on this site.
We do not have an existing "user base" to ask for opinions, like how UX designers typically do. A/B Testing and similar approaches are also out of the question for this project. However, Dung is fairly critical of the user experience of every app he has ever used, hence he criticises this app to the best of his abilities, then improves the app based on that "self-feedback".
We also asked for feedback from Zhu Hanming, the UI/UX workshop tutor, and improved the app accordingly.
As expected, Firebase is much slower compared to a self-hosted system, so the authentication section is relatively slow compared to a typical company website and we cannot really do anything against it. However, for the sections where we can improve, we have pretty much done everything we can.
Some steps we have taken:
Everything Is Static
All pages are statically generated and cached to the CDN around the world. Yes, including protected pages (although the generated pages only have loading screens and no sensitive information). Not only does this massively improve load time, Next.js's prefetch strategy makes the router super fast too, and navigating between pages feels instant.
Everything Is Responsive
Needless to say, responsive design is absolutely crucial for a modern web application. We take that seriously and always test our application on all viewports, from super small iPhone SE's to ultra-wide screen sizes.
Strategies for Fetching and Storing Data
The back-end is designed in such a way that it is possible to only fetch the data that the front-end needs. That optimises the speed of the HTTP connections between the front-end and the back-end.
In the front-end, we use SWR and the React Context API to store the fetched data. This has a lot of advantages:
- The React Context makes it possible to reuse data across different pages, therefore if you navigate from
/app/site/mysiteto/app/site/mysite/settings, there are no loading screens. - SWR's nice revalidation strategy makes the front-end data always up-to-date without the user even knowing.
We try to reduce the loading screens as much as possible (no one wants to see spinners). Right now, you likely only see the loading screen when you are not yet authenticated or when you visit a site/page for the first time. All other data fetching is done in the background.
Handling Router When Changing Site Name
Since the site name is used in the URL
https://ezkomment.joulev.dev/app/site/:siteNamewhenever a user changes the site name in the settings, we need to update the URL. Normally this is not easy, since the fast revalidation by SWR makes the page redirect to a 404 page before the redirect even has a chance to happen. You can solve it by manually updating the URL with window.location, but since it does not use the Next.js router, it is slower and the website feels 1990s again.
Therefore, we had a look at how some popular applications handle this. Vercel changes the URL without even giving the impression that the page has been reloaded, and that is what we aim for. In the end, we use a temporary URL query to handle this (similar to how Vercel does it) and remove that URL query when it is no longer necessary. It works and although you see a loading screen again (since you are visiting the new site again), the overall user experience is enhanced a lot.
Interested readers can see how we implemented it in here, here and here.
Search Engine Optimisations
In pull request #66, we have added the necessary SEO tags to every page that needs them, and also set up a process to
- automatically generate new
og:imageimage URL for new pages based on a common skeleton, at build time, and - easily add SEO tags to new pages, as well as new page types.
Although we have not enabled the site to be crawled for search engines as of now, the tags are now effective when sharing the pages over social media.
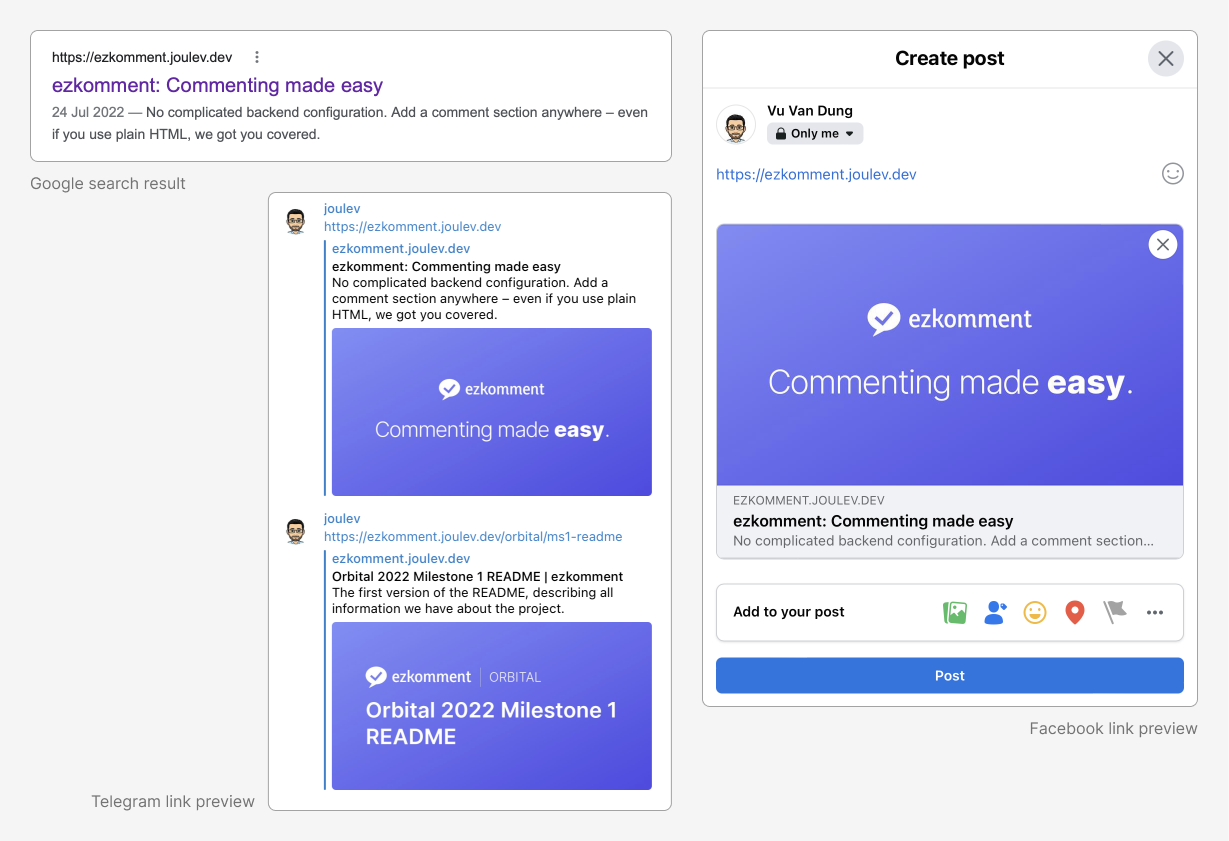 Display of ezkomment on social media (and Google search too!)
Lighthouse Audit
Lighthouse is a popular tool for evaluating the performance of a website. We conduct Lighthouse score checks frequently and also use Vercel analytics to monitor, from there we can make suitable improvements to improve the whole application.
As of right now, the website has a very good score for these metrics. Aside from the photo above of real-time Vercel analytics, the following are the Lighthouse scores as of 22 July 2022 (updated):
- Performance: 100 for desktop, 99 for mobile
- Accessibility: 86
- Best Practices: 100
- SEO: 91
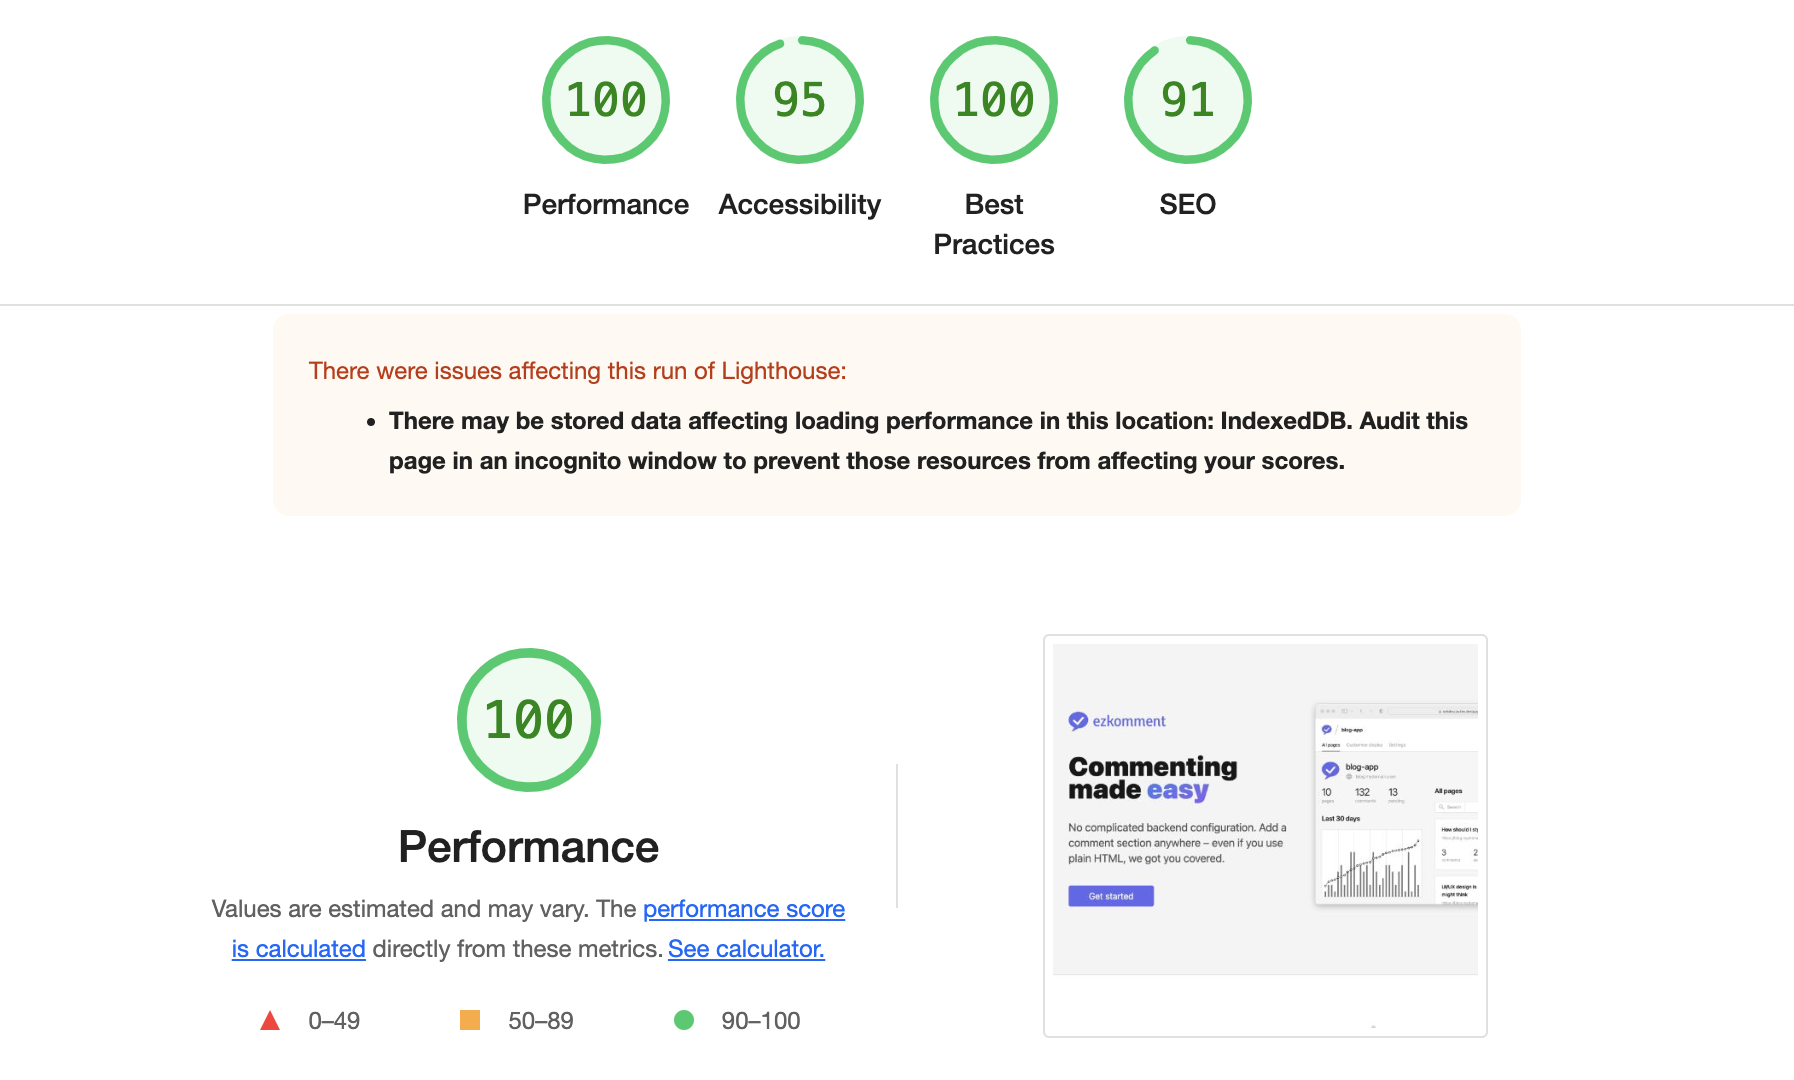 Lighthouse scores for desktop, test done at 2:53pm 24 June 2022 (SGT)
Security
Authentication workflow is mainly done by the Firebase client library. With it being one of the most popular libraries of its type, with about 1.3 million downloads per week, I think it is safe to say this step is as secure as we can possibly get. Especially compared to self-made authentication patterns which may fall to many well-known attacks, such as Cross-Site Request Forgery attacks if cookie-based authentication is used.
For other interactions between the front-end and the back-end, the front-end authenticates by attaching the short-lived user ID token to the request header, and the back-end would decode this token to verify its authenticity. This is secure, and given that the token is short-lived, there are few chances for any potential attackers.
That said, security issues may still show up, a notable example being issue #137. We continue to closely monitor the whole application to ensure such vulnerabilities are addressed quickly.
Software Engineering Practices
Repository Structure
Since the back-end has been decided to be based on Next.js' API routes, we have ditched the monorepo system. Now everything is developed in a single JavaScript package.
Even so, we still organise the repository in such a way that clearly differentiates back-end code and front-end code. This is the current repository structure:
.
├── __tests__             # Jest tests
│   ├── client
│   ├── misc
│   └── server
├── client                # Front-end source code
├── config                # Configuration files (if any)
├── constants             # Some misc constants
├── docs                  # Documentation for users, rendered to /docs
├── misc                  # Used in both front-end and back-end
├── others                # Other non-JS files
├── pages                 # All pages, mandatory by Next.js
│   ├── api               # API endpoints, mandatory name, for back-end
│   ├── ...others         # All other pages are for front-end
├── public                # Static files, mandatory by Next.js
├── server                # Back-end source code
└── types                 # TypeScript typings
Design Principles
We make use of several standard design principles in the codebase, to make it easier to maintain and improve upon. These are the most notable and most actively enforced:
Functional Programming
React has been diverted from an OOP-based approach to more a functional approach for a few years now, so functional programming was a natural choice for the front-end when its development began. Hence, most of the front-end is written in functional programming. Back-end also follows suit, and currently except in a number of cases where it is not possible to not use OOP (such as React error boundary or custom JavaScript error classes), most of the whole codebase follows functional programming.
Immutability
In functional programming, the immutability of variables is a key principle. In fact, even before React functional component was a thing, React still enforced immutability of states. Therefore, the decision of making everything immutable is almost a forced choice.
However, having used it, we found out that it is a very good idea. Since all variables and states are immutable, it is easy to assess the value of any variables at the entirety of its lifetime, making debugging a lot easier. Especially when JavaScript gets object by reference, so when immutability is not enforced, it is easy to make mistakes like this:
let a = { b: 1 };
let c = a;
c.b = 2;
console.log(a.b); // 2 (not 1)
That said, it is not easy to make everything purely immutable, especially for very obscure functions having very specific requirements, such as the function to search for a query inside every documentation page. In such cases (and in such cases only), for now we are writing it in an imperative way, but we will refactor it to be more declarative and functional if we find a way to do so.
Single Responsibility
Although this principle is more generally applicable to OOP, we still make use of it in the codebase, by ensuring all utilities, whether they are functions, classes, components, etc., have one and only one responsibility. They should do exactly what it is supposed to do, and not do more. It helps make maintaining the codebase a lot easier, since when something goes wrong, based on the bug report we can generally pinpoint exactly what utility is buggy and find the bug accordingly. Moreover, it is a lot easier and more straightforward to unit test the codebase, since single responsibility utilities are often pure or near-pure functions that do not require too much mocking to test.
Don't Repeat Yourself (DRY)
In any types of programming, duplicating code is a bad idea, and this application is no exception. Whenever something looks like it is used more than once, it is a requirement that it is moved to a separate utility module.
One notable example is the <A> React component, used to replace the <a> HTML tag. It is a simple component: if the URL is external it adds extra attributes to the <a> tag to open the link in a new tab, otherwise it uses Next.js' router to handle the link. Something simple like that can be written directly in the pages without having to extract to a separate component. However, since it is used in a lot of places, we decided to extract it regardless to an utility component where all the logic related to it is maintained.
One Single Source of Truth
In the front-end, we make use of several contexts to hold the data related to the user, site and page. Whenever we need any data, we query to these contexts instead of making new calls to the database. By that, we ensure that the data throughout the front-end is always consistent, since whenever something is needed there is only one place to look for it – there is only one single source of truth.
Contributions and Feature Branching
The repository is developed mainly on two branches, main and prod.
prod is the production branch. Currently, the main domain https://ezkomment.joulev.dev is deployed from this branch. It is reserved for production-ready code only, and developing directly on this branch is not allowed.
main is the development branch, also the default branch of the repository. The front-end is deployed to https://ezkdev.joulev.dev. This is where we normally push our code or make pull requests, during the development process. Dependabot updates are also configured to be made against this branch.
We also follow the practice of feature branching. Most work is done on a separate branch with a descriptive name, and then a pull request is made to merge the branch to main. A typical workflow is as follows:
- Developer creates a new branch
- Developer commits to it
- Developer opens a pull request
- Developer fixes any merge conflicts
- Now, if the code changed includes the code that another person is in charge (i.e. @joulev for front-end and @VietAnh1010 for back-end), it is necessary to request a code review from that person. Pull requests should only be merged when that person has agreed to.
- In any case, the developer should not merge the pull request immediately, even when code reviews are not required. There should be a cool-down period of a few hours, before the developer self-reviews the whole pull request, makes any further changes and finally merges the pull request.
We use the "Rebase and merge" method as the merging method for all pull requests.
However, feature branching is not strictly enforced. In cases where there are few chances for bugs, separate branch and pull requests are not required. We have seen in repositories where feature branching is strictly enforced, a developer needs a separate branch and pull request just to update the copyright year value in the footer. Such pull requests would typically be merged immediately without reviewing code and waiting for CI pipelines to pass, hence losing the purpose of pull requests. We consider it to be way too redundant and would only spam the notification of all developers watching the repository (similar to how +1 messages are discouraged in GitHub issues).
Therefore, for smaller commits, typically about less than 50 lines changed (excluding machine-generated files such as lock files), feature branching is not needed and the developer can always push directly to main. After all, main is not production-ready and if anything goes wrong, git revert and git reset are available.
The contribution process is described in slightly more detail in the CONTRIBUTING file.
Continuous Integration and Continuous Deployment
Thankfully, Vercel automatically takes care of the deployment process for every commit in the repository. Therefore, the front-end section has always had CD since it was first deployed.
As we decided to mitigate from Express.js to Next.js for back-end implementation, the back-end section also has CD.
CI pipelines are done by GitHub Actions, and currently it involves running ESLint and unit tests for the whole application.
Testing
Automated Testing
Testing is done by Jest whenever possible, due to its simplicity, ease of use, high speed and good developer experience. Test results are then uploaded to Codecov. The tests involve unit tests on all non-trivial components, hooks and modules, as well as integration tests that test how all of them interact with each other.
For example, to test dark mode and everything related to it, we write tests to test the application under various browser conditions (window.matchMedia()) and integration with the browser's local storage for theme persistence.
Another example is the testing of the data fetching process, in which we assert that the parameters passed to SWR always work under various conditions, ranging from authentication state, failure cases, etc. Since SWR by itself is a well-tested library, this guarantees the communication between front-end and back-end is reliable.
Back-end tests also involve running Firebase emulator. It involves unit tests on all server utility functions and integration tests on how they interact with each other and the emulator.
For example, to ensure that statistic is updated correctly whenever a new comment is posted, we write tests for the createComment utility under different configurations (auto-approve is enabled/disabled).
Integration testing help us to detect and fix potential bugs early. For instance, we detected that the subcollections was not deleted correctly when we delete a site, and fixed it by using recursiveDelete instead of simple delete.
Due to the nature of the back-end being a REST API, it is possible to test it with Postman. Hence other than Jest, we also conduct manual tests with Postman.
We do not go into more details on individual tests here, since we consider this document to be long enough already and many readers may not be keen on more technical aspects, especially in a field they may not have much interest in. However, interested readers may be interested in the test results – here is an overview of the test results of commit 8f9b437 (v1.0.0-rc.1.1) (which can also be viewed in more details in the GitHub Actions log):
$ jest --ci --coverage --config=jest.client.config.js
info  - Loaded env from /home/runner/work/ezkomment/ezkomment/.env.test
PASS __tests__/client/lib/docsSearch.test.ts
PASS __tests__/client/hooks/theme.test.tsx
PASS __tests__/client/lib/fetcher.test.ts
PASS __tests__/misc/validate.test.ts
PASS __tests__/client/lib/documentation.test.ts
PASS __tests__/client/lib/getOgImage.test.ts
PASS __tests__/client/components/siteGraph.test.tsx
PASS __tests__/client/components/buttons.test.tsx
PASS __tests__/client/components/navbar.test.tsx
PASS __tests__/client/components/anchor.test.tsx
PASS __tests__/client/layouts/blog.test.tsx
PASS __tests__/client/components/input.test.tsx
PASS __tests__/client/hooks/breakpoint.test.tsx
PASS __tests__/client/components/footer.test.tsx
PASS __tests__/client/lib/nprogress.test.tsx
PASS __tests__/client/components/select.test.tsx
PASS __tests__/client/components/modal.test.tsx
PASS __tests__/client/lib/prism.test.ts
PASS __tests__/client/components/docs.test.tsx
PASS __tests__/client/components/copiableCode.test.tsx
PASS __tests__/client/components/banner.test.tsx
PASS __tests__/client/lib/tests/setupMediaViewport.test.ts

$ jest --ci --coverage --config=jest.server.config.js
info  - Loaded env from /home/runner/work/ezkomment/ezkomment/.env.test
PASS __tests__/server/pages.test.ts (5.951 s)
PASS __tests__/server/comments.test.ts
PASS __tests__/server/sites.test.ts
PASS __tests__/server/customisation.test.ts
PASS __tests__/server/users.test.ts
As of 22 July 2022, the code coverage stands at 96%, which we think is acceptable.
User Testing
We have asked some of our friends to use the application and give us their feedbacks. We also act as our own customisers by using the app to make comments for the official demo.
Thankfully, the majority of the feedback has been positive, and all testers were able to use all features of the application normally. However, there are minor bugs and user experience issues that have been reported. Thanks to these reports, we have been able to find many edge cases in our system and improve it accordingly. Here are the details:
-
On account deletion, the user account is successfully deleted, however after redirecting there is an "unknown error" message showing up (fixed in v1.0.0-rc.1.1).
-
User state is not updated automatically after new auth provider is linked or unlinked, leading to the user interface out of sync with the source of truth (fixed in v1.0.0-rc.1.1).
-
In some cases, auth provider of a user can be overridden unexpectedly (fixed in v1.0.0-rc.1.1).
-
Links in the comment section (default template) and the page dashboard is rendered as simple text instead of highlighted as actual links (fixed in v1.0.0-rc.1.1).
-
(External) links in the comment section should have the
target=_blankattribute to align more with the overall design system we use (fixed in v1.0.0-rc.1.1). -
Some search bars and filter input fields were forgotten and are not implemented (fixed in v1.0.0-rc.1.1).
-
When writing the customised template, the page may become unresponsive if a lot of JavaScript libraries are added to the template (fixed in v1.0.0-rc.2).
-
The customise page has weird scrolling behaviour in full screen mode (fixed in v1.0.0-rc.2).
-
The customise page should have an auto-save mechanism to avoid data loss on accidental tab/window close or page refresh, which may be very frustrating for users (fixed in v1.0.0-rc.2).
-
The
POSTmethod of the REST API fails access control checks (fixed in v1.0.0-rc.2). -
Many links in the app was pointing to
https://google.comas placeholder, but now they should be updated with useful URL (fixed in v1.0.0-rc.2).
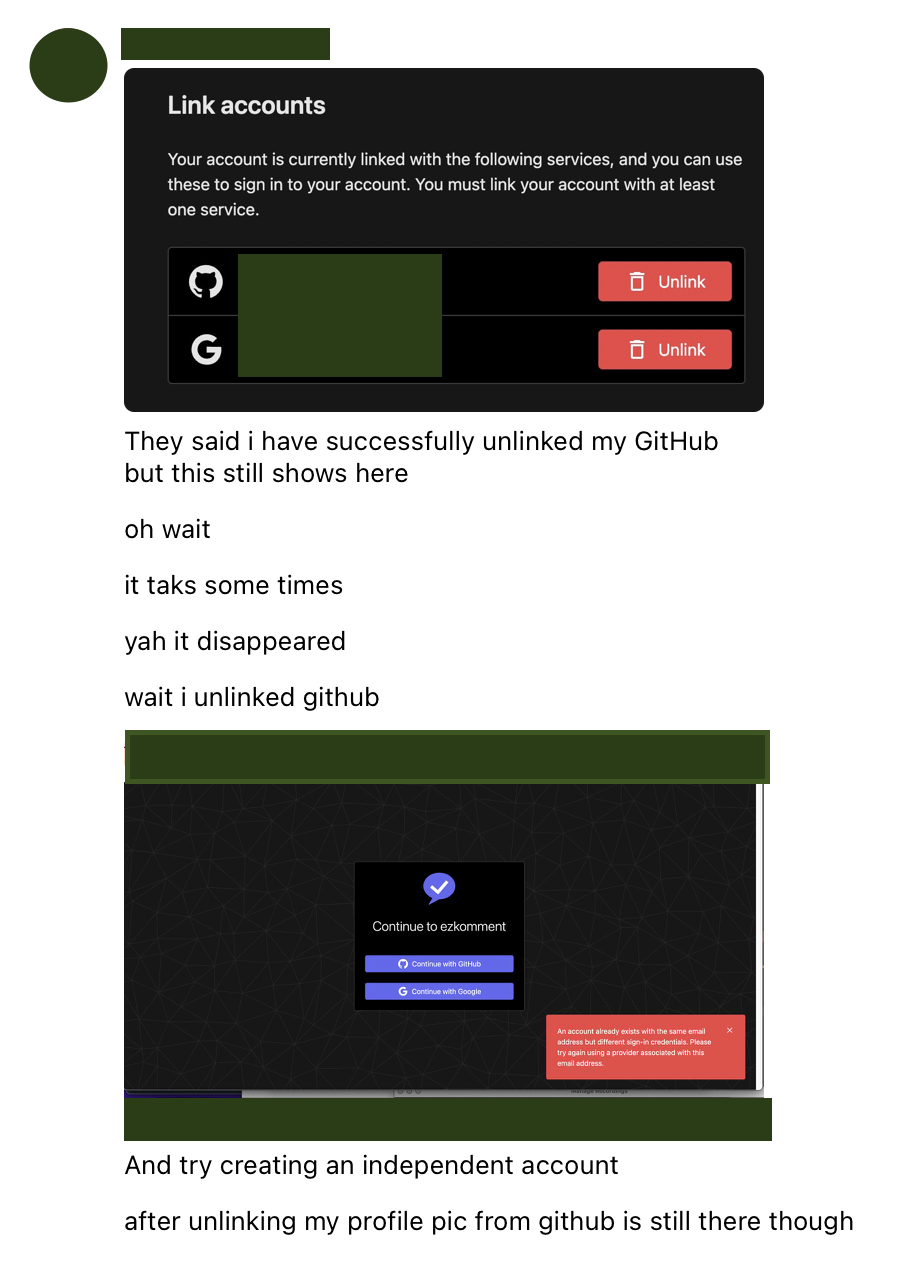 My friend reporting the bug number 2 in the list above (private information is hidden)
Despite the small number of human testers we had, their feedbacks helped us improve the application a lot more than we expected. It also boosts our confidence in the app, as even after being tested aggressively, the main functionalities still work well, which means the app is in good shape.
Project Management
We did not follow agile development process strictly, despite the fact that both of us are quite familiar with it (@joulev even works in a separate project which uses this development strategy with tri-weekly sprints, concurrently with Orbital):
-
It does not make sense for us to have two-person meetings. With direct messaging being the main mean of communication between the two, technically we are in a meeting 24 hours per day. We can communicate at any time of the day, without having to worry about timetable issues, and important details are always stored in the chat history. Especially as we stayed 300km away from each other during the summer, in-person meetings were not possible. Therefore, we decided to scrape all planned meetings and have all communication happen publicly on GitHub and privately on direct messaging instead.
You can see this only applies to two-person meetings. For projects with more than three people, of course meetings would be preferrable to direct messaging, which is suitable to more casual settings.
-
With meetings removed, pure agile's standup meetings do not apply. However, since we only use one remote repository (different branches on the same repository instead of different forks of a main repository), everything we do is already visible to us (and everyone) – I am always updated with all of my teammate's latest activities in terms of
gitcommits, and always know the current project progress. Therefore, standup meetings also turn out to be unnecessary.
Other than the difference mentioned above, we more or less follow the same agile development process.
To manage this project, we also make use of the new GitHub project. Issues and pull requests are assigned a "status" of either "To do", "In progress" and "Done" (we consider further classifications to be unnecessary, for example "Staging" is already handled by a main branch against the production prod branch). Most issues and pull requests are also assigned to at least one of the two developers, to make it clear that who is in charge of what.
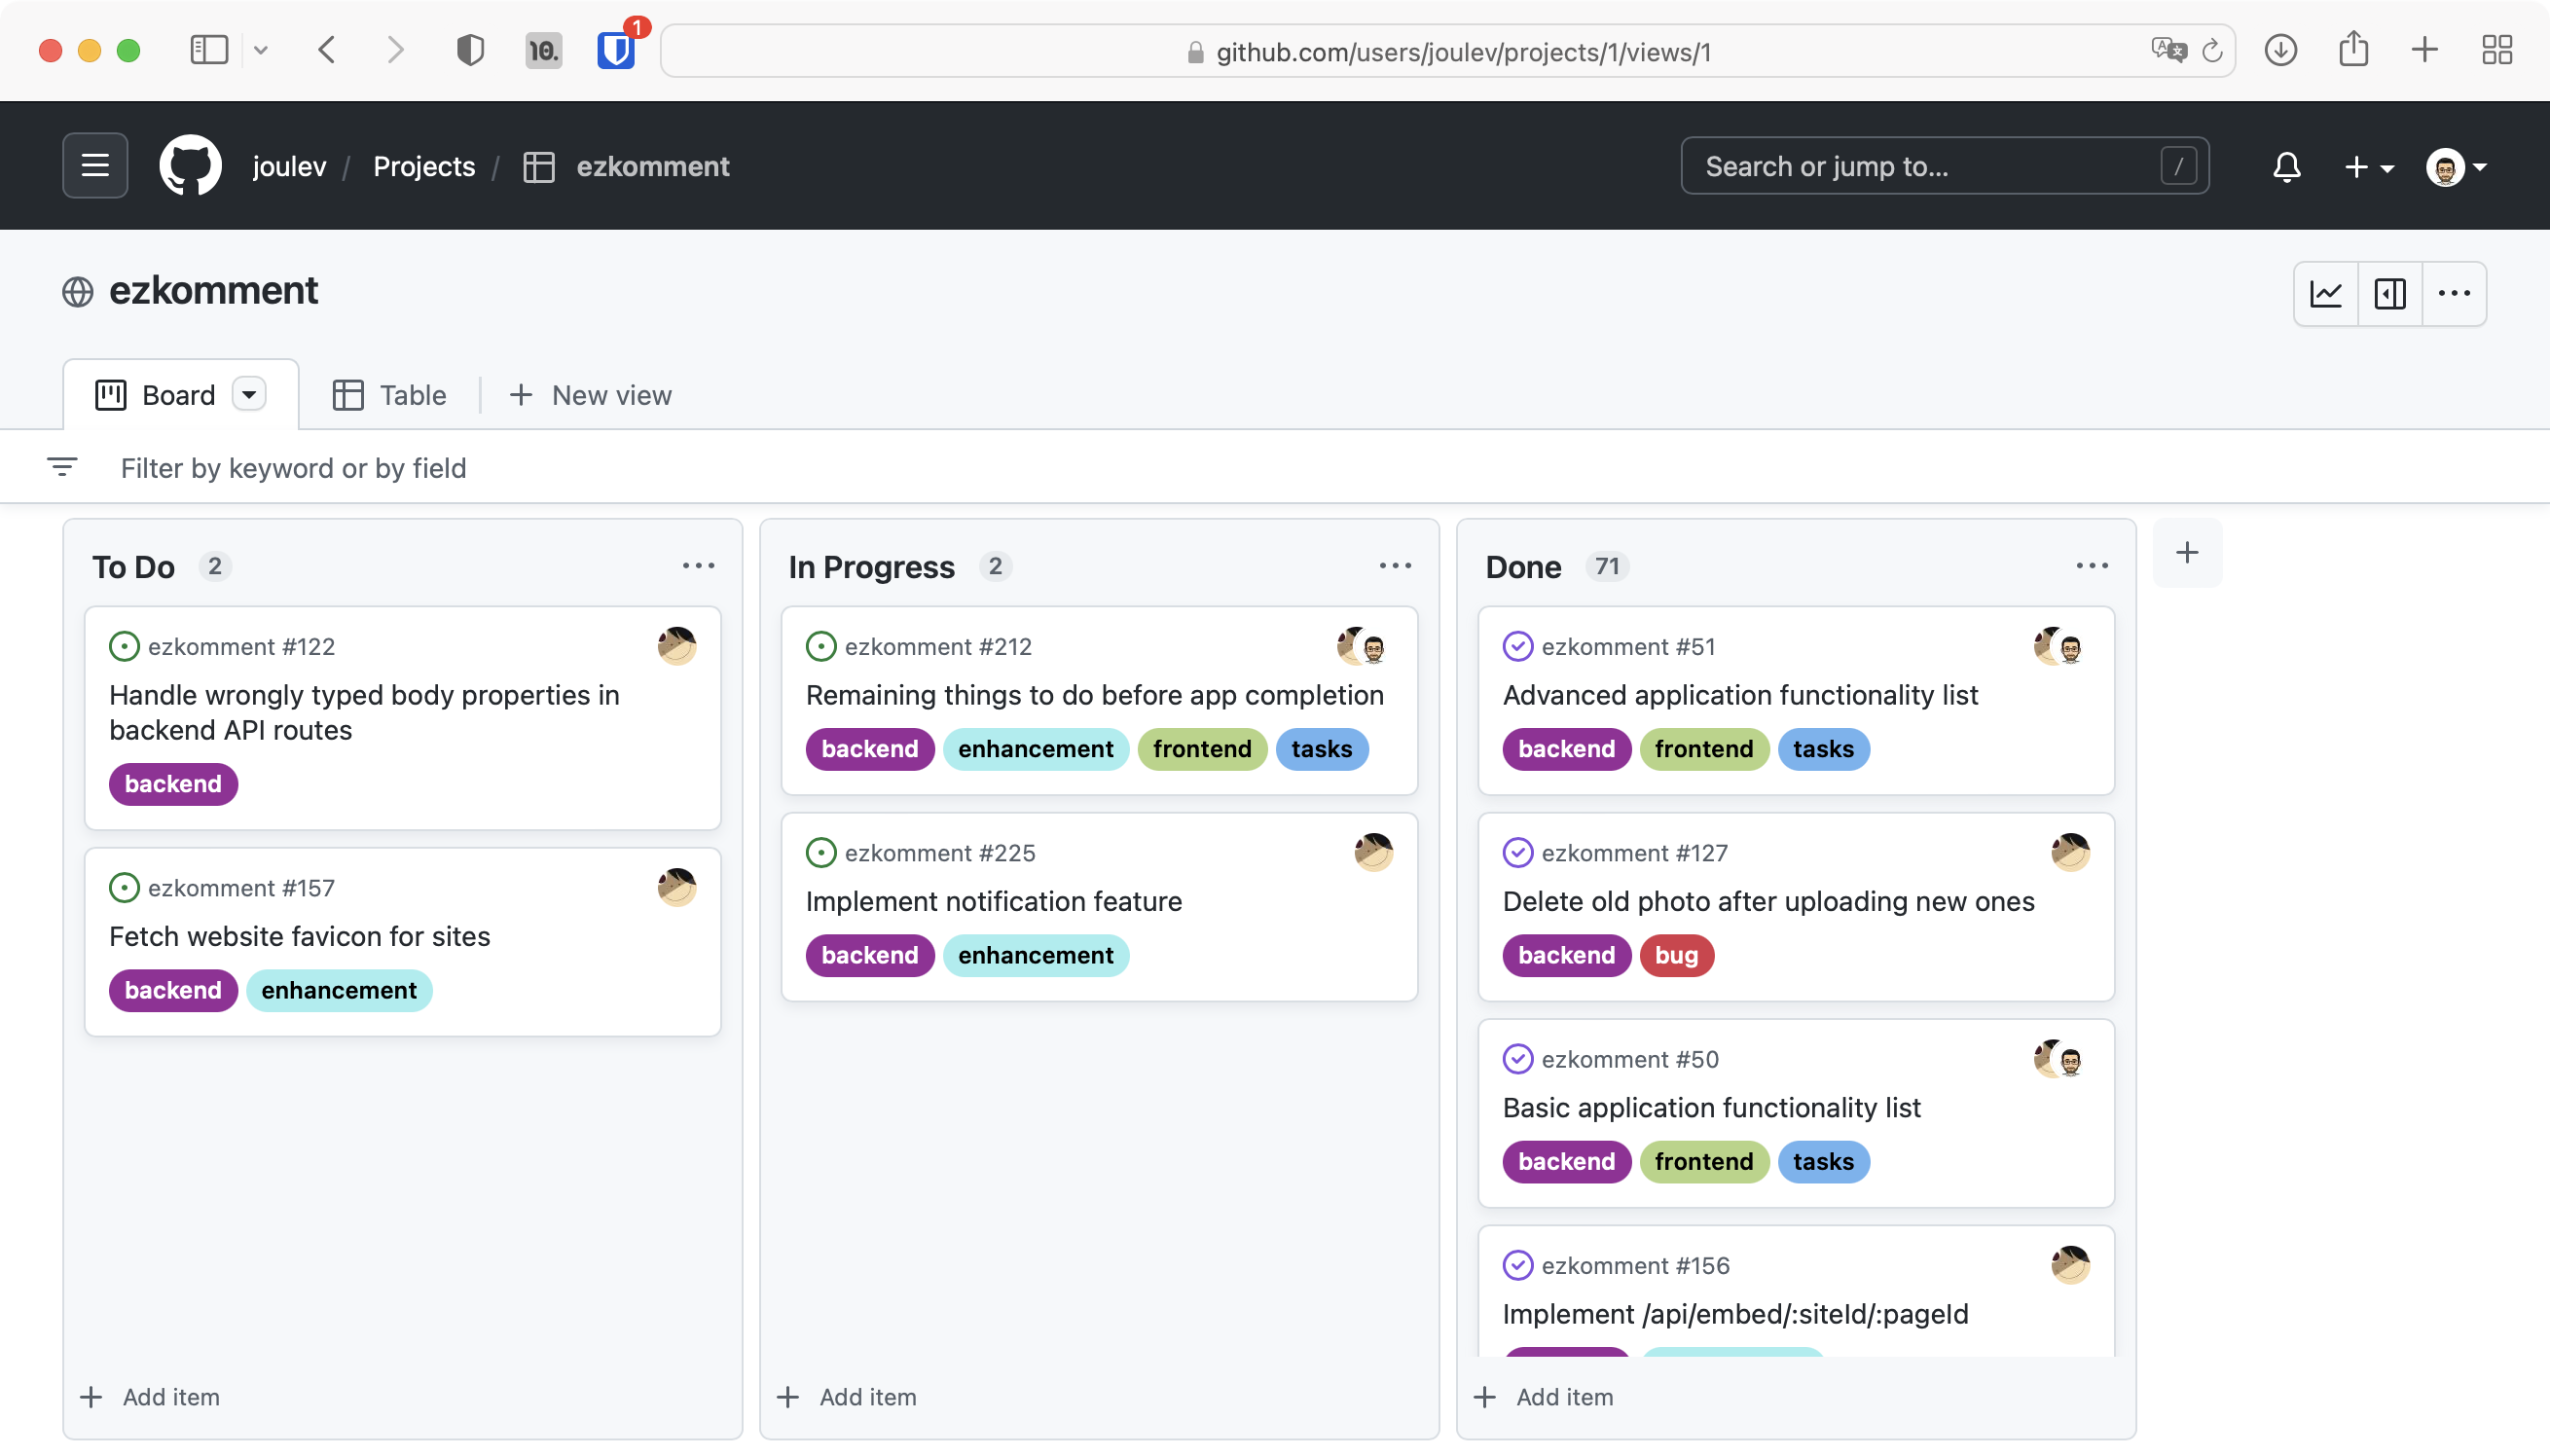 GitHub project board as of 5 August 2022
Moreover, issues and pull requests are also given labels to help us categorise them.
Timeline
Currently Already Implemented Features
We have implemented all four main features:
- Users can get commentable comment sections now.
- Comments can now be moderated.
- Comment sections can be customised.
- Public API is supported.
Other than these, a lot of minor features have been developed to assist the users. This is a list of some notable examples, with some description of what they do:
-
Dark mode is fully supported. Both on the app and in embed pages.
-
Authentication: The authentication system, based on third-party providers, is completed.
-
Auth state as well as other states are managed and data fetching is handled by a common system.
-
Toasts to handle user feedbacks (success confirmation, error messages, etc.).
-
Redesigned landing page, with illustrations and animations.
-
A system to serve and handle Orbital materials (except videos) is completed. You can visit Orbital 2022 @ ezkomment to see more.
- By popular request, PDF versions of the Orbital README are also available.
-
A system to handle public documentation is finalised, with documentation files divided to several sections and a working search engine.
Going Forwards
Currently in-progress features are
- Actual content for the public documentation
- Notifications
- Export buttons
After they are finished, the application can be considered to be complete, and suitable for a v1.0.0 release if semver is used. We reckon it will be done before the start of the new academic year on 8 August 2022. After that I think we will only be fixing bugs and thinking of new minor features.
We have not yet decided whether to continue this project after Splashdown (24 August 2022). It is likely we will no longer actively develop the application, however we may add some commits here and there to improve it when we have time. In the above sections, there are still several features waiting to be implemented "if we have time", so we may consider them. One thing is certain, though: the application will stay online at https://ezkomment.joulev.dev for as long as we can financially sustain it, therefore, you are more than welcome to use the app as if it is an actual commercial product.
Problems Encountered
From Milestone 2 to Milestone 3
None. We do not encounter much problems, either technical or not, in the development process.
From Milestone 1 to Milestone 2
In the technical aspect, the project progresses fairly smoothly (to a surprising extent). In fact, we have not actually asked our mentor for any technical assistance since we have been able to resolve all issues by ourselves.
However, in the first half of June, we had quite a few problems with miscommunication between the two members, thereby leading to a significant delay in the project:
- Basic backend: by 3 June, actual date of completion 9 June
- Auth integration: by 7 June, actual date of completion 18 June
- Site management: by 14 June, actual date of completion 21 June
- Page management: by 20 June, actual date of completion 23 June
- Comment commentable: by 27 June, not completed
Although in the end, we were not too much behind schedule, from 18 June to 24 June both members had to work for many hours per day to bring the massive delay of 11 days down to how it is currently.
Thankfully, the workload for the next phase after that turns out to not be that packed, thus this delay did not cause too much damage to the whole project. That said, we are determined to resolve any issues and questions early so that this problem will not appear again.